I will never forget how quickly things proceeded after my mom’s hip replacement. And I was pretty freaked out, when on the same day as her hip replacement surgery, they had my 88-year-old mom getting out of bed to take a few steps with the walker, and then going into the bathroom to use the toilet. I think I was more terrified than she was !
If you have had “posterior hip replacement”, or “lateral hip replacement”, surgery, and when you sit on your toilet, the seat level is lower than the point at which your knee bends, then you will need a raised toilet seat for up to 6 to 10 weeks after your hip surgery.
Patients with an “anterior hip replacement” are typically required only to use a raised toilet seat if their toilet is really low.
The “anterior hip replacement” surgery is performed at the front of the hip, and does not require the cutting of any large muscles, which is the case with the two other types of surgery, and so has necessitates different precautions.
The reason you need the raised toilet seat after posterior, or lateral, hip replacement surgery, is that the muscles around the hip, will be weakened with very little tone for some time, all of which can cause the joint to be less stable.
Due to this weakness and instability there may, in certain situations for a number of weeks, be a minor risk of dislocations.
Sitting down and standing up can put more stress on the hip if done incorrectly, and lead to a dislocation.
To avoid this, one of the measures taken is to raise the level of all the seats you are using, including the toilet, so that the seats are higher than the level at which your knee bends at the back.
CONTENTS - Overview & Quick Links
Toilet seat height after a hip replacement ?
Hip replacement sitting precautions ?
How to wipe your bottom after a hip replacement ?
When can you use a regular toilet after a hip replacement?
How soon can I take a bath after a hip replacement ?
Helpful items for after a hip replacement
Types of Raised toilet seats you can use after a hip replacement
Best raised toilet seats after a hip replacement
- Best raised toilet seats after a hip replacement for an elderly senior
- Best raised toilet seat after a hip replacement for a larger, elderly senior
- Best raised toilet seat after a hip replacement for a younger senior in good shape
- Best raised toilet seats after a hip replacement for larger, younger seniors
Toilet seat height after a hip replacement
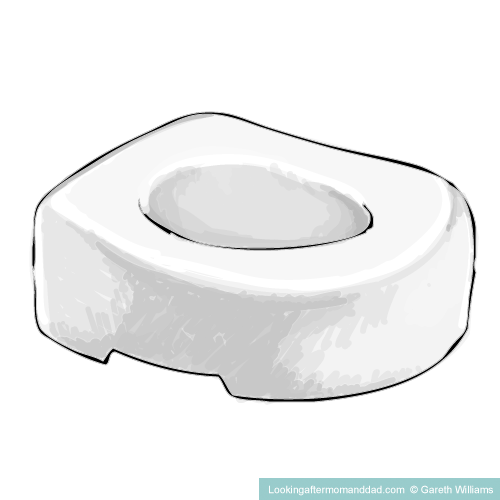
If you have had a posterior or lateral hip replacement, to find a good height for your toilet seat you need to measure from the floor to the back of your knee, to the point that it bends, and make sure that your toilet seat is at the least the same height from the floor, if not an inch or so higher.
The green arrow below indicates the height of the raised toilet seat required.

To learn more about how to measure a toilet for a raised toilet seat, you can read my article explaining how to check and measure the toilet to see if you have an elongated or a standard toilet bowl – that’s important too – and how to measure yourself to find out how much of a lift your seat needs.
That article is here – “How To Measure For A Raised Toilet Seat”.
Sitting precautions after a hip replacement ?
There are a number of precautions that a person needs to take when sitting, sitting down and standing up, after a “posterior” or “lateral” hip replacement, and which do not apply if you have had an “anterior” hip replacement.
To start, the 90 Degree Rule
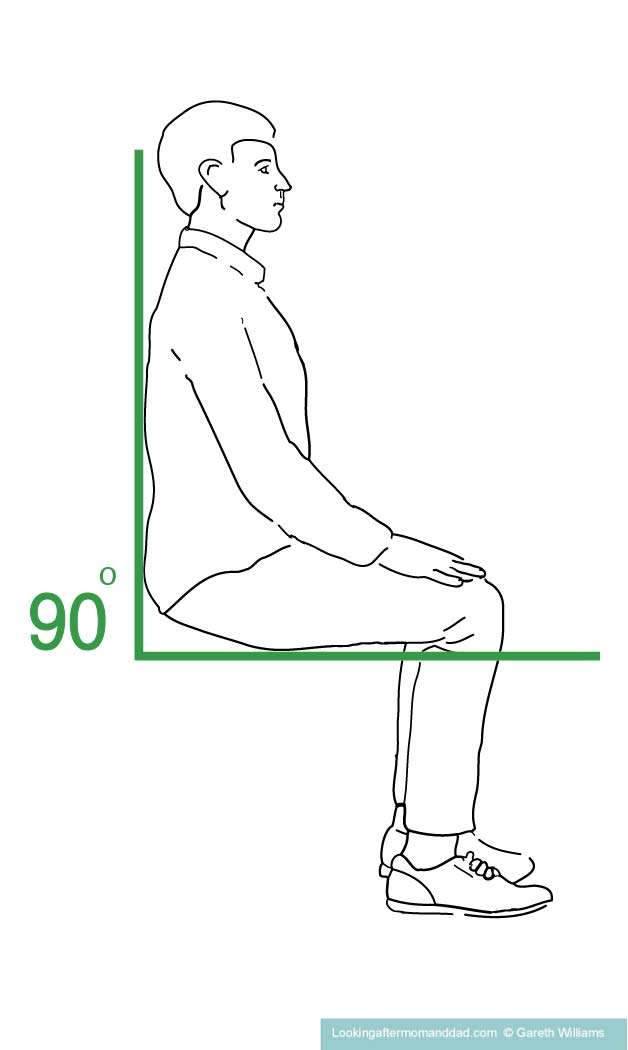
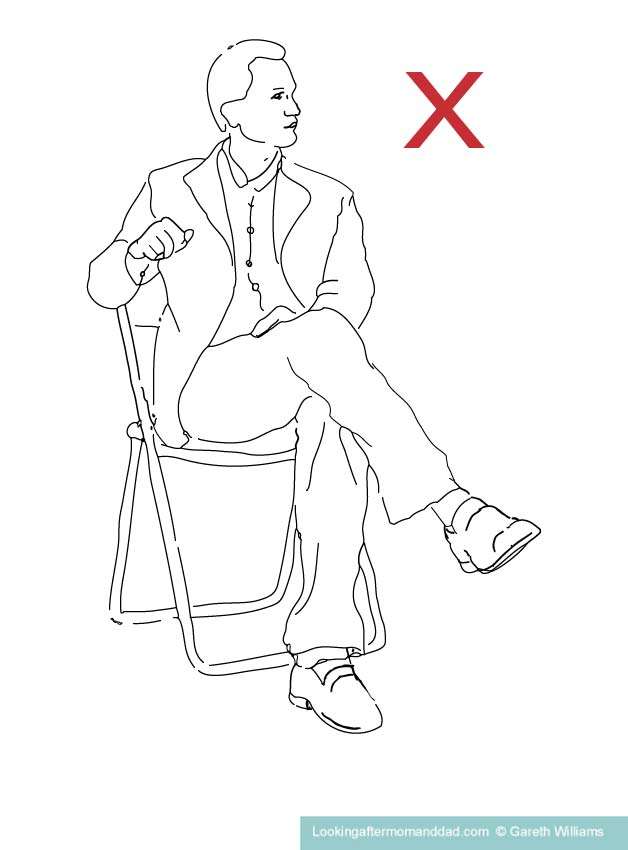
Illustration 1/
If you look at Illustration 1/, above, it shows the closest the knee, of the leg with the hip replacement, should come to your chest when you are sitting after having just had a hip replacement – your bottom should also not go lower than your knees when you are seated.
You should –
- neither lean your torso forwards to the knees
- nor lift the knees upwards
This is what is known as The 90 Degree Rule.
You will typically be advised not to break the rule for the first 12 weeks post surgery, to give time for the healing of the weakened muscles, and while you are still having physical therapy to build those muscles back up.
Patients are so advised, due to the fact that there is a small chance of a dislocation of the new hip replacement.
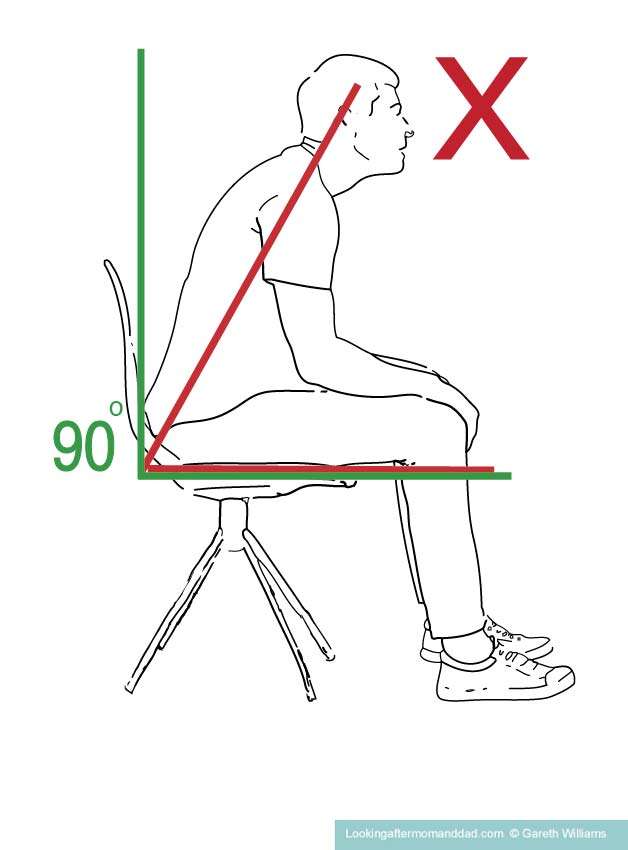
Illustration 2/
Avoid leaning forwards when you are seated, as in Illustration 2/, above, as this will exert pressure on the new hip replacement.

Illustration 3/
Illustration 3 shows a doubly bad situation, where the bottom is lower than the knees, and the character is leaning forwards.
I have also made this image to show –
1) the poor position of the knees on a low seat, in relation to the torso –
2) the poor position of the bottom, as it is lower than the knees, which will then a problem for standing
3) when this character tries to stand up, they will have to lean forwards to gain momentum to lift themselves upwards, this is going to even further reduce the distance between the knees/thighs and the torso, exerting a lot of pressure on the hip replacement, and greatly increasing the chance of a dislocation of the hip.
This is why, you will, most likely, be advised to use seats which are lower than the level of the back of your knee.
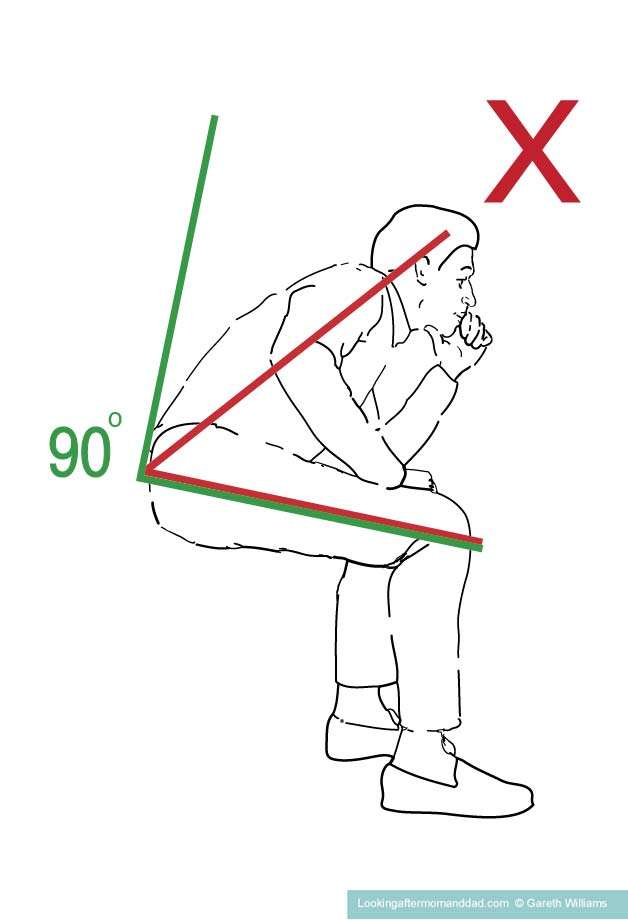
Illustration 4
Leaning forwards is again reducing distance between the knees and the torso, so
The torso, in this situation, should be behind the 90 degree line, and ideally the vertical position which should be at about 110 degrees to the thighs and knees.
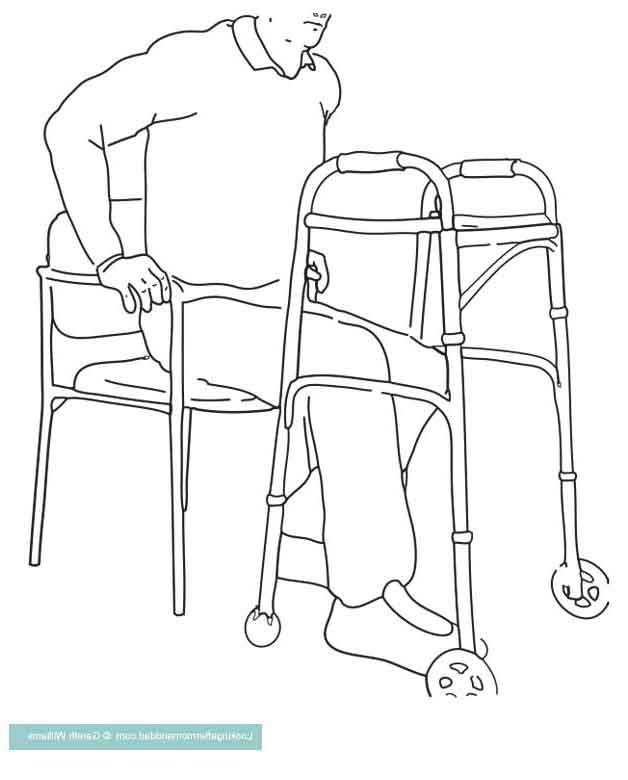
Illustration 5
Armrests can be extremely helpful with sitting and standing correctly, and maintaining good posture.
In Illustration 5/, above, you can see how using the armrests of a chair to stand will stop you from leaning forwards.
Armrests, will both provide support when you sit and stand, and make it much easier to maintain the correct vertical posture when you stand up.
Placing your hands on the armrests of a chair, or raised toilet seat, you can push up vertically as they stand, and vitally not lean forwards.
Without armrests, you have to lean forwards to build the momentum, again getting into a risky position, and exerting too much pressure on the new hip replacement.
Using chairs or raised toilet seats with armrests helps to avoid injuries.
If you are interested in learning how you will need to sit down, or stand up, after a posterior or lateral hip replacement, using a walker, I have an illustrated article “How To Sit On A Toilet After Hip Surgery: A Detailed Illustrated Guide”.
Again, I would like to point out that the article above is not for patients who have had an anterior hip replacement.
Illlustration 6/
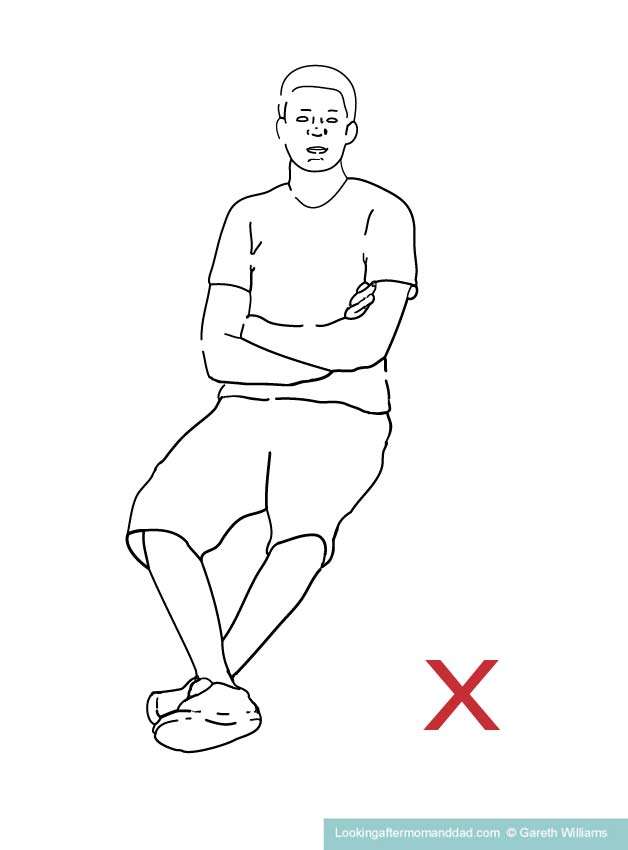
Illustration 7/
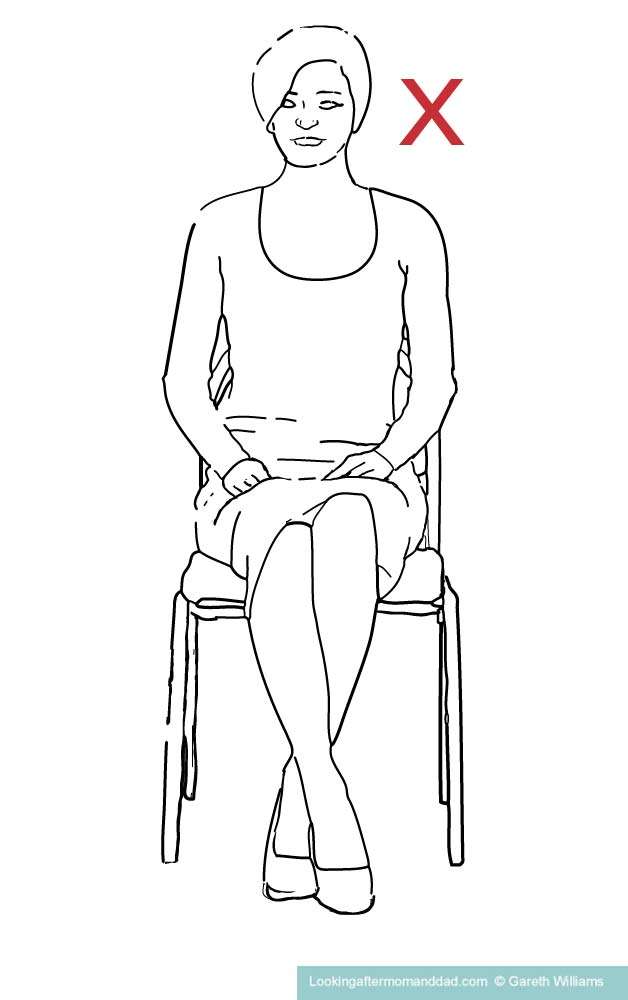
Illustration 8/
Don’t sit with your legs crossed after surgery
Illustrations 6-8 show a few more positions to avoid with your legs crossed.
While your muscles around the joint are still healing from the surgery, patients will be advised to keep their legs straight, not to cross them, and not to turn them inwards in any way.
This will typically be for the first 12 weeks.
How to wipe your bottom after a hip replacement
I want to preface this section with the fact that my mom sitting on her bedside commode never had any problem wiping herself after her hip replacement, and did not use any devices to help her, but this is not the case for everyone.
My mom is very small and slim, and as far as I understand it this is more of a problem for larger, or obese individuals
There are a number of devices, and certain models of raised toilet seat, which will give make it easier to wipe yourself on the toilet without leaning forwards and hurting yourself –
Open Front Seats
There are safety frames with raised toilet seats and bedside commodes which have seats which are open at the front so that you have greater access for personal care.
Toilet Aids for wiping
The “Freedom Wand” is a device which has a little gripper on the end, in which you put toilet paper, retract the gripper, so it holds the toilet paper firmly, and then clean yourself.
The device has a tubular plastic handle which has a number of extensions which allows you to go all the way up to 30″ in length – the wand can be 7″, 14″, 21″, 25″ or 30″ long, and is made longer by simply adding extensions until you reach the maximum length of 30″.
All the sections come apart, and it is easily washed in at a sink in water with some detergent – the head of the device with the gripper actually has a hole in it to allow water to run through it, making it possible to thoroughly clean it.
The Freedom wand doesn’t just have to be used for wiping, it can be used to pick up objects, and is strong enough that a person can use it to hold a razor to shave.
Another similar toilet aid is “Comfort Wipe”.
This is a long-handled device which has a different type of gripping system for the toilet paper or moist wet wipes, and is only for the toilet.
The length of the handle extends a person’s reach by 15 “.
Handheld bidet sprayer
You can buy a handheld spray unit which is attached to your toilet water inlet valve on a hose, and when you have been to the toilet, you can take the handheld spray and clean yourself.
This is actually going to be a lot easier if you do have a raised toilet seat with an open front, as you will have lots of room to slip the device in under the raised toilet seat from the front, and then to direct the spray as needed.
The only problem that you may encounter is that the point at which you will attach the hose of the device to your toilet water inlet, has a valve, which it is recommended you turn on and off each time you use the spray, otherwise it may wear out the valve and release the water around the bathroom.
In some cases reaching for that valve, depending on where it is, may cause you more discomfort and even harm, than wiping yourself. So you are going to need to see how you can do that, before you buy one of these devices – or it may be the case that for a month or so you take the risk and leave the valve open.
When can you use a regular toilet after hip surgery ?
This is just to give a rough idea.
Typically, people will need to use a form of raised toilet seat for between 6 and 10 weeks after surgery, before they can go back to using their regular toilet seat.
It will depend on the strength and age of the patient – in my mom’s case it was quite a lot longer, but she was 88 and has arthritis in both legs – 4 years on, and Mom is still using her bedside commode over the toilet as a raised toilet seat !
Ask your doctor this question, as each case is different.
Only your doctor knows can see how you are progressing, and how you are recuperating.
While you are looking for raised toilet seats and toilet aids, there is lots more that you can do to make your bathroom a safer place for seniors, or anyone else with mobility issues.
To find out all the different things you can do, to have an instant impact on bathroom safety, take a look here, “54 Bathroom Safety Tips For Seniors – A Helpful Guide”.
How soon can I take a bath after a hip replacement ?
This is another question that you should really be asking your doctor, as they know all the specifics of your case.
There are aspects to this question –
- how soon can I get my stitches or staples wet
- how soon can I sit on the bottom of a bath tub
Bathing in a bathtub after a hip replacement
Typically, a patient will be asked to keep their stitches dry for around 48 hours.
For a complete answer you will have to ask your surgeon or nurses as they will be the only ones familiar with the type of dressing that you have.
Some dressings are waterproof, and some are not, and some patients will have dissolving stitches, and others may have staples.
You should under no circumstances submerge your hip wound underwater, until your surgeon, or nurses, have said that it is okay to do so. Typically, you have to wait 6 weeks before you can immerse your hip in a bath, hot tub or swimming pool, but you should always ask your doctor.
You will be given information on how to care for your dressing by the team looking after you in hospital.
In general, patients are advised not to sit in the bottom of a bath tub, for approximately 12 weeks.
If you have a transfer bench, on which you sit down and then transfer the seat to over the tub, above the water, and on which you can stick to the 90 degree rule, and you do not sit in the water, the time period that you have to wait will be less.
If you are thinking of using a bath transfer bench, remember that you cannot lean forwards to wash yourself or to get things out of bath water, so you will need to have a hand held shower head, and a long handled sponge, or a carer to help you wash.
Getting in, and out of a bath, to sit in the bottom of the tub, though, is normally at least 12 weeks as there are so many risks involved and a lot of bending in positions which could cause a dislocation.
Taking a shower after a hip replacement
You will probably be allowed to shower quite quickly after your operation, and you will typically use a shower chair and a handheld shower head to do so.
You will need to ask your surgeon or nurses what type of dressing you have, and if it needs to be covered if it is not waterproof.
Furthermore, you will also need to find out about whether you can get your stitches wet, and what to do if you get them wet.
Helpful items for after a hip replacement
Here are a number of devices, or aids, which if you have them, can make your life considerably easier.
General –
– Reacher/ grabber / handi-grip / gripper – this is a basic lightweight, multipurpose, long handled, reaching aid with a trigger action, which will allow you to pick up items without reaching down and bending.
– Non-slip PVC – this is just a little trick that I did for my mom by the side of her bed where she was putting her feet to stand, as she found that her feet were sliding a little as the bed may be a touch too high.
I bought some non-slip PVC mat underlay, the type you can put under rugs or in drawers, cut a piece about 24 inches by 28 inches, and then taped it down with some heavy duty Gorilla Tape.
Now Mom can get off the bed, and she doesn’t slip or slide. One piece lasts about a year, and then I replace it.
Walking Aids –
– A walker – you are going to need a walker to help to maintain your balance, and to keep your weight off your new hip, when walking, sitting, and standing, and especially when using the toilet
- pouches for your walker – these can be very helpful, especially if you are using the walker for a longer period than expected, as you can pop things in the pouches that you can’t carry otherwise, and items that you use all the time in particular – but don’t make it so heavy that you can’t move it easily, and they won’t be great on a walker with no wheels, as you will be lifting the frame forwards each time you step
– Canes – you will typically use a walker after surgery to start walking again, and after you can manage that you will try walking with several canes, then one cane. The speed with which you transition from one aid, to the next, will depend on how well you are doing, and the team looking after you.
– a leg lifter – this a type of strap which you will use to lift your leg on to, and off, your bed if you do not have a carer to help you.
It has a loop for your foot on one end, and a smaller loop for your hand.
Toileting Aids –
– A raised toilet seat – this will allow you to sit more easily and safely on your toilet.
– A bedside commode – this is my mom’s preferred choice for a raised toilet seat, but it is also very useful if the bathroom is too far from your bedroom, as you may, for the first week, wish to use a bedside commode, especially at night, as it can be put anywhere you need to have a toilet that is within an easy distance.
– Toilet wands – see the section above on how to wipe your bottom
– Handheld bidet– see the section above on how to wipe your bottom
Dressing Aids –
Getting dressed is probably going to be the activity which takes the longest, as you are not going to be able to bend down, or twist for quite some time.
There are a number of inexpensive little devices that will make dressing much more comfortable, and which will stop you from bending and reaching down to perform tasks such as putting on socks or pants.
– Elastic shoes laces
– Long handled shoe horn
– Sock Aid
– Dressing stick
Bathing aids
The bathroom is going to pose quite a few problems, and you will need to make it as safe to use as possible. For this there are a number of items which can make showering or bathing easier.
– Bath transfer bench or Bath board – you cannot take a bath sitting in the bottom of the bathtub, but you can sit on a bath transfer bench, or a bath board, as it is too risky to sit in the bottom for the first 3 months after surgery. And stepping in and out of the bathtub, is also ill-advised in the beginning.
– Shower chair – A simple shower chair will mean that you can safely sit in the shower, reducing the risk of a standing fall. It will also be far easier to take a shower sitting down, in particular in the beginning when you are lacking in muscle strength.
– Long handled sponge – just as it sounds, this is a long plastic handle with a sponge on the end that you can wash parts of your body which you cannot otherwise reach without twisting and bending.
– Hand-held shower head – this is very important as it means you don’t have to move around to get wet, and again you can rinse yourself all over without any twisting or bending.
– Non-slip rubber mat – anywhere that you have water that you have water that you are going to be standing in, it is best to have a non-slip mat. Not just because it stops you from slipping, but also because it just makes your footing a little assured.
– Grab bars – in the shower and on the bath or the wall next to the bath tub these are a very good addition for safety, and I know that they can make a person feel far safer when showering who is having issues with their mobility.
There are lots of types, and I would one which has an engraved non-slip grip, as they are much easier to keep hold of.
I would not get the suction types – we had three of those, and they all just came off the wall – luckily in each case it was with myself holding on to it, and not my 92-year-old mom.
I eventually installed a classic chrome grab bar that you have to screw on to the wall, and despite being petrified of breaking the tiles when drilling it all went without a hitch.
– Toilet safety frame – a toilet safety frame is really just a set of big armrests which fits onto your toilet without adding any height to the seat, to add a little support when you are sitting down or standing up.
Some models attach to the toilet, without legs, and other models stand over the toilet and have four legs.
Types of raised toilet seat
For an exhaustive look at all the types of raised toilet seats, how they work, fit to the toilet, what advantages each type has, lots of different examples of models, the weight capacities of the different models etc., I have an article here – “Types Of Raised Toilet Seats: All You Should Know Before You Buy”.
There are a few important points to be made here about raised toilet seats –
- you will want to check the weight capacity of any seats you are interested in, and you can do that in my article, “Raised Toilet Seat Weight Capacity: Over 180 Examples”, which has a huge list of raised toilet seats, their product numbers and weight capacities
- you are going to need to find the correct height for a raised toilet seat for your body height, and your toilet, which you can find that in my post, “How High Should A toilet Seat Be After Hip Surgery ?”
If you are thinking of using a bedside commode over your toilet, there are a few things you will need to look at –
- just like raised toilet seats, bedside commodes have different weight capacities, and you will want to pick a commode with the right one – I have an article with a long list of bedside commodes and their weight capacities, “Bedside Commode Weight Capacity: A Guide With Over 140 Examples and Illustrations”
- to learn how to use and set up a bedside commode over your toilet, you can read this article, “Can A Bedside Commode Be Used Over A Toilet ?”
Raised toilet seats for a temporary situation
The two seats below are really only meant to provide a portable solution for when you are not in your own home.
Neither seat is really suitable for anything more than a brief period of use.
There are no armrests on these types of seats, so especially for older users you would want a grab bar on the wall, or a toilet safety frame as well.
The seats have a tendency to wobble, and when we tried some examples, my mom and I found them wholly unsuitable for an elderly adult, let alone one who had recently had a hip replacement.
Bubble seats
Clip-On seats
Raised toilet seats for medium term use
The three types of seats below, are more solid and somewhat more solidly secured to the toilet, by various plastic clamping systems, flanges and bolts, but they still are prone to moving around.
Some only fit either an elongated, or a standard shaped toilet, and although a lot of the front locking toilets say they fit all toilet shapes, this is not always true.
But at least the Clipper seats and the Front Locking types of seats can be bought with armrests.
I think these seats may be fine for younger users who have a one good leg and no problems with arthritis, balance or any other mobility problems, but I don’t feel good about suggesting them for long-term use by an elderly adult.
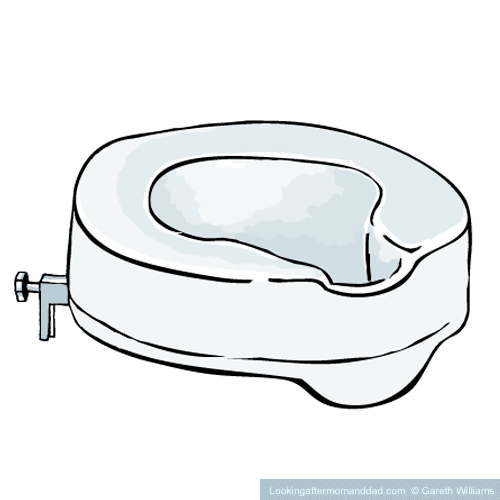
Seats with side fixings
Clipper Seats

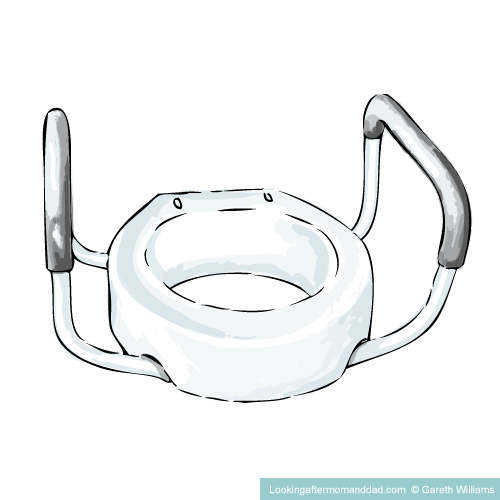
Front locking seats
The Raised toilet seats for long-term use
The following types of seats have been designed for long-term use, and are well suited to use by an elderly person.
The “Tall Seats” or seats with spacers are very secure as they are bolted to the toilet, but will of course will need some kind of grab bar, or safety rail on the wall.
The toilet plinth, or base riser, may be rather over doing it though, for just a brief period after a hip replacement, if you are not looking to raise the toilet permanently.
My favorites are the last four types –
- raised toilet seat with legs
- safety frames with raised toilet seats
- 3-in-1 bedside commodes
- toilet plinth or base riser
Raised toilet seats with legs, safety frames with raised toilet seats, and 3-in-1 commodes are removed from the toilet in seconds, whereas the risers have to unbolted along with the seat and lid, which then have to be put back, which is not the quickest endeavor, especially if you have a guest.
For larger individuals requiring a raised seat a weight capacity of 400 lb, or more, and a lift of more than 2 inches in extra height, have only one option, a bariatric 3-in-1 style bedside commode.
For larger individuals who want to add just 1 or 2 inches, Big John toilet seats (the only other option with a high weight capacity) are a very good choice. But again you will need to install either a safety frame over the toilet as well, or put grab bars up on the wall.
3-in-1 commodes come in a variety of seat widths, aperture sizes, with elongated seats and seat heights, not available in any other form of raised toilet seat.
Tall seats
Risers
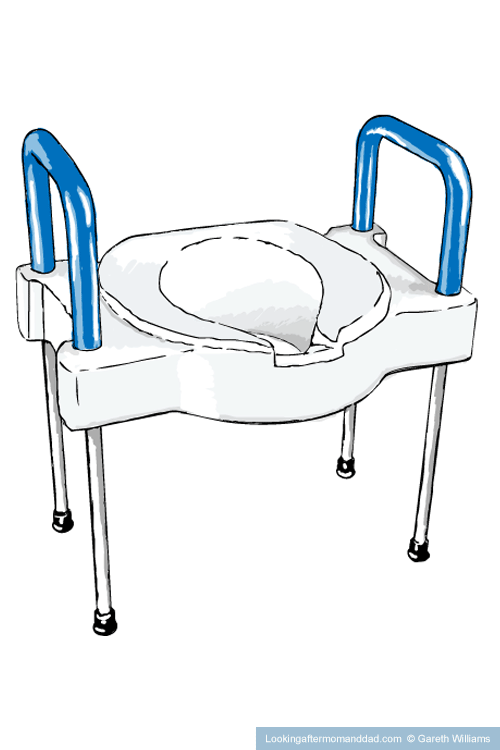
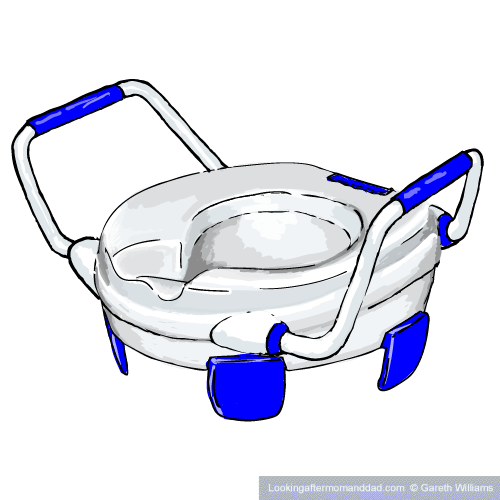
Raised toilet seats with legs
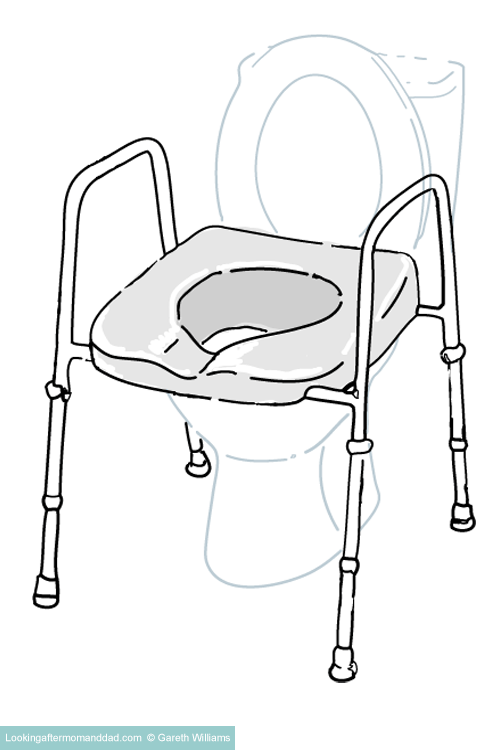
Safety frames with raised toilet seats
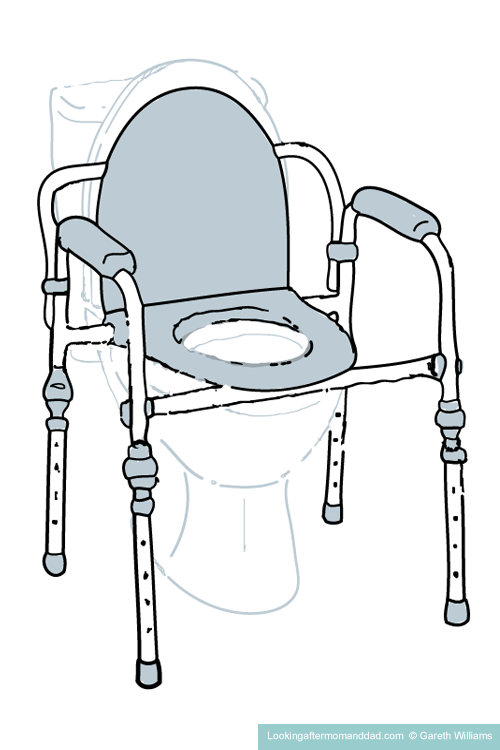
3-in-1 bedside commode
Toilet Plinth or Base
Best raised toilet seats after a hip replacement
I have a full article which explains all the choices that you are going to find below, as well as the different specifications of the seats and how they help, here – “Best Raised Toilet Seats After A Hip Replacement”
Here are what I think are the best models of raised toilet seats, for a variety of different circumstances, depending on the age and weight of the user –
Best raised toilet seat for the elderly after a hip replacement
1) OasisSpace Stand Alone Safety Frame and Raised Toilet Seat – with a hard seat
2) OasisSpace Stand Alone Safety Frame and Raised Toilet Seat – with a padded seat
3) PlatinumHealth Ultimate Raised Toilet Seat (safety frames with raised toilet seat)
4) Medline – basic 3-in-1 Bedside Commode
5) Nova Drop-Arm Padded Commode
6) PlatinumHealth GentleBoost Uplift 3-in-1 Commode and Shower Chair
Best raised toilet seat for larger elderly seniors (over 350 lb) –
1) Nova Heavy Duty Drop-Arm Commode 8583
2) Drive Deluxe Bariatric Drop-Arm Commode 11135-1
Best raised toilet seat after a hip replacement for a younger senior in good shape
Risers with armrests –
1) Nova 3.5″ raised toilet seat riser with arms (standard), Model No. 8344-R
2) Nova 3.5″ raised toilet seat riser with arms (elongated), Model No. 8343-R
3) Vive 3.5″ toilet seat riser with handles (standard), Model No. LVA1071S
4) Vive 3.5″toilet seat riser with handles (elongated), Model No. LVA1071E
Front locking raised toilet seat with armrests
1) Vive raised toilet seat with detachable handles, Model No. LVA10011
2) Drive Medical Premium plastic raised toilet seat with armrests, Model No. 12013
3) Nova raised toilet seat with detachable arms, Model No. 8351-R
It is always prudent with a seat which is not bolted to the toilet, or sitting on four legs, to have a grab bar securely installed on the wall next to the toilet, as these seats do not always fit all the toilets they say they do, all that well.
Best raised toilet seats after a hip replacement, for larger, younger seniors (over 300 lb)
1) Nova Heavy Duty Drop-Arm Commode, Model No. 8583 – 500 lb weight capacity
2) Drive Deluxe Bariatric Drop-Arm Commode, Model No. LVA1071S – 1000 lb weight capacity
How to choose a raised toilet seat ?
To learn more about how to choose a raised toilet seat, you can read my blog post,“How To Choose A Raised Toilet Seat ?”, in which I look at –
- the types of raised toilet seats
- the different types of features available on those seats
- features of bariatric seats for larger individuals
- how the features will help you choose
- the questions you should be asking yourself to help you choose
- the different brands of seats available
- the retailers and online sites selling raised toilet seats
- Medicare insurance coverage
There is also a free PDF Checklist you can download and print out, full of the questions you need to asking, to help you get started.
Sources for this article –
https://www.edwinsu.com/anterior-hip-replacement-post-op-instructions.html
https://www.newyorkhipknee.com/faqs/total-hip-replacement-faqs/
https://www.stefankreuzermd.com/anterior-hip-replacement.html
https://www.orthonewengland.com/wp-content/uploads/sites/156/2018/02/KENNON-DISCHARGE-INSTRUCTIONS-HIP-2016.pdf
Frequently asked questions
Do raised toilet seats fit any toilet ?
A freestanding elevated toilet seat should be able to be place over most toilets, as they typically have a maximum seat height of at least 21 inches from the floor.
Raised toilet seats which attach to the toilet, depending on the particular model, can be for –
- elongated toilets only
- round toilets only
- universal, fitting both types of toilet type
Can a raised toilet seat be too high ?
If a toilet seat is too high and the user’s feet are hanging in the air, and not flat to the floor, the blood circulation in the legs can be affected, causing the user’s feet to go to sleep, and lead to falls when standing.
Secondly, for those with issues with constipation, a lower seat is more conducive to passing a bowel movement.
What’s the tallest toilet height ?
The tallest toilet height is a wall mounted toilet from Kohler.
The Kohler Veil Wall-hung Toilet K-6303 has a maximum bowl height of 28 1/2 inches from the floor.
The tallest standing toilet is the Signature Hardware Bradenton Elongated Toilet, which has a bowl rim height of 21 inches without a seat from the floor.
Why do people use a raised toilet seat ?
The main reason for using a raised toilet is to reduce the distance a user has to bend down to sit on
the toilet, to reduce any pain and to increase the user’s stability and safety.
Hopefully, using a raised toilet seat will also help build a user’s confidence and increase their independence if it allows them to use the toilet without assistance safely.
How high are raised toilet seats ?
Raised toilet seats which attach to the toilet come in a range of heights from 1 to 6 inches.
Freestanding raised toilet seats, known as safety frames with raised toilet seats, or 3-in-1 commodes (these can also be used), typically have an adjustable seat height of 17 to 21 inches, with taller models available, up to 27 1/2 inches.
How much does a raised toilet seat cost ?
Raised toilet seats cost between $15.00 and $259.00.
This does not include heavy-duty 3-in-1 commodes, as specialist models for individuals weighing a 1000 lb cost a lot more.
Does Medicare cover raised toilet seats ?
Medicare does not give coverage to raised toilet seats, as they are considered not to be primarily medical in nature.
Certain models of bedside commode are covered by Medicare Part B, for use in the home, with stipulations, and can be used as a raise toilet seat.
Raised toilet seat weight capacity ?
Raised toilet seats all have different weight capacities, ranging from 220 lb all the way up to over 1000 lb.
Standard raised toilet seat models which attach to the bowl have varying weight capacities in the range 0f 220 lb to 350 lb, with only a few exceptions.
The heavy duty seats, with the exception of Big John, and Bemis tall seats, are all 3-in-1 bedside commodes which can be used over the toilet as a raised toilet seat, and as I said some models will support over 1000 lb.
I’m Gareth, the author and owner of Looking After Mom and Dad.com
I have been a caregiver for over 10 yrs and share all my tips here.