Having hip replacement surgery, is pretty intimidating for most people, and their caregivers. But it doesn’t have to be. There are quite a few relatively inexpensive items which will make life a lot simpler, and safer. Combined with some thinking ahead, it doesn’t have to be so daunting. If my 88 yr old Mom and I can get through it, you can too!
Helpful items after a hip replacement –
- a reacher
- a leg lifter
- non-slip PVC rug underlay
- a cane
- crutches
- an open front toilet seat
- wiping aids – toilet wands
- a handheld bidet spray
- a bidet toilet seat
- a raised toilet seat
- a bedside commode
- an elastic shoe laces
- slip on shoes
- a long handled shoe horn
- a dressing stick
- a shower chair or bench
- a shower walker
- a bath board
- a bath transfer bench
- a long handled sponge
- a non-slip rubber mat
- grab bars
- a toilet safety frame
- a straight back chair with armrests and a firm and high seat
CONTENTS - Overview & Quick Links
Helpful assistive devices for after a hip replacement
Hip replacement kits with seats
What do you need at home after a hip replacement – think ahead and set things up
What’s the best chair after a hip replacement ?
Best shoes after a hip replacement
What can you never do after a hip replacement ?
How long do you need a carer after a hip replacement ?
Helpful Assistive devices for after a hip replacement
General –
A reacher – a basic lightweight, long handled, reaching aid with a pincer at one end, for picking up items without reaching down, or bending. The pincer is activated by a finger trigger at the opposite end.
This is going to be just about the most important, and useful, device you can get to help you deal with all the precautions against bending during daily activities.
A leg lifter – this a type of strap with a semi-rigid section in the middle, and a loop on either end.
You will use this to lift your leg when –
- you are getting on and off your bed
- you are using a bath transfer bench, or bath board
The device is fabulously simple, and works very effectively, stopping the user you from bending their leg and hip the wrong way while doing so.
If you are alone to get in and out of bed, this is really a great answer to a safe way of doing it, which costs almost nothing.
Non-slip PVC rug underlay – I have taped a piece of PVC rug underlay to the floor where Mom is getting on and off the bed, as she complained that her feet didn’t grip the floor properly, and she was sliding a little.
It is especially good if the bed is a little higher than you would ideally want, and is for floors without carpeting.
Walking Aids –
A walker – after surgery, you will first be using a walker to aid you with walking, to maintain your balance, stability and to keep your weight off your new hip.
You will use a walker to sit down and stand up, for a number of weeks after surgery.
Most patients with anterior hip replacements, as well as, patients with posterior and lateral hip replacements, will use a walker at first, although the period a walker is used by anterior hip replacement patients may be a week to ten days only.
Canes or crutches – after the walker you will progress to walking with crutches, or two canes, and then on to one cane (in some cases hospitals prefer crutches, but eventually you will use a cane for a period of time).
Toilet hygiene Aids –
Patients with anterior hip replacements may not need any of these pieces of equipment, and should check with their surgeon.
Open Front Seats
Safety frames with raised toilet seats and 3-in-1 bedside commodes, both have models which feature open front seats.
These allow greater access and room for personal care on the toilet, which is going to be necessary, as you may need to use a few devices to maintain your hygiene, without bending, or leaning, in a way which can hurt your new hip replacement.
A raised toilet seat – if you need to elevate your toilet seat to a new height, you will have to get a raised toilet seat of some type – I suggest only getting models with armrests, and preferably those which stand over the toilet on four legs, for increased stability.
A 3-in1 bedside commode – a 3-in-1 bedside commode can be used as a raised toilet seat, as well as a toilet in a bedroom.
This can be especially handy for when you first come home from the hospital, as getting quickly to the toilet won’t be possible, and even more so at night, as you may be drowsy and very unsteady.
So, having a toilet by the bed may be best advised.
A toilet wand – will allow you to clean yourself after going to the toilet without bending, leaning forwards or over reaching, and breaking the 90 degree rule. All toilet wands have some kind of gripping device on the opposite end from the handle, with which you can attach your wipes or toilet paper.
Handheld bidets – these are the best for really cleaning yourself after going to the toilet, without any bending. You just the spray to clean yourself.
The unit is on a hose which is easily attached to your toilet inlet valve.
If you get one, as well as a raised toilet seat, I would suggest that you get a safety frame with an open front raised toilet seat, or a 3-in-1 bedside commode with an open front seat, as this will give you more room to spray.
If the idea of a bidet is takes your fancy, and you want one for the long haul, you can also get units which –
- are incorporated into a toilet seat, and which just require bolting to the toilet and attaching to the water inlet pipe
- can be attached under your existing seat toilet seat, and then attached to the water inlet pipe
There are also more elaborate models, which are electric and offer a choice of water temperature.
You’ll find something to suit pretty much every budget.
Dressing Aids –
Slip-on shoes – I know these are not a device, but it can make life easier if you buy a pair of slip-on shoes with a low, flat heel, to wear after your surgery.
Elastic shoe laces – if you don’t want to use slip on shoes, then you can use elastic shoe laces.
Prior to your surgery, you will want to put the elastic shoe laces into your shoes, and check how tight you have to tie them, for them to work.
Once you have the elastic laces in the shoes, the shoes can be put on just like slip on shoes, using a long handled shoe horn to avoid bending.
Using the reacher, so you don’t have to bend over, you place the shoes on the floor in front of you, put your toes in the opening of the shoe, and then slip your foot into the shoe, with the aid of the shoe horn.
The elastic laces should stretch as your foot goes in, and then tighten up again once it is in fully.
Long handled shoe horn – this is just a long shoe horn which allows you to put on shoes without bending down.
Sock Aid – a device over which you slide your sock, place it on to the floor using a reacher, and into which you stick your foot – all done easily without bending.
Dressing stick – a long-handled stick with a hook on the end, which is designed to help you put your cloths on without twisting, or bending, in the ways you should not.
Bathing aids
Shower chair or bench – makes showering safer – you can sit down and shower, but make sure the rubber tips are on the ends of the legs.
Shower walker – if you are not steady, you can get waterproof walkers specifically for the shower.
Bath transfer bench or Bath board – goes across the top of the bathtub, so you can sit over your bathtub and wash. You cannot sit in the bottom of the tub for 10 – 12 weeks.
Long handled sponge – a long plastic handle with a sponge on the end, making it easier to wash yourself without bending or twisting.
Hand-held shower head – this is very important to have for both the bath and the shower – it means you won’t have to move around, twist, or bend to get wet, or to rinse yourself.
Non-slip rubber mat – you should have a non-slip mat wherever you have your feet in water – the shower and the bath for instance.
Grab bars – these are great for providing support and avoiding falls.
You should have these on the walls of the shower, above the bathtub, and by the toilet if you are not using a raised toilet seat with armrests or a safety frame – I prefer the type which have a rough engraved grip, as your hands don’t slip when they are wet.
Attach the grab bars either vertically or horizontally, but not diagonally, as the hand can just slide down the grab bar too easily.
In addition to wall grab bars, there are grab bars which are specifically made to stick up vertically from the side of the bathtub itself, which you hold onto as you step into, and out of the tub.
Toilet safety frame – this can a frame without legs which is attached to the toilet, or a frame which stands over the toilet on four legs. The frames provide big armrests which help with sitting and standing up from the toilet, if you don’t have a raised toilet seat with armrests.
Hip replacement kits with toilet seats
You can buy kits, of what are considered to be the most “essential” assistive devices that you would want for after a hip replacement –
- a sock aid
- a shoe horn
- a dress stick
- a reacher
- a long handled bath sponge
- a raised toilet seat
- and elastic shoe laces
This is a great idea, and I got one for Mom, and it was really did help us…all except for the raised toilet seat. What a piece of junk!
I really do not like, and neither does my mom, the raised toilet seats that wobble on your toilet, and the one we got was like being caught in a storm at sea, and before you say it, it was the right size for our toilet. It was one of the models which has side fixings – plastic screw in brackets – awful.
I have looked at hundreds of kits and have never seen one with a raised toilet seat which has armrests, or that fixes really solidly on to the toilet. And don’t forget that you will need a seat which fixes to your toilet shape – standard or elongated!
I only like raised toilet seats which have armrests, and which, if they don’t bolt on to the toilet using the toilet bolt holes, stand independently over the toilet, such as risers, raised toilet seats with legs, safety frames with raised toilet seats, and 3-in-1 bedside commodes.
Unfortunately, in the kits which do include a raised toilet seat, the type of seat included is not something I would want my parent sitting on without a new hip replacement, let alone with one.
You can, though, get hip replacement kits without raised toilet seats, and they are worth it.
If you want higher quality assistive devices, you will need to buy those separately, but I don’t know if that is really necessary. We still have the same reacher that was in the kit, four years later, and it works just fine.
You can find the hip replacement kits online, in all the usual large retailer outlets, and in medical supply stores.
What do you need at home after a hip replacement – think ahead and set things up
It’s a great idea to think ahead, and to prepare your home for your recovery period, post surgery.
There are many things you can do to prepare, in addition to buying assistive devices –
In general
- cook and freeze lots of meals in advance, so that all you have to do is heat them up
- buy canned foods as well that you can just heat up
- stock up on all the non-perishables you will need for a month or so – and store them at a height where you do not have to bend down, or reach up, to get them
- put plates, glasses mugs and cutlery, all at a height where there is no bending, and where you can easily reach them
- make sure that all laundry is done, so that you have clean clothes for the longest time possible
- go through the house and find what things you use the most each day, and put them all at a height where you do not have to bend down, or reach up high – especially in the kitchen and the bathroom
- prepare an area where you will be spending most of your time on the first floor – set up a kettle with tea, coffee or whatever drinks you like, cookies etc. next to where you will be sitting, so that you have snacks drinks if you want them
- make sure that where you are getting on and off the bed, the floor is not slippery
- make sure the bed is at the right height, so that your feet are flat on the floor when you are seated on the bed
- if your bed is upstairs, try to bring it to a room on the first floor, so you can avoid having to go up and down stairs
- if your bathroom is not on the same floor as where you will be sleeping etc., get a bedside commode for next to the bed
- get a pouch for your walker, so you can carry a few of the most frequently used items with you
- get a fanny pack, or small rucksack, that you can put items such as your cellphone in
- get a mobile phone if you don’t have one, as you don’t want to be rushing to the phone, and if you have an emergency the mobile is easy to keep on you at all times
- go through the house and remove rugs or obstacles on which you can trip
- remove any furniture in front of curtains, so you don’t have to reach around it to close and open the curtains
The bathroom
This is going to be the most dangerous room in the home because of the water, so you need to make sure that everything here is prepared.
- place grab bars in the shower, by the tub and by the sink – this will give something to hold on to for stability – not ones with suction cups, but grab bars which are screwed on to the wall
- some form of raised toilet seat with armrests – if you don’t get armrests, put grab bars on the wall by the toilet as well
- in the shower, if you are going to sit, use a caddy and put everything you require in it, and put it where you will not have to reach or bend down, to get to it
- if you don’t have a handheld shower head, get one
- put non-slip mats in side and outside the shower, and by the bathtub, if you are washing there
What’s the best chair after a hip replacement ?
If you had an anterior hip replacement, you should not have to worry about this, unless your surgeon has told you otherwise.
Most of the time, the precautions to avoid bending your hip more than 90 degrees do not apply to anterior hip replacements.
If you had a posterior or lateral hip replacement, you want to get a chair with –
- armrests – these will be invaluable when standing up
- a straight back
- a seat which is higher from the floor than the back of your knees, so you are that your hip is higher than your knee when you are sitting
- you should be able to place your feet flat on the floor when you are seated
- the seat should be firm but comfortable, and not the type that you sink into
Keep far away from low seats, puffy seats, sofas and all seats without armrests.
If you find that your chosen chairs are a little hard after a while, you can always add a wedge cushion, or a square cushion of dense foam, 2 to 4 inches thick, to make things a little more comfy
My mom after her hip replacement used a very basic upright wooden chair with armrests, and a slightly padded back and seat. The seat level was about 1 inch higher than her knees.
If you have had a posterior or lateral hip replacement you will also want to know how to measure a toilet for a raised toilet seat, you can find that, and how to measure the toilet to see if you have an elongated, or a standard toilet bowl – that’s important too!
That article is here – “How To Measure For A Raised Toilet Seat”.
Best shoes after a hip replacement ?
Slip on shoes with a wide, flat heel are the best.
If you still want lace up shoes, then get the elastic laces and put them in your shoes, and test them in advance.
Do not wear high heels, or pointed heels, until you are told it is okay by your surgeon. The higher the heel and the more of a point it comes to, the greater the stress it places on the hip.
It is also easier to fall wearing high heels, than it is wearing low flat heels, which have a greater surface area in contact with the ground. And you want to avoid falls when you have a hip replacement.
What can you never do after a hip replacement
For Posterior and lateral Hip replacements
After a posterior or lateral approach, hip replacement, you will be given a number of precautions that you will need to observe.
You will typically follow these precautions until your surgeon says otherwise – you will be asked to follow of these guidelines for somewhere between 3 and 12 weeks, depending on which precaution it is.
The precautions are taken, to avoid a dislocation of your new hip joint, caused by adopting a position, or a movement, which places too much stress on the joint.
We’ll start with –
The 90 Degree Rule
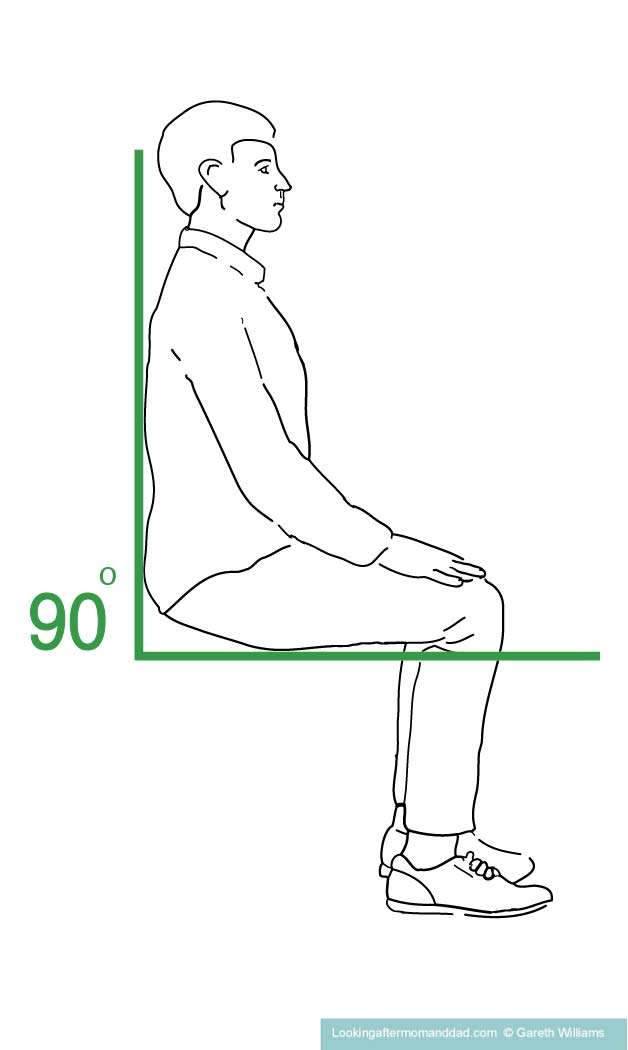
The illustration, above, demonstrates the 90 degree rule for the sitting position.
The 90-degree rule is so-called, because you are not supposed to take up any position, or move in a way, which places your hip at an angle of 90 degrees, or more to your body.
After your hip replacement, you will spend a large amount of time, especially in the beginning, sitting down, and so this is where we will start.
While you are sitting, your hip should not be lower than your knees – it can be higher than the knees, just not lower.
And, you should –
- neither lean your torso forwards to your knees
- nor lift your knees upwards towards the torso
This means no leaning forwards when seated to pick things up, or to pull covers over you etc.
If my explanation of the 90 degree rule is a little confusing, imagine that a standing person’s hip is at 0 degrees, and when the person raises their leg upwards, the angle builds up, until you get to a position where the leg and hip are at a right angle to the body (90 degrees).
In that position of a right angle, your hip is at the maximum amount that you are supposed to bend it hip during your recovery period, post surgery.
Here are many of the precautions you will typically need to follow, just until your surgeon says otherwise – generally up to 3 to 12 weeks, depending on which one it is.
General precautions – whether standing, sitting, or lying down
- don’t lift your knees higher than your hips
- don’t break the 90 degree rule
- don’t bend at the waist – use a reacher to pick things up
- don’t twist your upper body, try to keep facing straight ahead
- don’t point your feet, or toes inwards – your toes should point straight ahead or slightly outwards
- don’t try to kneel for around 3 months, and check with your surgeon first before you do
- don’t drive until you are given the okay by your surgeon
- don’t immerse your hip underwater – usually 6 weeks
- don’t play any sports until you are told you can
- don’t cross your legs
Sitting precautions
- don’t break the 90 degree rule when sitting
- don’t sit on seats where your knee is higher than your hip
- don’t lean forwards when sitting
- don’t raise your leg upwards when sitting
- don’t stay still for too long
- don’t cross your legs when sitting, at all
- don’t twist your upper body out of line with your hips – try to stay facing the same way
- don’t point your toes inwards
- do not sit on the floor
- do not try to kneel
- don’t sit in the bottom of a bathtub
Sitting down and standing up
- don’t lean forwards when sitting
- don’t lean forwards when standing up
- don’t put weight on your new hip replacement leg when sitting down or standing up
Sleeping precautions
- the best sleeping position is on your back
- don’t put pillows under your knees if you are sleeping on your back
- if you sleep on your back, put a pillow between your legs to stop them from turning in and twisting the hip – your toes should be pointing straight up
- don’t sleep on your stomach
- don’t reach to pull the covers up when you are lying in bed
- if you sleep on your side, don’t lay on the side of your hip replacement
- if you sleep on your side, put two pillows between your legs – in a line – to keep your hip aligned in a neutral position
- don’t bend your knees up to the 90 degree point if you are sleeping on your side
- do not bend your leg when you get into and out of bed
- don’t cross your legs when lying down or sleeping
Standing and walking precautions
- don’t bend over to pick things up – remember the 90 degree rule- use a reacher
- don’t twist your upper body, try to keep facing straight ahead – if you wish to look in another direction you need to take small steps till you are facing the way you wished to look
- don’t stand with your toes pointing inwards – your toes should point straight ahead or slightly outwards
- don’t pivot on your foot of the operative hip to turn – turn by making a series of small steps (avoids twisting the hip, and allows you to keep your toes pointing straight ahead of you as you walk
For anterior hip replacements
Precautions with anterior hip replacements are far fewer, as the hip is more stable after surgery – less soft tissue has been cut through, than for the posterior and lateral approach hip replacements.
You must always get the okay from your surgeon before you stop following these rules –
- don’t lean too far forwards if it hurts
- don’t bend or stretch backwards, extending your hip (hyperextension)
- don’t pivot on your foot
- don’t turn your foot outwards
- don’t twist your leg to the outside
- don’t lay, or sleep on your stomach
- don’t twist your knee outward when sleeping
- don’t sleep on the hip replacement side, if sleeping on your side
- if you sleep on your side, place two pillows length ways between your legs
- don’t immerse your hip underwater for 6 weeks
- don’t sleep in a recliner
- don’t try to do sit-ups
How long do you need a caregiver after hip surgery ?
This is going to be a very different answer depending on the type of hip replacement surgery.
Anterior approach hip replacements
For those individuals who have had an anterior approach hip replacement, they may need a little help for the first few days, but they do not face all the restrictions in terms of activities, that the other types of hip replacement patients face, unless their case is out of the ordinary.
The person should be able to dress on their own pretty much straight away, and if it is still a bit painful to do so, they can use some devices that I have already described, to make things easier for them, and less painful.
Washing, may be a bit more difficult for a week, because of the risk of slipping falling, and cooking may prove to be a bit much during that time as well.
This does of course come with caveats about a person’s age, and their prior state of health.
If the person is elderly, a little weak, or has poor health, I would think you would want a carer there, helping for at least a couple of weeks – if before surgery the person had difficulty performing daily activities, which didn’t just relate to their hip, they will still need help afterwards.
Driving in some cases after an anterior hip replacement can be resumed after two weeks, so long as the person is no longer taking any opioid painkillers, which may impair their driving performance. You will have to check this with your doctor.
This means that for transport to appointments and shopping, for at least the first two weeks the person will need some assistance.
Posterior and lateral approach hip replacements
For those individuals who had a posterior, or lateral approach hip replacement, you may need a carer for at least the first two weeks.
The first two weeks will typically be the most challenging after a hip replacement, but this does of course depend on the age and prior state of health of a patient.
After posterior and lateral approach hip replacement surgeries, the patients will typically be faced with quite a number of precautions to observe, and cannot bend forwards, lean over, twist their torso when standing, or reach down, and so will doubtless require some level of help.
Let’s now take a look at what I had to do when I looked after my mom after her posterior hip replacement.
After my mom’s posterior approach hip replacement, at 88 yrs old, we managed like this –
Week 1 was spent at the hospital.
For the first 4 weeks at home (weeks 2 -5) we had a lady carer to help Mom with bathing – this was done seated on a bedside commode.
I did the following for her –
- had a bedside commode for the first week in the bedroom which I tended to for her (after which it was used over the toilet as a raised toilet seat)
- in the very beginning, helped my mom to the bedside commode
- shampooed her hair,
- helped her with dressing
- helped her to get in and out of bed
- cooked all meals
- served her breakfast, lunch and dinner
- was present for standing up and sitting down in the beginning
- groceries were delivered, but I put them away
- I did her exercises with her
- I walked alongside her if she had to go do something, or wanted a change of scene from room to room
- I had organized a coffee and tea station next to the chair where Mom sat, with a kettle and some cookies
After about 4 weeks at home (starting week 5)
- I started to wash Mom’s legs and feet while she sat, and for the rest she showered on her own with a walker for stability
- Mom started getting her own breakfast – I laid out the items out for her on a table beforehand
- the fridge was organized so that there was no bending down low
- I did her exercises with her for about a year
After about 7 weeks –
- Mom did not need so much help with dressing
- Mom started to be able to do a full shower with the long handled sponge and handheld shower head
- I still did all the chores and cooking at this point
I hope that gives you some idea of what is required with an elderly person.
MedlinePlus, which is a service of the U.S. National Library of Medicine, and the website of the NIH – National Institute of Health, says that patients may need a caregiver to help them with daily activities for the first two weeks after coming home from surgery. You can check that out here –
The activities with which a person may need help in the first few weeks are –
Getting in and out of bed
This can be very tricky at first and cause a lot of anxiety, both for the person with the hip replacement, and for the caregiver if they are not trained – it freaked me out at first, but a trained nurse gave me some guidance, and that was that.
The nurse showed me how to lower, and to raise the leg safely using a towel, which was very easy for Mom as well
Without help, she could not do this at first for about a week.
Dressing
You are not going to be able to bend down and ties your shoes, pull on your socks, put on pants etc. without using aids.
Bathing
This is where it is complicated, and we simply used our bedside commode as a chair on which my mom could sit and be washed – this was the way she washed for almost a month, with the help of the caregiver, and then myself for her legs after that, and when she was steady enough (after 6 weeks), she did the rest in the shower and had a walker to aid her.
Driving
You are not going to be able to drive, until you are no longer taking pain medication – that is a bare minimum, and it is usually between 2 and 8 weeks before you can drive again. You will need to have your strength back in the leg with the hip replacement, and your reflexes must be back to normal. Posterior and lateral approach hip replacement patients will take longer to recover to the point where they are allowed to drive, than those who have had an anterior approach hip replacement.
Cooking
How soon a person is able to cook is really going to depend on how you have set up the kitchen to eliminate bending. By cooking, I mean heat up frozen meals, or a tin of soup. We are not talking about making 4-course meals for all our friends!
You can, of course, if you have a table, set up a good chair in a kitchen and sit to prep food and to cook it on a hot plate on that table, you don’t have to use the stove.
Groceries
You are not going to be able to go get groceries by yourself for some time, and driving is also not possible for quite a while, so you will need someone to do this for you for at least a month, or get home delivery.
Appointments
You will need someone to take you to any appointments for at least the first 4 weeks.
https://www.edwinsu.com/anterior-hip-replacement-post-op-instructions.html
https://www.newyorkhipknee.com/faqs/total-hip-replacement-faqs/
https://www.stefankreuzermd.com/anterior-hip-replacement.html
https://www.nwh.org/classes-and-resources/patient-guides-and-forms/joint-replacement-surgery-patient-guide/joint-replacement-faqs
https://www.ozorthopaedics.com.au/blog/how-long-after-a-hip-replacement-can-i-tie-my-shoe-laces-23710.html
https://orthoinfo.aaos.org/en/recovery/activities-after-hip-replacement/
https://my.clevelandclinic.org/health/treatments/17102-hip-replacement
https://scottsdalejointcenter.com/patient-education/anterior-total-hip-replacement-precautions/
https://www.arthritis-health.com/surgery/hip-surgery/anterior-hip-replacement-dos-and-donts
https://ortho.duke.edu/sites/ortho.duke.edu/files/u18/Anterior%20Hip%20Precautions.pdf
https://www.sehat.com/sleeping-positions-after-anterior-hip-replacement
https://www.henrymayo.com/documents/CP-Anterior-Hip-Complete.pdf
I’m Gareth, the author and owner of Looking After Mom and Dad.com
I have been a caregiver for over 10 yrs and share all my tips here.