If you are about to have posterior or lateral hip replacement surgery, you are probably rather intimidated by all the things that you have been told you cannot do for a while. Rest assured, though, my mom and I found lots of relatively inexpensive items which will make life a lot simpler.
To pick things up after a posterior or lateral hip replacement, you will have to use a reacher, or grabber, as you will not be allowed to bend down to pick things up for 6 to 12 weeks post surgery. Your surgeon will tell you when.
To pick things up after an anterior hip replacement should not be much of a problem, as you are allowed to bend forwards. If it is painful at first, you can also use a grabber, or a reacher, until it doesn’t hurt – you should never force it.
CONTENTS - Overview & Quick Links
When can you bend down after a hip replacement ?
What can you never do after a hip replacement ?
Positions to avoid after a posterior and lateral hip replacement
Positions to avoid after anterior hip replacement
Kneeling after a hip replacement
Walking unaided after a hip replacement
How long after a hip replacement can I tie my shoes ?
Helpful items for after a hip replacement
12 weeks after a hip replacement: What to expect ?
When can you bend down after a hip replacement ?
With a posterior, or a lateral hip replacement, you are not to bend down, or reach forwards when seated, or standing, for up to 6 to 12 weeks post surgery.
For an anterior hip replacement the precautions are different, and typically there is no problem with bending or reaching forwards.
For each type of hip replacement you will have a range of precautions to observe after your hip surgery, and those precautions will be different for posterior and lateral hip replacements, from those for anterior hip replacements.
Typically, at 6 weeks after your surgery, for all types of hip replacements, you will be having a postoperative assessment with your surgeon, and you will find out if any of the precautions can be dropped.
Only your surgeon knows exactly when you can drop the different precautions, and it can vary drastically.
With the anterior replacements, the recovery is far faster than for the posterior and lateral hip replacements, because of the nature of the surgery.
Posterior and lateral hip replacements involve cutting through some of the largest muscles in the buttocks, and some ligaments, and these will take a considerable amount of time to heal and physical therapy, and the joint is less stable for a while due to this.
The precautions for all three types of hip replacements are there to stop any complications, and to try to avert the risk of a hip dislocation.
What can you never do after a hip replacement
For Posterior and lateral Hip replacements
You will typically need to follow these precautions until your surgeon says otherwise – you will be asked to follow of these guidelines for somewhere between 3 and 12 weeks, depending on which one it is
- don’t lift your knees higher than your hips
- don’t break the 90 degree rule (all explained further down the page)
- don’t bend at the waist
- don’t stay still for too long
- don’t cross your legs
- don’t twist your upper body out of line with your hips – try to stay facing the same way
- don’t point your feet out
- don’t point your feet in
- don’t pivot on your foot of the operative hip
- don’t sit with your hip lower than your knees
- don’t kneel
- don’t drive until you are given the okay by your surgeon
- don’t sit in the bottom of a bathtub
- don’t immerse your hip underwater – usually 6 weeks
- don’t play any sports until you are told you can
- don’t sleep on your stomach
- don’t put pillows under your knees when you are sleeping
- don’t reach to pull the covers up when you are lying in bed
- don’t lay on your side on the side of your hip replacement
- don’t bend your knees up to the 90 degree point if you are sleeping on your side
For anterior hip replacements
The number of precautions with anterior hip replacements is far less, as the hip is more stable as it is a less invasive surgery, and far less soft tissue has been cut through than for the posterior and lateral hip replacements.
You must always get the okay from your surgeon before you stop following these rules
- don’t lean too far forwards if it hurts
- don’t bend or stretch backwards, extending your hip (hyperextension)
- don’t pivot on your foot
- don’t turn your foot outwards
- don’t twist your leg to the outside
- don’t lay or sleep on your stomach
- don’t twist your knee outward when sleeping
- don’t sleep on the hip replacement side, if sleeping on your side
- if you sleep on your side, place two pillows length ways between your legs
- don’t immerse your hip underwater for 6 weeks
- don’t sleep in a recliner
- don’t try to do sit-ups
Positions to avoid after a posterior, or a lateral hip replacement
Now let’s see how these rules apply to the positions you will be taking up after surgery.
What is the 90 degree rule that I keep referring to.
When you are lying down, standing, sitting, sitting down and standing up, after a “posterior” or “lateral” hip replacement, you do not want to position your hip at the wrong angle, as it will put stress on it and can lead to dislocations, and also delay healing.
The 90 Degree Rule
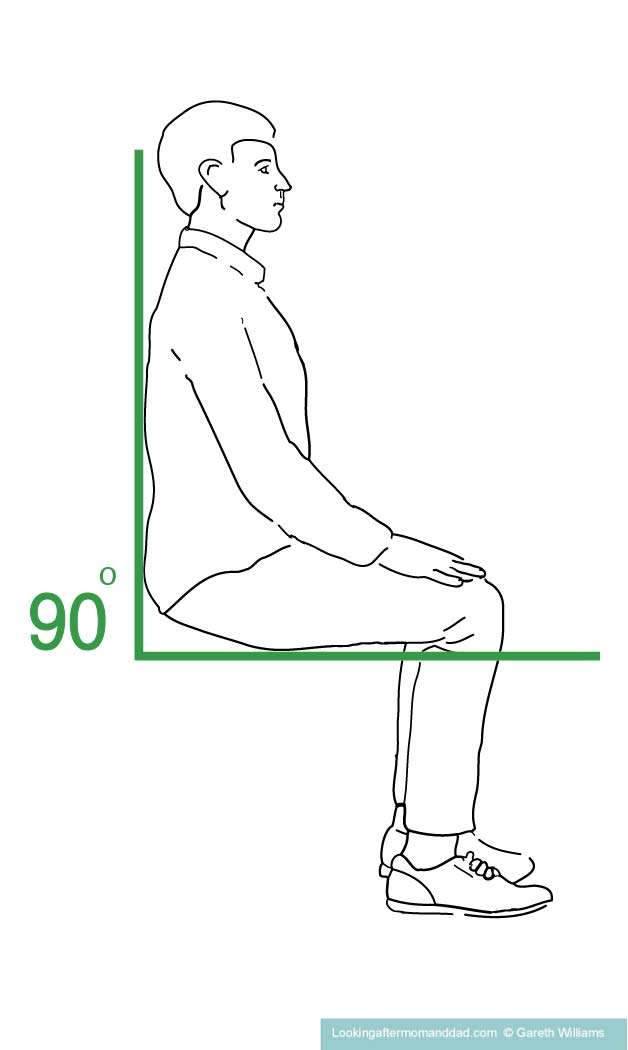
Illustration 1/
Illustration 1/, above, demonstrates the 90 degree rule for the sitting position.
You should not bend your hip at more than 90 degrees at any time.
In the illustration above, you see the closest the knee, of the leg with the hip replacement, should come to your chest, when you are sitting, as the hip is at 90 degrees at this point.
Your bottom should never be lower than your knees when you are seated – it can be higher than the knees, but never lower.
When in the seated position, you should –
- neither lean your torso forwards to the knees
- nor bring your knees up
During the first 6 to 12 weeks after you had your hip replacement, your hip should not be at a greater angle than 90 degrees.
– if this angle stuff is too confusing, try to imagine a person standing and their hip is at 0 degrees to the torso – when they lift their leg upwards, the amount of degrees builds up, until it gets to where the leg and hip are at a right angle to the body (90 degrees). This is the maximum you are allowed to bend your hip during the precaution period after surgery.
The above, is what is known as The 90 Degree Rule.
During the period that you will be taking precautions, the hip muscles and ligaments will get the time they need for the healing and strengthening.
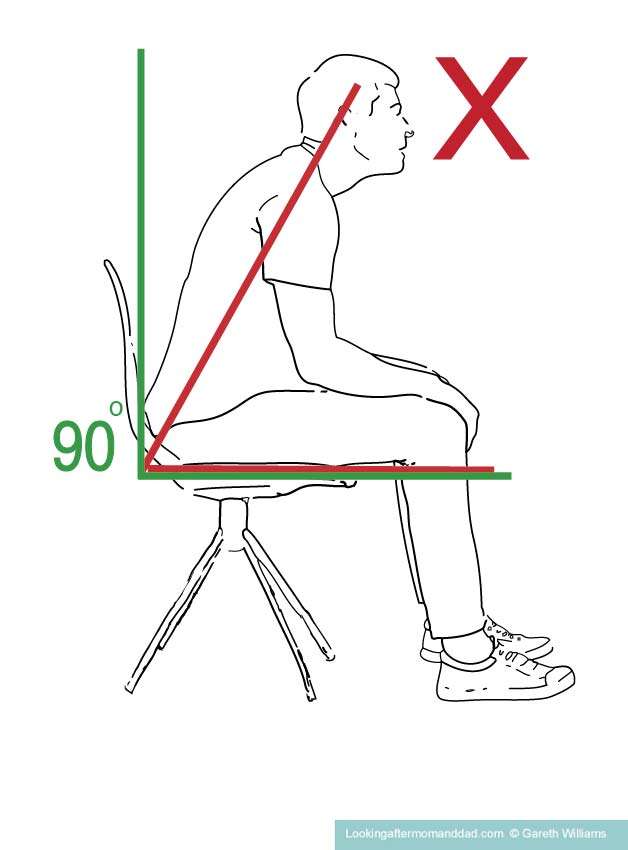
Illustration 2/
Illustration 2/, above, shows how you can break the rule by leaning forwards when seated, which results in pressure being exerted on the new hip replacement.
Some of the biggest muscles in the buttocks have been cut, and the hip could move backwards, if you do this before it has really had time to heal porperly.
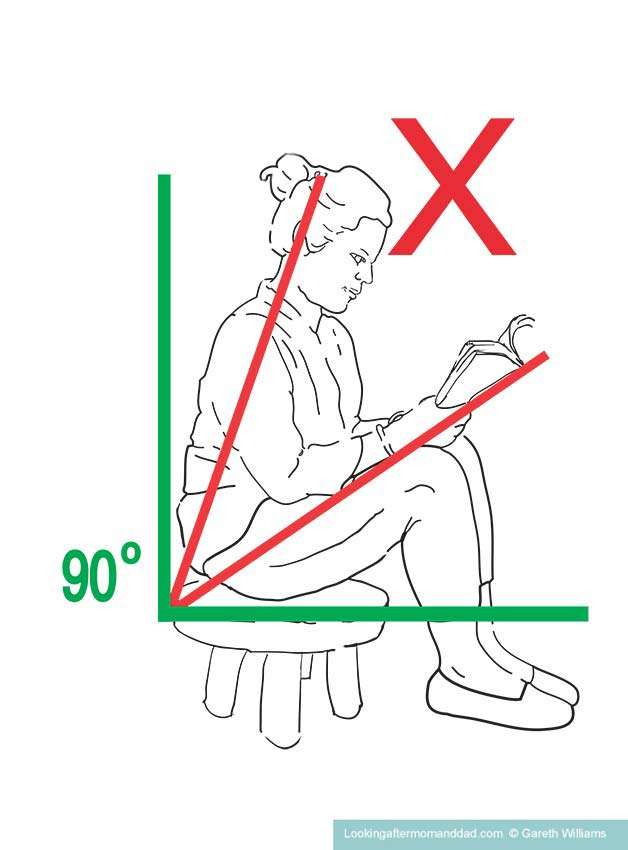
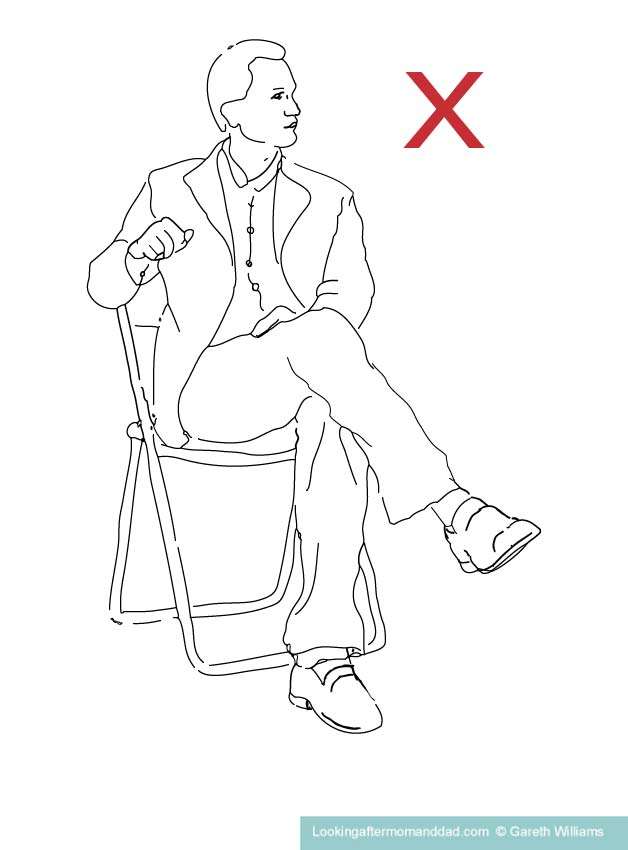
Illustration 3/
Illustration 3, above, is possibly the worst way of sitting after a posterior or lateral hip replacement.
This image demonstrates several important points –
1) there is the poor position of the knees on a low seat, in relation to the torso – the knees are way too close to the chest
2) the person’s bottom is seated below the knees, which as well as exerting too much pressure on the hip, will cause an additional problem for standing up
3) as this person tries to stand up, they will not be able to stand, without leaning forwards to gain momentum to lift themselves upwards, which will put a huge amount of pressure on the hip as the angle will be too great increasing the chance of a dislocation of the hip
This is why after a posterior or lateral hip replacement you are told not to sit on a seat which has your bottom closer to the floor than your knees.
Illustration 4
In Illustration 4/, above, the seat level, and hips are good in relation to the knees, which is very good, but this is spoiled by the person leaning forwards.
The torso, in this situation, should be behind the 90 degree line if you are sitting upright, and ideally the vertical should be at about 110 degrees to the thighs and knees.
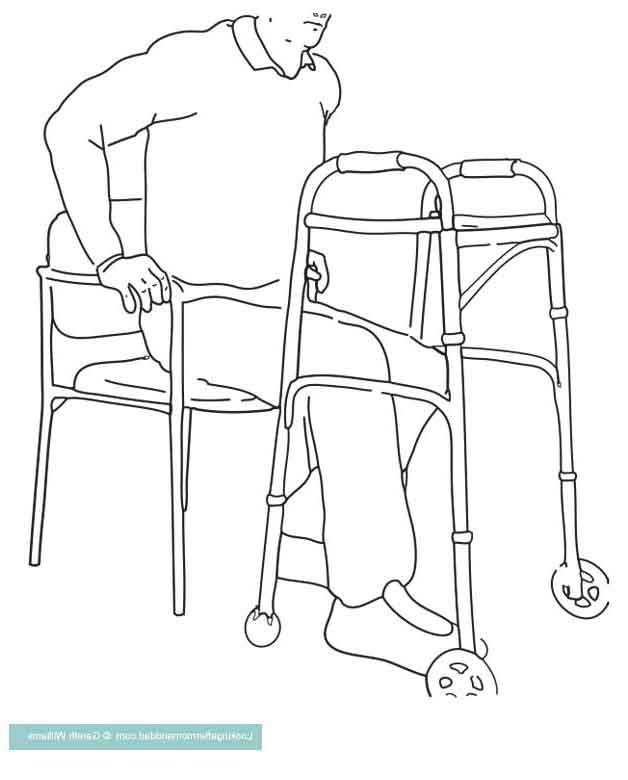
Illustration 5
Armrests
It is recommended that you sit in straight backed chairs with armrests after your surgery, as they will help you to sit down, and to stand up, correctly, and to maintaining a good posture, without leaning forwards and breaking the 90 degree rule.
In Illustration 5/, above, shows you how the character is pushing up vertically, using the armrests of a chair to stand.
Using the armrests in this way will stop you, when you do it, from leaning forwards for momentum – your arms give you the thrust to rise, and you don’t need the impetus that leaning forwards gives you.
It also helps, if you tuck your good leg slightly behind its normal position for standing (tuck it under you a bit more – a few inches), and this will give you more power for standing up – and remember that your operated hip leg will be extended out in front, as you stand.
Without the armrests, you are going to have to lean forwards to build the momentum (even if you push up from the seat with one hand), which is risky, and exerts extra pressure on the new hip replacement.
To find out more about how to sit down, or stand up, after a posterior or lateral hip replacement, using a walker, I have an illustrated article “How To Sit On A Toilet After Hip Surgery: A Detailed Illustrated Guide”. The article also shows you how to stand up from a seat without armrests.
Illlustration 6/
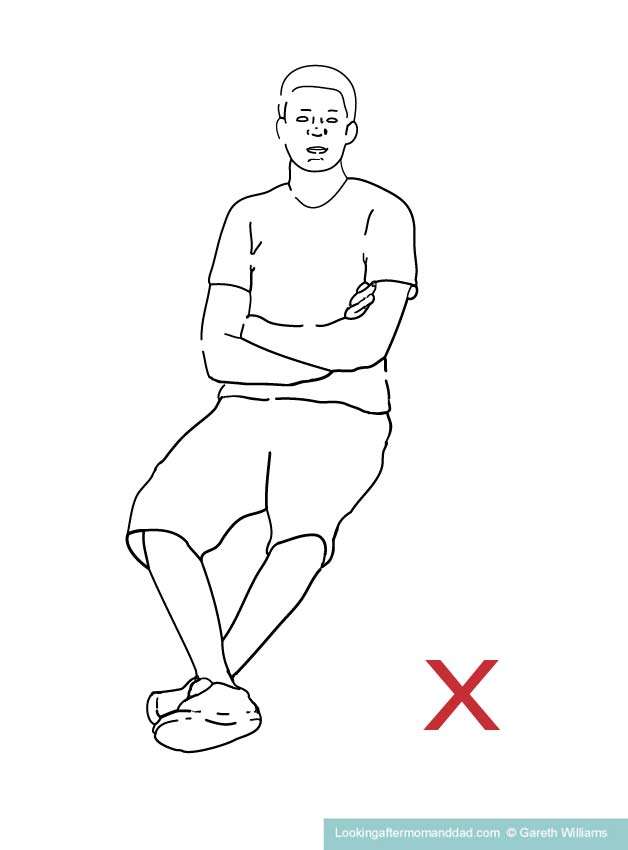
Illustration 7/
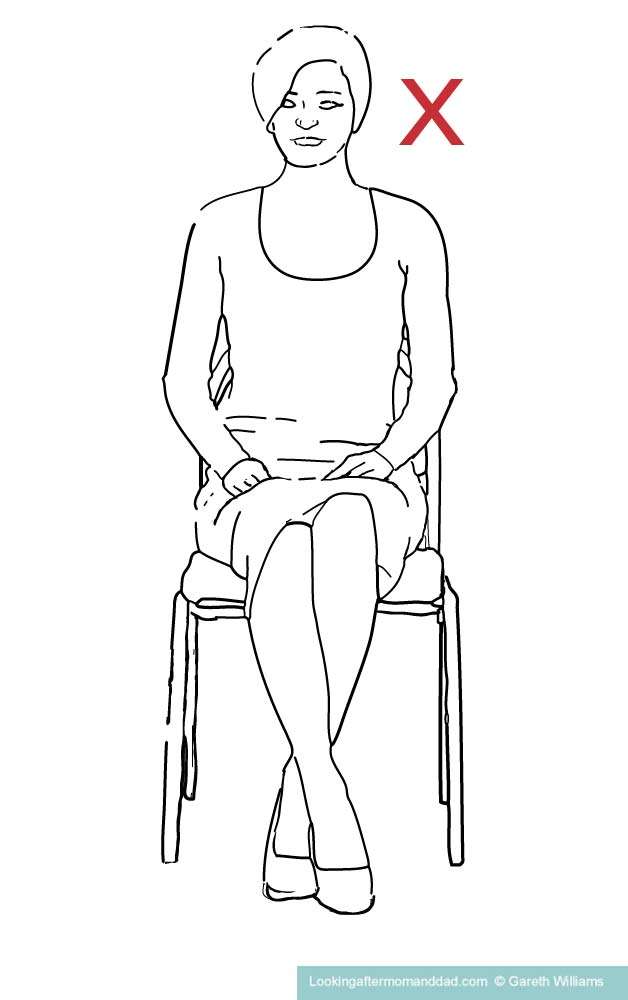
Illustration 8/
Don’t sit with your legs crossed after surgery
Illustrations 6-8 show a few more positions to avoid with your legs crossed.
While your muscles around the joint are still healing from the surgery, patients will be advised to keep their legs straight, not to cross them, and not to turn them inwards in any way.
This will typically be for the first 12 weeks.
Sleeping positions
There are a few precautions for sleeping –
- do not sleep on your stomach, as this will force your feet to point in or out, which twists your leg and hip, which can cause complications with the healing process
- the best position for sleeping is on your back
- if you are sleeping on your back, do not put pillows under your knees
- if you sleep on your back, have a pillow between your legs to stop you from twisting them, and don’t let your toes point inwards or outwards, but rather, straight up
- if you are sleeping on your side, you need to put a couple of pillows between your legs to keep your hip at a neutral angle
- definitely don’t cross your legs when lying down or sleeping
- when you are lying down, do not reach forwards to pull up covers, use a reacher
Standing positions
There are only a few precautions for when you are standing and walking –
- do not bend down to pick things up – use a reacher
- stand with your toes pointing ahead of you or very slightly to the outside, but not inwards – this is to avoid twisting the hip
- do not pivot on your foot as it will twist your hip – if you wish to turn you do so with small steps
- do not twist your upper body when you are standing, always make small steps to turn where you wish to look
Positions to avoid after an anterior hip replacement
After an anterior hip replacement, you will be told to take a few precautions, avoiding getting into certain positions for up to 6 – 12 weeks.
Your surgeon will let you know at what point you can stop with the precautions.
The “anterior capsule” is cut through during surgery to allow the surgeon to put the implants in. The capsule contains soft tissue ligaments, and it will take up to 4 months for the capsule to “re-form”, so you will be told to not get into variuos positions, and to adopt others –
- although there is no 90 degree rule, some surgeons say not flex the hip beyond 120 degree for the first 6 weeks
- do not do any stretching bending backwards – do not step backwards on your surgical leg – don’t extend your leg behind you
- do not push your hips forwards or bridge
- the best position to sleep is on your back, with a pillow between your legs to stop the hip from twisting
- do not twist your knee outward in any sleeping position
- don’t cross your legs when you are lying down – put a pillow between your legs to keep them from turning
- sleep on the side without the surgery and with pillows between your legs to align the hips if you are a side sleeper
- never lay or sleep, on your stomach
- it is advised to not sleep in a recliner – the hip will become stiff and harder to straighten out
Activities which push the knee towards the head – this is hip flexion – are not a problem, as the “posterior capsule and muscles are intact”, and this is why you can reach forwards, and pick things up without any worry.
Kneeling after a hip replacement
After the 12 weeks of precautions, it is possible that you may be able to kneel down, but this is really a question for the surgeon.
If your surgeon says it is okay to kneel down, the recommended safest way to do it, is to kneel on the knee of the operated side only.
This way you have the knee of the operated hip which is bent on the ground, while the operated hip is extended, or in line with the body if you like, and the hip on the other side is bent at a 90-degree angle with the foot and knee out in front of you.
Kneelers – you can also buy a “kneeler” which can be very useful, as it has two armrests, one on either side, which you will use when you wish to stand back up, and push up with your arms.
This really is a question you should be pursuing with your surgeon, and they will tell you if you should do this, and the best method for your case.
Walking unaided after a hip replacement
Patients with posterior, or lateral, hip replacements should be walking unaided around the home by 6 weeks after surgery, and by 10 to 12 weeks should be resuming most normal activities.
Typically, it is in the period 3 to 6 weeks post surgery that you will stop using an assistive device to walk inside.
Another factor to consider is that, if you used a can for a very long period of time prior to surgery, you may need it afterwards for longer, as you may have balance issues, or be walking incorrectly and this will have to be corrected
For patients with anterior hip replacements, I have read drastically differing timescales.
Some doctors say in 10 days you can walk without a cane, or other form of support, some aim for 2 weeks, and others say you will need a cane or walker for stability for up to 3 to 6 weeks post surgery.
How long after a hip replacement can I tie my shoes ?
If you have had a posterior, or lateral hip replacement, you will have to wait up to 6 to 8 weeks, before you can tie your shoe laces the normal way, and again your surgeon will let you know when.
If you had an anterior hip replacement it depends on the pain, and if your surgeon says you can bend this far, you may want to use the tips I am giving you here for a week or so. You don’t want to force it if it hurts.
Elastic shoe laces – replace your normal shoe laces with elastic shoe laces before your surgery, and then tie them, make sure they are staying on properly – you may need to tighten or loosen to find the right grip.
To put your shoes on after your hip replacement, sitting down correctly, you –
- use a reacher, or grabber, to place the shoe in position on the floor in front of you
- without bending forwards, enter your toes into the shoe
- take the long-handled shoe horn and place behind your heel in the shoe
- slide your foot on into the shoe
As you do this, the elastic shoe laces will stretch enough to let you slide your foot into the shoe, and then will hold shrink back to hold the shoe snugly on your foot.
You can try it a few times before you have your hip replacement, to get used to doing it, and walk around to make sure you have it tight enough.
Slip-on shoes – You will –
- position the shoe with the reacher
- hold the shoe in place with the reacher while you get your toes in the shoe
- take the log-handled shoe horn and place it behind your heel in the shoe
- slide your foot on into the shoe
And remember to stay sitting upright and not to bend forwards and break the 90 degree rule !!
If you have had an anterior hip replacement, you can put shoes on however you want to.
There are a number of other assistive devices which are going to be helpful to you in the first month, or so, so let’s briefly take a look at those now.
Helpful items for after a hip replacement
These very inexpensive assistive aids, and three slightly more expensive ones – will make your life much easier after a hip replacement – this mainly applies to individuals who have had a posterior, or a lateral hip replacement, but if you had an anterior replacement and your surgeon doesn’t want you to overdo the forward bending for a week or so, you can use these to
These devices are designed to help you avoid bending forwards, twisting, or reaching too far down while bending.
General –
– Reacher/ grabber – a basic lightweight, long handled, reaching aid for picking up items without reaching down and bending.
– a leg lifter – this a type of strap with a semi-rigid section in the middle, is used to lift your leg when you are getting on an off a bed, or if you are bathing using a bath transfer bench, or bath board.
It really is a fabulously simple device and works without too much pain, and it stops you from bending your leg and hip the wrong way while doing so.
– non-slip pvc rug underlay – I taped some PVC rug underlay to the floor where my mom is getting on and off the bed, as she complained that her feet didn’t grip the floor properly, and she was sliding a little – this is only for uncarpeted floors – I change it once a year at the most, and tape it down with gorilla tape.
Walking Aids –
– A walker – after surgery you will be using walker with walking to help to maintain your balance, stability and to keep your weight off your new hip.
You will also need a walker for a number of weeks to help you with sitting down, and standing up, and especially when using the toilet. This applies to most anterior hip replacements as well as posterior and lateral hip replacements, although the period for anterior replacement patients may be a week to ten days only.
– Canes or crutches – after the walker you will progress to walking with crutches or two canes, and then on to one cane (in some cases hospitals prefer crutches, but eventually you will use a cane for a period of time).
Again, for patients of anterior hip replacements the period of time is usually way shorter.
Toileting Aids –
Patients with anterior hip replacements may not need any of these pieces of equipment, and should check with their surgeon.
– A raised toilet seat – you will need to elevate your toilet seat to the correct height.
– A bedside commode – a 3-in-1 bedside commode can be used as a raised toilet seat or as a toilet in a bedroom, which is especially handy for when you first come home from the hospital, and even more so at night, as you may be very unsteady and unable to get to the bathroom quickly enough.
– Toilet wands – will permit you to clean yourself after going to the toilet without bending, or over reaching, and breaking the 90 degree rule.
– Handheld bidets – these are fantastic for cleaning yourself after going to the toilet, without any bending – a lot easier than using a toilet wand. You just spray yourself with the handheld unit.
If you get one, I would suggest that you get a bedside commode with an open front seat, as your raised toilet seat, as this will give you more room to spray.
Dressing Aids –
The assistive devices make dressing much more comfortable, without bending over or reaching down, and injuring your new hip.
– Elastic shoe laces – as I described above
– Slip on Shoes – (not a device, but they make life easier)
– Long handled shoe horn – this is a long shoe horn to facilitate putting your shoes, again as I described above
– Sock Aid – a device over which you slide your sock, pop on to the floor using a reacher, and then into which you stick your foot – all done easily without bending.
– Dressing stick – a long-handled stick with a hook on the end, which is designed to help you put your cloths on without twisting, or bending, in the ways you should not.
Bathing aids
– Shower chair or bench – makes showering safer – you can sit down and shower.
– Shower walker – for standing in the shower, if you are not steady, you can get waterproof walkers specifically for this purpose.
– Bath transfer bench or Bath board – goes across the top of the bathtub, so you can sit over your bathtub and wash.
– Long handled sponge – a long plastic handle with a sponge on the end for washing yourself without bending or twisting.
– Hand-held shower head – this is very important to have for both the bath and the shower – it means you won’t have to move around twist, bend to get wet, or to rinse yourself.
– Non-slip rubber mat – you should have a non-slip mat wherever you have your feet in water – the shower and the bath for instance.
– Grab bars – to provide support and avoid falls, you should have these on the walls of the shower and above the bathtub – I prefer the type which have a rough engraved grip, as your hands don’t slip when they are wet.
I have bought three types of suction grab bars for our bathroom shower, which are supposed to hold on to the wall by suction – they all just fell off the wall by themselves, so I wouldn’t bother with buying those.
I finally bought, and installed, a grab bars which you have to screw on to the wall – it isn’t that hard to do, and you can do it without breaking your tiles easily enough.
– Toilet safety frame – can come without legs and be attached to the toilet, or other models can stand over the toilet on four legs. Basically these provide big armrests which help with sitting and standing up on the toilet.
12 weeks after a hip replacement: what to expect ?
With a posterior or lateral hip replacement, it can typically take up to 10 to 12 weeks for the soft tissues to heal around the hip.
In the first 6 weeks post surgery, it is typical to concentrate on strengthening, work on balance, and working towards walking without any kind of aid.
In the weeks 6 – 12 post surgery you will be working on increasing your strength, endurance and being able to manage independently around your home
Typically, by the 12-week time mark, you will be told by your surgeon, that you no longer have to observe the hip replacement precautions that you were given post-surgery –
- bending down – the 90 degree rule (usually somewhere in the 6 to 12 week time period)
- sitting positions
- sleeping positions
It differs from person to person, and your surgeon will tell you exactly when this is, and it will vary according to your age, state of health and how well you have recovered – and exercises will be a part of your recovery, so it’s good to do them properly if you want to heal quickly.
With an anterior hip replacement, the recovery period is completely different, as it is far less invasive
Some surgeons write that at the 6-week mark you may be able to start playing tennis and weight lifting !!!
It seems that there is a great deal of range in the recovery timescale with the anterior hip replacements, and it depends on how conservative your surgeon is, as to how soon you can do things, but it is across the board far sooner than with the posterior and lateral hip replacements.
https://www.edwinsu.com/anterior-hip-replacement-post-op-instructions.html
https://www.newyorkhipknee.com/faqs/total-hip-replacement-faqs/
https://www.stefankreuzermd.com/anterior-hip-replacement.html
https://www.orthonewengland.com/wp-content/uploads/sites/156/2018/02/KENNON-DISCHARGE-INSTRUCTIONS-HIP-2016.pdf
https://www.nwh.org/classes-and-resources/patient-guides-and-forms/joint-replacement-surgery-patient-guide/joint-replacement-faqs
https://www.ozorthopaedics.com.au/blog/how-long-after-a-hip-replacement-can-i-tie-my-shoe-laces-23710.html
https://orthoinfo.aaos.org/en/recovery/activities-after-hip-replacement/
https://my.clevelandclinic.org/health/treatments/17102-hip-replacement
https://scottsdalejointcenter.com/patient-education/anterior-total-hip-replacement-precautions/
https://www.arthritis-health.com/surgery/hip-surgery/anterior-hip-replacement-dos-and-donts
https://ortho.duke.edu/sites/ortho.duke.edu/files/u18/Anterior%20Hip%20Precautions.pdf
https://www.sehat.com/sleeping-positions-after-anterior-hip-replacement
https://www.henrymayo.com/documents/CP-Anterior-Hip-Complete.pdf
https://orthospecialtyclinic.com/wp-content/uploads/2013/04/OSC-Gait-Instructions.pdf
I’m Gareth, the author and owner of Looking After Mom and Dad.com
I have been a caregiver for over 10 yrs and share all my tips here.