After a hip replacement, if you have been told that you need to follow precautions when sitting down, and standing up, you will need to –
- sit and stand using a walker
- use a chair with armrests
- use a chair with an upright back
- use a chair with a firm but comfortable seat
- find out the correct height for your seat
- don’t sit in a chair where your feet are not able to sit flat on the floor
- don’t sit in low chairs
- don’t sit in rocking chairs
- don’t cross your legs
- don’t sit with your toes pointing inwards or outwards
- don’t lean forwards when sitting
- don’t bend forwards when sitting down or standing up – you must go up and down vertically, as little of an angle as possible
- not bend down when sitting, or standing for that matter
So how do you do all this ? Take a look below at a fully illustrated guide to sitting down and standing up using a walker.
CONTENTS - Overview & Quick Links
How to sit down in a chair after a hip replacement ?
How to get out of a chair after a hip replacement ?
Correct chair height after a hip replacement ?
What’s the best chair after a hip replacement ?
Positions to avoid after a posterior, or a lateral, hip replacement
Positions to avoid after an anterior hip replacement
When can I sit in a normal chair after a hip replacement ?
Can I sit with my legs up after a hip replacement ?
Can you sit in a recliner after a hip replacement: Can you do it ?
How to sit down in a chair after a hip replacement ?
This is typically just for posterior and lateral approach hip replacements, unless otherwise indicated by your surgeon.
To sit down in a chair after a hip replacement, you will be using a walker to help you with your stability and balance.
NEVER TIP THE WALKER OVER TOWARDS YOU AT AN ANGLE TO SIT, OR TO STAND, ALL FOUR LEGS OF THE WALKER MUST BE ON THE FLOOR AS YOU SIT DOWN OR STAND UP.
A quick guide to sitting down in a chair after a hip replacement –

1
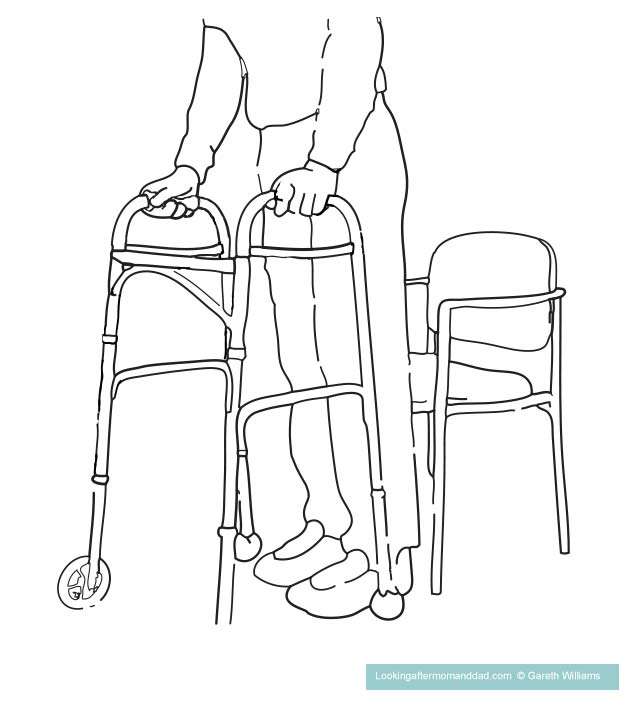
2
3
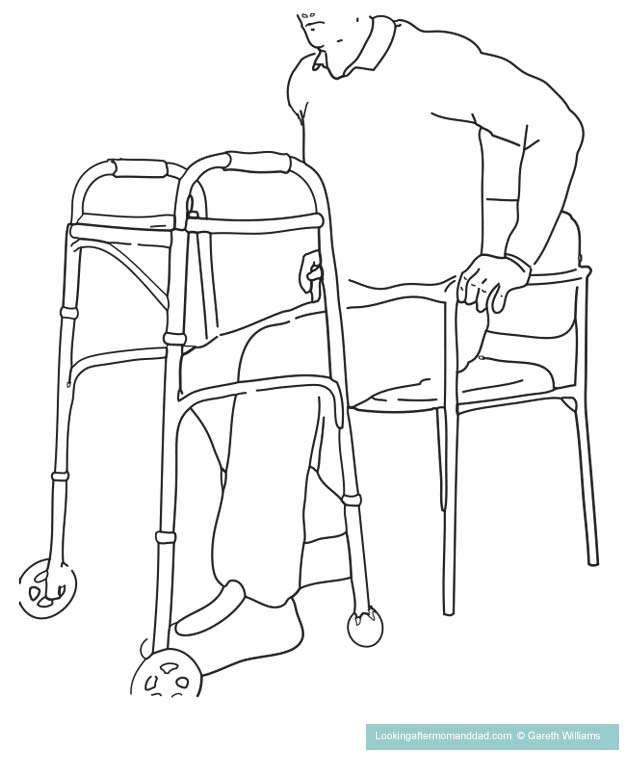
1.
- using a walker to assist you, back up slowly to the chair
- stepping back with your good leg first
- then your operated hip leg
- and then bring the walker up to you again
- and repeat the sequence until you get to the chair
2.
- stop backing up when you feel the seat of the chair touching against the back of your legs
3.
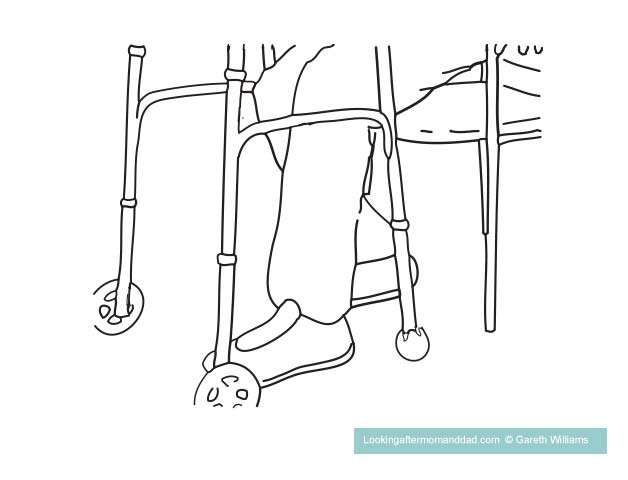
- extend your operated leg out in front of you
- do not put any weight on your operated when it is extended like this
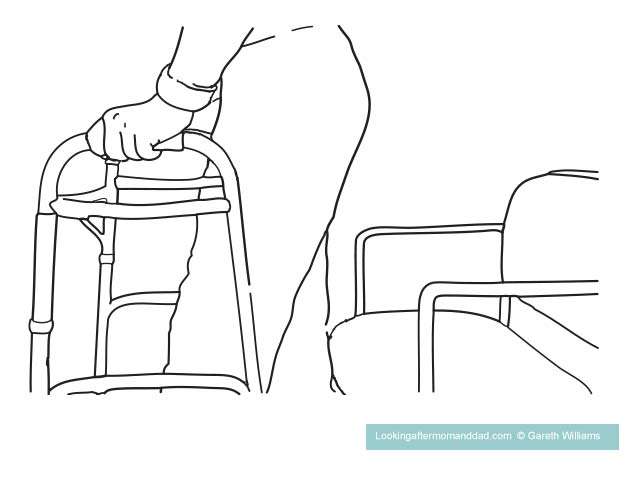
4.
- reaching back with your hand on your hip replacement side, take hold of the chair armrest on that side
- do not pull the walker towards you with the other hand, it is just there to help you keep your balance until you have hold of both armrests – if you pull it towards you, it will likely just tip over
- once you are holding the chair armrest on the side of your operated hip, you can let go of the walker with your other hand, and take hold of the chair armrest on that side
- lowering yourself with your arms, taking your weight with your good leg and your arms, you can sit back on to the front edge of the chair seat
- do not bend or lean forwards, start to sit down, but using your arms drop as vertically as you can, with a back nice and straight
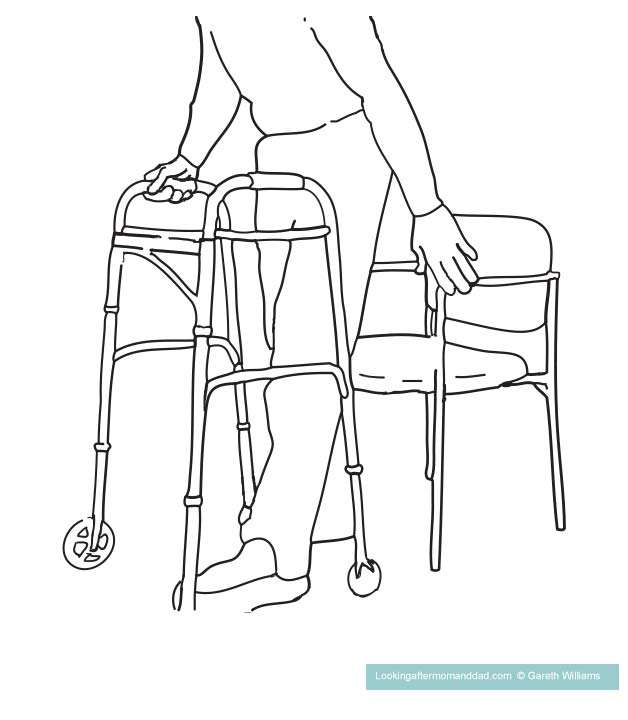
5.
- sit on the front edge of the chair seat, it is better to not try to go all the way into the seat straight away
6.
- once you are sitting on the front edge of the seat, you can use your arms to lift your weight off your bottom, and then scoot back further into the seat
- you can use your good leg to help you scoot back, but don’t twist your hips
- don’t lean forwards as you do this
4

5
6
How to sit down in a chair after a hip replacement ?
This is typically just for posterior and lateral approach hip replacements, unless otherwise indicated by your surgeon.
To sit down in a chair after a hip replacement, you will be using a walker to help you with your stability and balance.
NEVER TIP THE WALKER OVER TOWARDS YOU AT AN ANGLE TO SIT OR TO STAND, ALL FOUR LEGS OF THE WALKER MUST BE ON THE FLOOR AS YOU SIT DOWN OR STAND UP.
A quick guide to sitting down in a chair after a hip replacement –
1
- using a walker to assist you, back up slowly to the chair
- stepping back with your good leg first,
- then your operated leg, (without putting weight on it)
- and then bring the walker up to you again
- and repeat the sequence until you get to the chair
2
- stop backing up when you feel the seat of the chair touching against the back of your legs
3
- extend your operated leg out in front of you
- do not put any weight on your operated while it is extended
4
- reaching back with your hand on your hip replacement side, take hold of the chair armrest on that side
- do not pull the walker towards you with the other hand, it is just there to help you keep your balance until you have hold of both armrests – if you pull it towards you, it will likely just tip over
- once you are holding the chair armrest on the side of your operated hip, you can let go of the walker with your other hand, and take hold of the chair armrest on that side
- lowering yourself with your arms, taking your weight with your good leg and your arms, you can sit back on to the front edge of the chair seat
- do not bend or lean forwards, start to sit down, but using your arms drop as vertically as you can, with a back nice and straight
5
- sit on the front edge of the chair seat, it is better to not try to go all the way into the seat straight away
6
- once you are sitting on the front edge of the seat, you can use your arms to lift your weight off your bottom, and then scoot back further into the seat
- you can use your good leg to help you scoot back, but don’t twist your hips
- don’t lean forwards as you do this
How to get out of a chair after a hip replacement ?
This typically only applies to posterior and lateral hip replacements, unless your surgeon has indicated otherwise.
To get out of a chair after a hip replacement, you will be using a walker to help you with your stability and balance.
NEVER TIP THE WALKER OVER TOWARDS YOU AT AN ANGLE TO SIT OR TO STAND, ALL FOUR LEGS OF THE WALKER MUST BE ON THE FLOOR AS YOU SIT DOWN OR STAND UP.
A quick guide to getting out of a chair after a hip replacement –
1
2
3
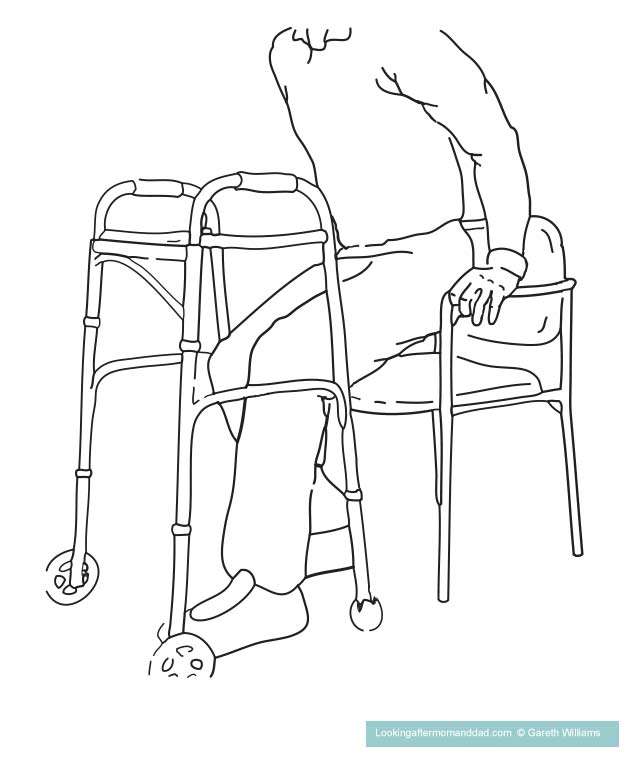
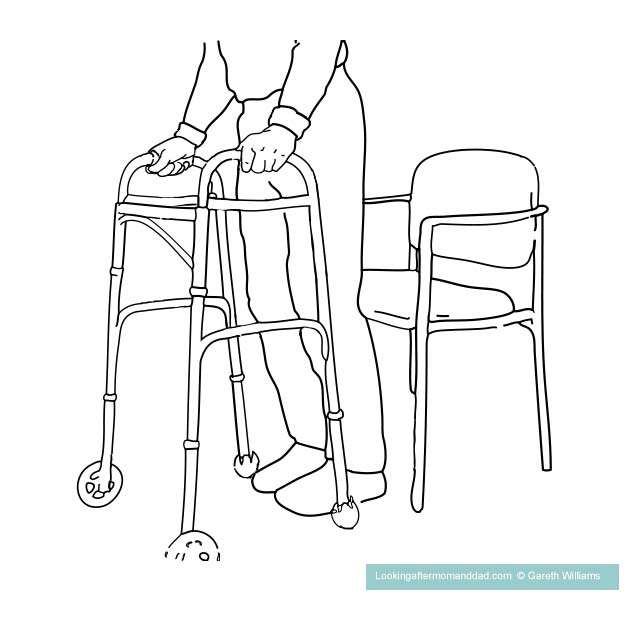
1.
- extend your operated hip leg out in front of you (no weight-bearing at this point on the operated hip)
- take hold of the chair armrests
- with your arms push up a little and scoot yourself forwards to the edge of the seat
- don’t lean forwards as you scoot, and don’t wiggle your hips from side to side
2.
- when you are ready to stand, make sure your good foot tucked is further back under you than is normal – having your foot tucked in under your body mass, will mean that you are not so inclined to lean forwards to gain momentum – standing up will be easier the more your foot is under your body
- remember the operated leg should not be taking weight as you stand
3.
- now push up vertically with your arms from the armrests and your good leg, trying not to lean forwards, and stand up
- do not use with your operated leg, it should not be load bearing as you stand
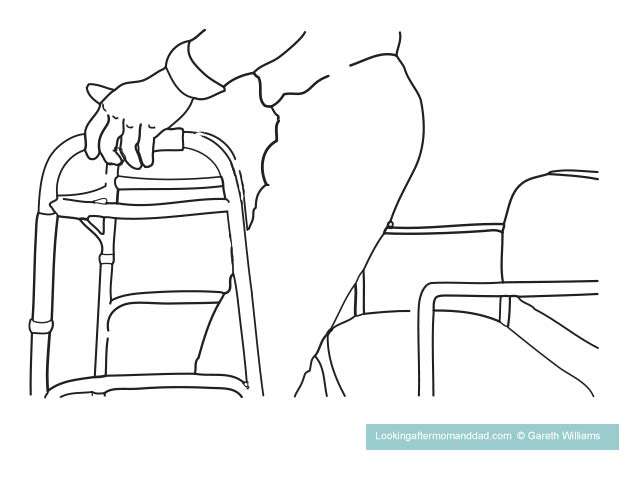
4.
- take hold of the walker with your hand on the side of your operated leg
- do not tip the walker towards you
- your other hand is still on the other chair armrest, as you do this, momentarily
5.
- once you have the walker in your first hand, take hold of the walker with the other hand
6.
- you can now bring the leg with the hip replacement back into a normal standing position
- stop for a moment, make sure you are stable, and then walk using the frame as you have been taught
4
5
6
How to get out of a chair after a hip replacement ?
This typically only applies to posterior and lateral hip replacements, unless your surgeon has indicated otherwise.
To get out of a chair after a hip replacement, you will be using a walker to help you with your stability and balance.
NEVER TIP THE WALKER OVER TOWARDS YOU AT AN ANGLE TO SIT OR TO STAND, ALL FOUR LEGS OF THE WALKER MUST BE ON THE FLOOR AS YOU SIT DOWN OR STAND UP.
A quick guide to getting out of a chair after a hip replacement –
1
- extend your operated hip leg out in front of you (no weight-bearing at this point on the operated hip)
- take hold of the chair armrests
- with your arms push up a little and scoot yourself forwards to the edge of the seat
- don’t lean forwards as you scoot, and don’t wiggle your hips from side to side
2
- when you are ready to stand, make sure your good foot tucked is further back under you than is normal – having your foot tucked in under your body mass, will mean that you are not so inclined to lean forwards to gain momentum – standing up will be easier the more your foot is under your body
- remember the operated leg should not be taking weight as you stand
3
- now push up vertically with your arms from the armrests and your good leg, trying not to lean forwards, and stand up
- do not use with your operated leg, it should not be load bearing as you stand
4
- take hold of the walker with your hand on the side of your operated leg
- do not tip the walker towards you
- your other hand is still on the other chair armrest, as you do this, momentarily
5
- once you have the walker in your first hand, take hold of the walker with the other hand
6
- you can now bring the leg with the hip replacement back into a normal standing position
- stop for a moment, make sure you are stable, and then walk using the frame as you have been taught
Correct chair height after a hip replacement
The correct height for a chair after a hip replacement is calculated by measuring from the floor to the back of your knee, the point where it bends. Your chair seat should be at the least the same height from the floor as your knee, if not an inch or so higher.
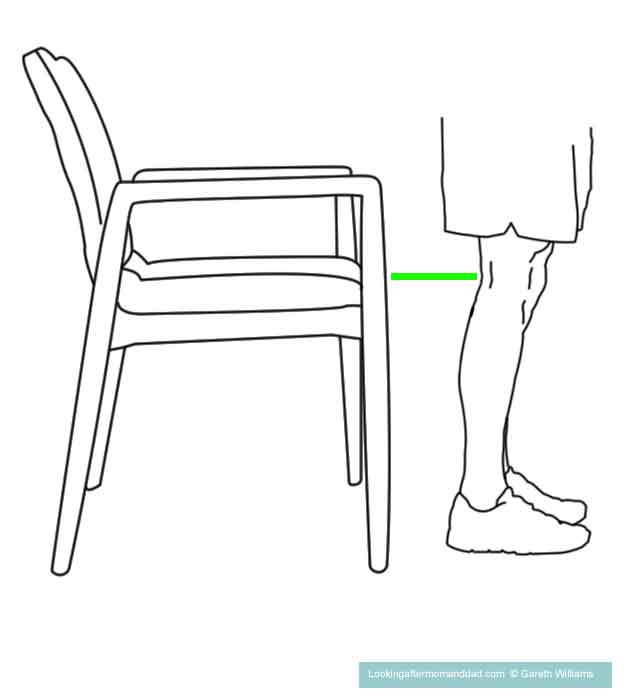
Chair seat height after a hip replacement
So why do you have to do this ?
You need to observe this rule, so that your hip is as high as, or higher than, your knee while you are sitting.
You do not want to sit in a position an angle of greater than 90 degrees, as it places too much stress on the hip and can cause complications, such as dislocations.
What’s the best chair after a hip replacement ?
Typically, the following information is really only relevant for those individuals who have had a posterior, or lateral, approach hip replacement, unless you have been told otherwise by your surgeon.
For anterior approach hip replacements it is wise to avoid any really low chairs, and if the chair has armrests, that can make it easier for you to stand up in the early stages of your recovery, but if your surgeon has not told you that you need to observe any precautions, to avoid bending your hip more than 90 degrees, then this following information is irrelevant to you.
After a posterior, or lateral, approach hip replacement, you want to get a chair with –
- armrests – assistance with standing up
- a straight back – probably you’ll want a little padding
- a seat which is higher from the floor than the back of your knees
- you must be able to place your feet flat on the floor when you are seated – no feet dangling in the air
- a second reason you don’t want your feet dangling, is that it can cut off the circulation, causing feet to go to sleep, and this can lead to accidents when standing
- a firm but comfortable seat
Don’t sit on low seats, puffy seats, sofas, poofs and seats without armrests.
You can always add a wedge cushion (thicker at the back than the front) or a square cushion of dense foam, 2 to 4 inches thick, to make things a little more comfy – latex foam is often recommended as it is natural.
I could recommend to you a number of chairs, but truthfully, a firm chair with armrests which has a high enough seat is all you need.
Especially, as you will only be using it for 6 to 10 weeks, in most cases, and the specialist chairs are expensive.
Don’t, whatever you do, use a seat that you sink into, which forces you to lean forwards to get out of it, and as you will see in a moment, this places a great deal of stress on your new hip.
My Mom’s chair ?
My mom used a very basic upright wooden chair with armrests, and a slightly padded back and seat. The seat level was about 1 inch higher than her knees, so she was fine with the 90 degree rule for her hip.
You may also want to know how to measure a toilet for a raised toilet seat, after a hip replacement, – you can read my article explaining how to check and measure the toilet, (a) to see if you have an elongated or a standard toilet bowl, – that’s important too – and (b) to find out what height raised toilet seat you need.
That article is here – “How To Measure For A Raised Toilet Seat”.
Now, let’s move on to the correct seating positions are, and which positions you should avoid after a hip replacement.
Positions to avoid after a posterior, or a lateral hip replacement
Following, a “posterior” or “lateral” hip replacement, there are a quite large number of precautions which need to be taken when lying down, standing, sitting, sitting down and standing up, due to the nature of the surgeries.
If you have traditional posterior, or lateral, approach hip replacement, large muscles such as the gluteus maximus, and some other soft tissues are going to be cut to access the joint. Once the new implant is in place, the muscles and tendons will be repaired, and it is these which will need time to heal, before the hip regains all its stability.
This is why, after these particular surgeries, there are a number of precautions to be observed, which exist to stop a person from over flexing the hip, twisting it, or dislocating it.
You do not want to bend your hip beyond a 90-degree angle for 6 to 12 weeks post surgery – your surgeon will tell you when you can start to bend, etc.
This means either by bringing the hip up, and by bending down, or a combination of the two types of movement – and that is just to start.
The 90 Degree Rule
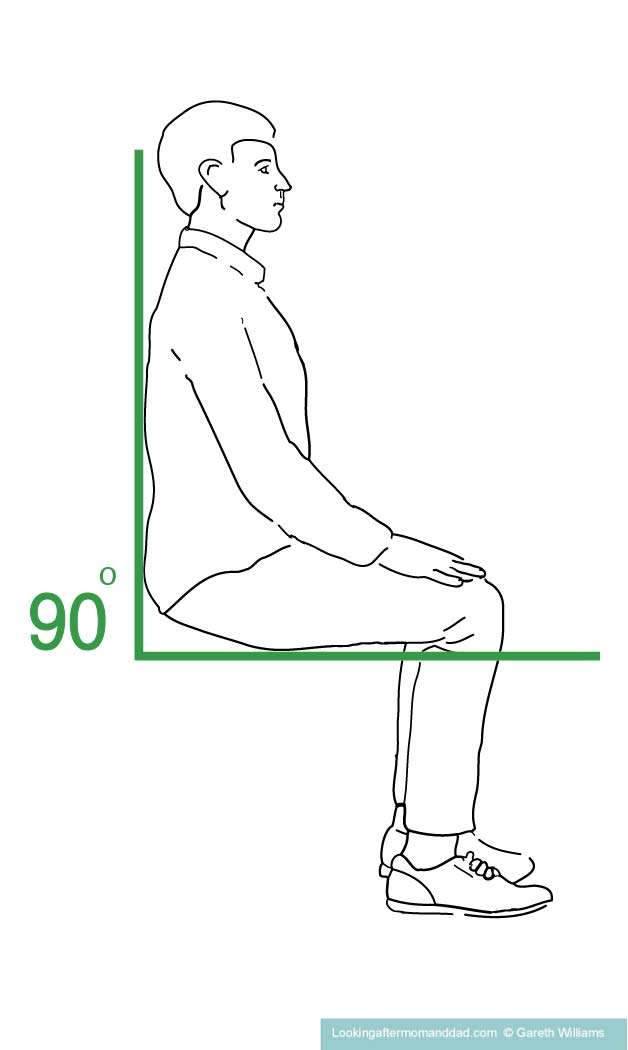
Illustration 1/
Illustration 1/, above, demonstrates the 90 degree rule for the sitting position.
You should not bring the knee, of the leg with the hip replacement, any closer to your chest than this – here the person is sitting, but if they were standing or lying down, the rule is the same.
In the upright seated position, your hip should stay above your knees – you should not have it lower.
In the seated position, you neither want to
- lean your torso forwards to the knees
- nor raise your knees
This does not mean that you cannot lie back and have your legs up, but the angle of the hip must be no greater than a 90-degree angle.
– if you are finding this 90 degree is a little tough to grasp, try to imagine that a person who is standing upright, has their hip at 0 degrees to the torso.
As the person lifts their leg lifts upwards, the angle of the hip increases, and once the thigh is at a right angle to the body (90 degrees), the hip is also – you are at the maximum amount that you are supposed to bend your hip during the precautionary period, post surgery.
A little side note – forward movement of the hip upwards is called flexion, and movement of the hip backwards is referred to as extension.
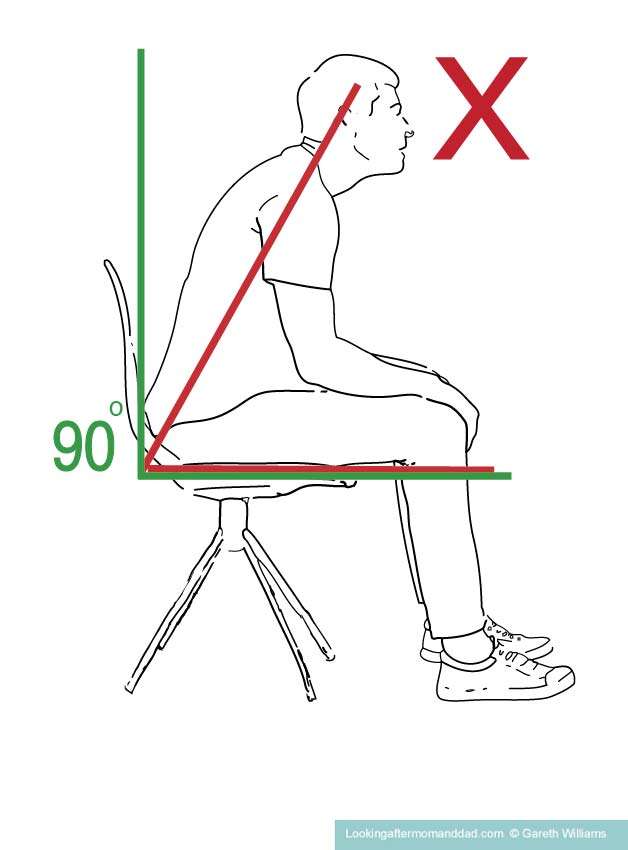
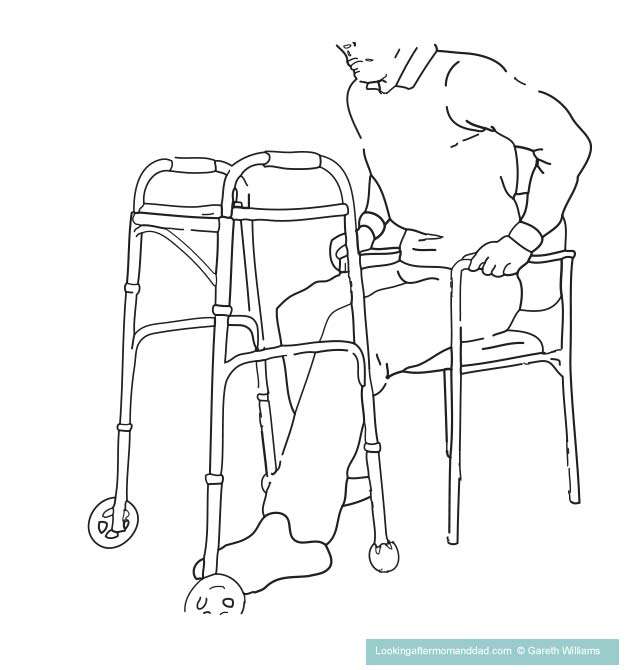
Illustration 2/
Illustration 2/, above, shows you not to lean forwards, even a bit, when seated.
This position will exert pressure on the new hip replacement, and with those muscles behind the joint in the buttocks having been cut, the hip could move backwards out of the joint, if you put pressure on it like this, before it has had time to heal.
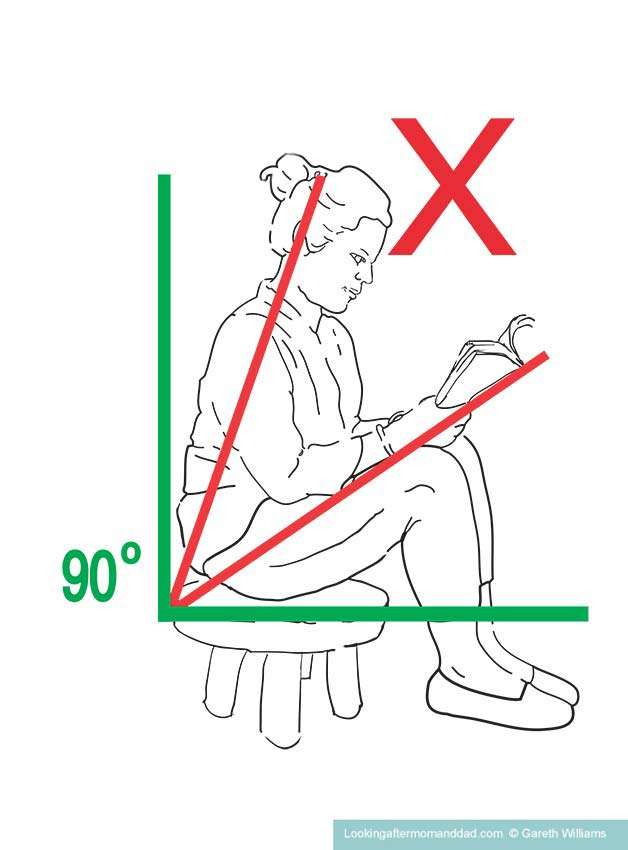
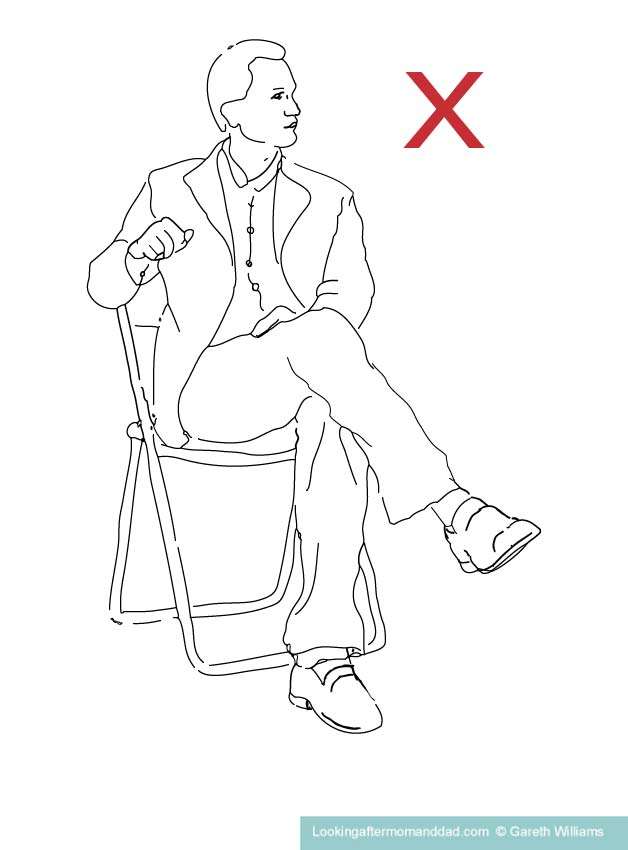
Illustration 3/
Illustration 3, above, demonstrates several things you cannot do after a posterior, or lateral, hip replacement –
- the bottom is lower than the knees
- the character is leaning forwards
This is going to create multiple problems for the sitter, their hip is at an angle of around 140 degrees – 50 degrees above the recommended maximum.
Firstly, there is the fact that the bottom, being positioned at a lower level than the knees in an upright seated position, is exerting too much pressure on the hip.
And secondly, as the sitter tries to stand up, they will have no choice in this position, other than to lean forwards to gain momentum to lift themselves upwards.
This is going to exert a huge amount of pressure on the hip joint, as it further reduces the distance between the knees and the torso, increasing the angle of the hip still more, and greatly increasing the chance of a hip dislocation.
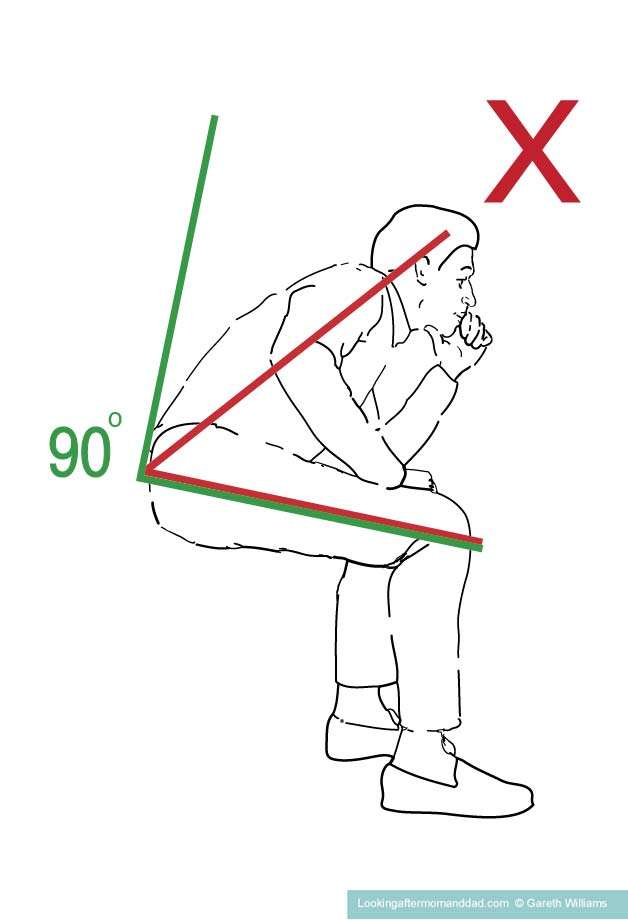
Illustration 4
In Illustration 4/, above, the hip is slightly higher than the knee, which is very good, but the position is then spoiled by the character is leaning forwards.
If the figure were sitting upright, and the hip would be at an angle of around 80 degrees which is pretty much ideal.
Illustration 5
Armrests
As, I keep repeating, you should not lean forwards when sitting down or standing up.
This is why armrests are recommended for the chairs you sit in.
Using a chair with armrests will help you to sit down, and to stand up, correctly while maintaining good posture, and help you not to lean forwards.
Illustration 5/, above, demonstrates that you should push up vertically from the armrests to stand.
Using the armrests this way for standing stops you from leaning forwards for momentum – your arms will provide the thrust to rise up.
Without armrests, you have no choice but to lean forwards to build the momentum (even if you push up from the seat with one hand), exerting extra pressure on the new hip replacement.
Sitting down, you can drop yourself vertically onto the chair, without leaning forwards.
If you want to know how to sit down using a walker, on a toilet with a raised toilet seat, but without armrests, I do have an illustrated article where you can find that – “How To Sit On A Toilet After Hip Surgery: A Detailed Illustrated Guide”.
The article above is not for patients who have had an anterior hip replacement, unless your surgeon has told you to use a raised toilet seat .
Illlustration 6/
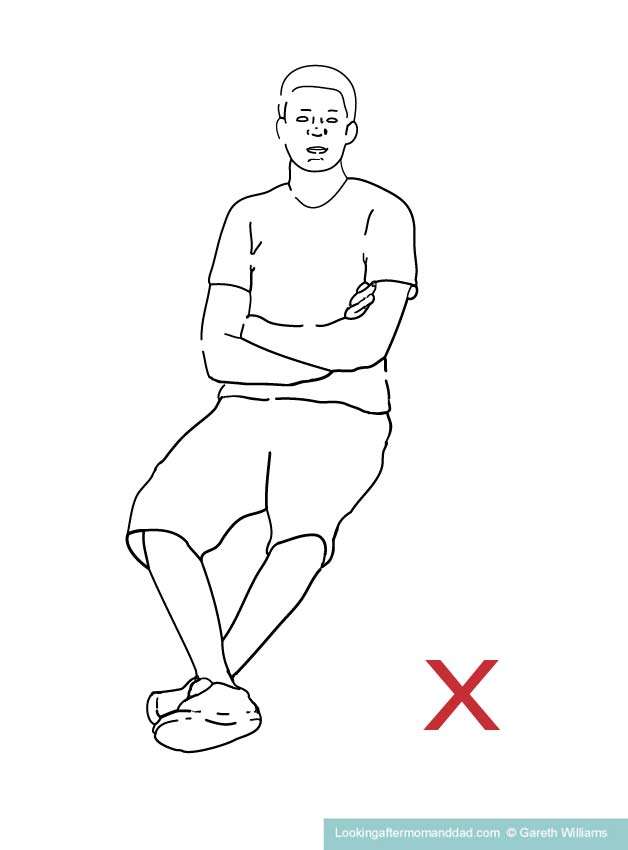
Illustration 7/
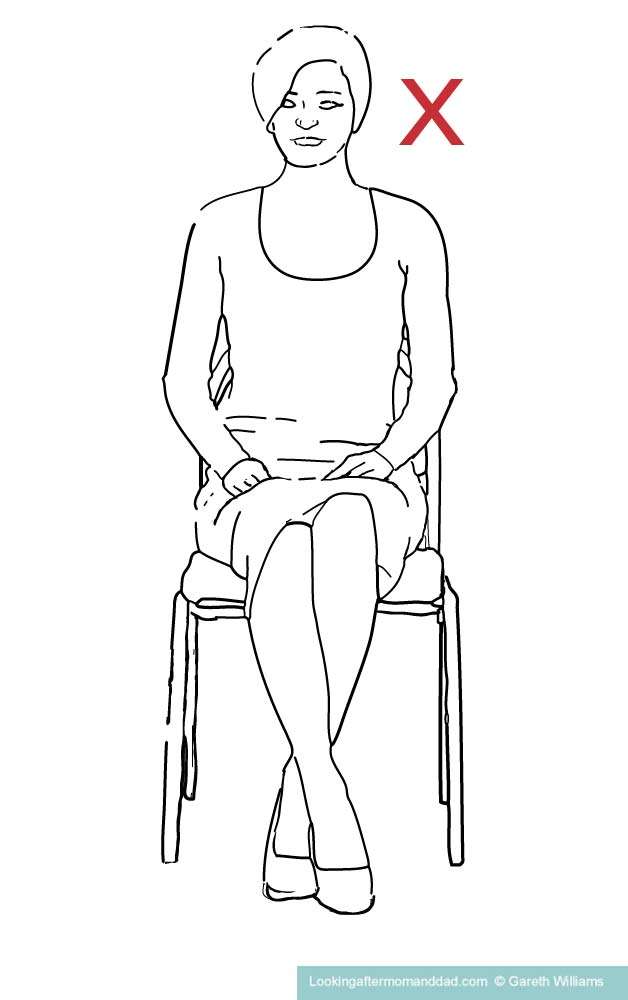
Illustration 8/
Don’t cross your legs after surgery
Illustrations 6-8 show seated characters in positions with their legs crossed, all of which are to be avoided.
For the first 6 to 12 weeks, while your muscles around the hip joint are still healing from the surgery, you will be advised to keep your legs straight, and also not to turn your feet inwards at all.
Both crossing your legs and pointing your toes inwards are advised against when you are in sitting, standing and sleeping positions as you will see below.
Sleeping positions
These precautions relate to both for the 90 degree rule, and twisting of the hip –
- do not sleep on your stomach – your feet will be forced to point in or out, which twisting your leg and hip creating stress on the joint
- sleeping on your back, is the best position for your hip to heal
- when you are sleeping on your back, do not put pillows under your knees to lift them up
- do though have a pillow between your legs when you sleep on your back to stop your toes pointing inwards, only let your toes point straight up
- you can sleep on your side, you must not sleep on the hip replacement side
- you also have to put a couple of pillows between your legs, if you sleep on your side to keep your hip at a neutral angle
- when sleeping on your side, do not bend your knees beyond the 90 degree point for hip
- don’t cross your legs in any position when you are either lying down, or sleeping
- do not lean and reach forwards to pull up covers in bed – always use a reacher
Standing positions
Here are a few precautions for when you are standing and walking –
- do not bend down, or lean forwards, to pick things up – use a reacher
- don’t point your toes inwards when you are standing – keep your feet pointing straight ahead or slightly outwards- this stops the hip from twisting
- do not pivot on the foot of your operated leg – to turn, you must do so with small steps
- when you are standing upright, don’t twist around
Positions to avoid after an anterior hip replacement
With an anterior hip replacement, there are a few precautions for up to 6 – 12 weeks.
Your surgeon will let you know when you are okay to stop observing the precautions.
During the surgery, some soft tissue ligaments are cut, and it may take as much as 4 months to heal, during which time you have to take care, but not anything like as much as with the posterior and lateral approaches.
The cutting is also not behind the joint, so the hip cannot come out the back.
In most cases there are no problems with leaning forwards, bending forwards, and sitting down or standing up.
Your surgeon may ask you may to avoid –
- flexing the hip beyond 120 degree for the first 6 weeks
- sit-ups
- twisting or pointing the leg and foot to the outside – even pointing your toes to the outside is too much, as this twists the hip
- when you turn, do not pivot on your leg – take a series of smaller steps
- extending your leg behind you, do not step backwards on your surgical leg, don’t extend your leg behind you, do not bend backwards
- do not push your hips forwards, or do a bridge
- if you sleep on your back, place a pillow between your legs to stop the hip from twisting
- don’t put a pillow under your knees if you are sleeping on your back
- do not let your knee twist outward in any sleeping position
- don’t cross your legs when sitting down or lying down
- if you want to sleep on your side, sleep on the side without the surgery, and put pillows between your legs to align the hips
- never lie, or sleep, on your stomach
- do not sleep in a recliner – it will cause the hip to become stiff and harder to straighten out
When can I sit in a normal chair after a hip replacement ?
Typically, if you have been told to observe the 90 degree rule, and not to bend down etc., you cannot sit in a “normal” chair, for up to 6 to 10 weeks
You may, once you have been given the okay to sit in a normal chair, decide to continue to use a chair with armrests until 3 months after your surgery, just to make sure you don’t strain yourself.
Using your arms to push, and you’ll maintain good posture when standing, and placing less stress on the joint, and letting it continue to heal.
Can I sit with my legs up after a hip replacement ?
You can put your feet up when sitting, but you need to make sure that you don’t break the 90 degree rule, i.e. make sure your hip isn’t at a 90-degree angle or higher.
Remember not to sleep with your feet up, and don’t put pillows under your knees when you go to bed, as this will put stress on the hip in these positions.
Can you use a recliner after a hip replacement ?
You have to ask your surgeon about using a recliner.
I have researched this question thoroughly and found many contradictory opinions, most of which are in relation to posterior and lateral hip replacements.
There are clinics which, flat out, say don’t sit in sofas, low seats, and recliners. While others say that recliners are fine.
The main issues with recliners relate to –
- the height of the seat – is it too low
- the type of reclining mechanism – there are electric and manual types which require different amounts of physical effort, to absolutely none
- does your recliner have the kind of lever so that you don’t strain yourself getting back to the upright seated position
- breaking the 90 degree rule when you stand up – this is if the seat is too low, or so soft that you sink into it
- can you scoot forwards to the edge of the seat without hurting the hip, to stand up – this is an issue if the seat is too deep, or again if you sink into it too much
- do you have strong enough arms to stand up from the seat, or are you going to hurt yourself by leaning too far forwards to stand
- does the seat have an electric lift mechanism – this can lift you to a standing position, and you won’t have any problems with bending to stand
- if you have a recliner with an electric lift mechanism, is the seat actually high enough when you are sitting in it, or is your hip too low in comparison with your knees
Getting in and out appears to be the biggest issue.
For anterior hip replacements, there are two precautions –
- do not sleep in them as it will lead to your hip stiffening up
- do not use them if they have a very low seat, and you are tall
Ask your surgeon if they advise a recliner in your case, and if they do, which type, and what seat height.
Sources for this article –
https://www.edwinsu.com/anterior-hip-replacement-post-op-instructions.html
https://www.newyorkhipknee.com/faqs/total-hip-replacement-faqs/
https://www.stefankreuzermd.com/anterior-hip-replacement.html
https://www.orthonewengland.com/wp-content/uploads/sites/156/2018/02/KENNON-DISCHARGE-INSTRUCTIONS-HIP-2016.pdf
I’m Gareth, the author and owner of Looking After Mom and Dad.com
I have been a caregiver for over 10 yrs and share all my tips here.