I can still remember before, and after, my 88-year-old mom’s hip surgery being pretty worried about how she was going to sit and use the toilet, without causing herself any injury to the hip replacement. But rest assured, it all went well, as we simply followed a few rules that we were told to try and stick to by the surgeon, and the physiotherapists.
To sit on the toilet after a hip replacement, you will want to –
- measure the height of the toilet seat and your knee
- raise your toilet seat to the correct height, so that you do not injure your hip when sitting
- learn to use a walker to take your weight off from the new hip when sitting, and to help you keep your balance
You can find all the instructions on how to do this, with illustrations, below.
CONTENTS - Overview & Quick Links
How to sit on a raised toilet seat with armrests ?
How to sit on a raised toilet seat without armrests ?
Do I need a raised toilet seat after hip surgery ?
Discuss what type of raised toilet seat you need with your surgeon
What is the correct posture for sitting after a hip replacement ?
How high should a toilet seat be after a hip replacement ?
For how long should you use a raised toilet seat after hip surgery ?
Helpful items for after a hip replacement
How soon can I take a bath after a hip replacement ?
Does Medicare cover raised toilet seats ?
Best raised toilet seats after a hip replacement
- Best raised toilet seats after a hip replacement for an elderly senior
- Best raised toilet seat after a hip replacement for a larger elderly senior
- Best raised toilet seat after a hip replacement for a younger senior in good shape
- Best raised toilet seats after a hip replacement for larger, younger seniors
How to choose a raised toilet seat ?
How to sit on a toilet seat after a hip replacement
Along with getting in and out of bed, lying in bed, sitting in a chair, and turning as you walk, sitting on a toilet, in the first weeks after surgery, is going to be one of the critical situations in which you need to know how to do things without causing injury to yourself.
The individual who has had the surgery, and the caregiver, both need to know how the sitting on the toilet, and the getting up from the toilet, are done.
In most cases, unless you have an unusually tall toilet, you are going to want to raise the height of your toilet seat.
To raise your toilet seat height, you are going to need some form of – you’ve guessed it – raised toilet seat.
If you don’t know anything about raised toilet seats, I have an article you can look at, “Types Of Raised Toilet Seats: All You Should Know Before You Buy”, and which goes into depth about all the types, with lots of different examples of each. In all, I discuss 13 different types of seats which you can use, and which are best for which situations.
If you don’t have the time for that, I have a much shorter section on the different types further along in this article.
A few points to remember when you start looking for a raised toilet seats are –
- you need to buy a seat with the correct weight capacity – you can check the weight capacities of seats in my article, “Raised Toilet Seat Weight Capacity: Over 180 Examples – the seat product numbers and weight capacities are listed, so that you can just paste those into your browser, and see all the different sites selling the model you want
If you’re thinking of using a bedside commode over the toilet, as a raised toilet seat, which by the way is the best solution we found for my mom, then there are a few points you want to consider –
- first, as with raised toilet seats, the models have different weight capacities, and I have another article with a huge list of bedside commodes, with their product numbers and weight capacities, “Bedside Commode Weight Capacity: A Guide With Over 140 Examples and Illustrations”
- to know how to use and set up a bedside commode over your toilet, you can take a look at this article, “Can A Bedside Commode Be Used Over A Toilet ?”
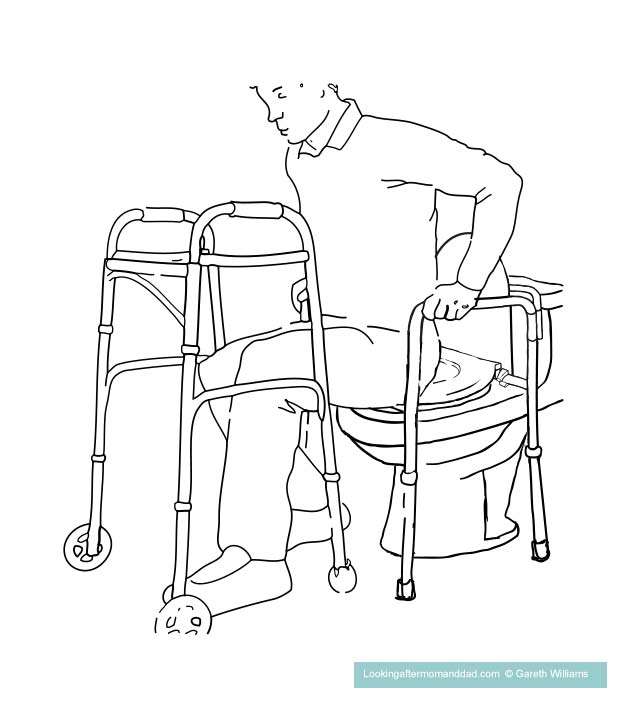
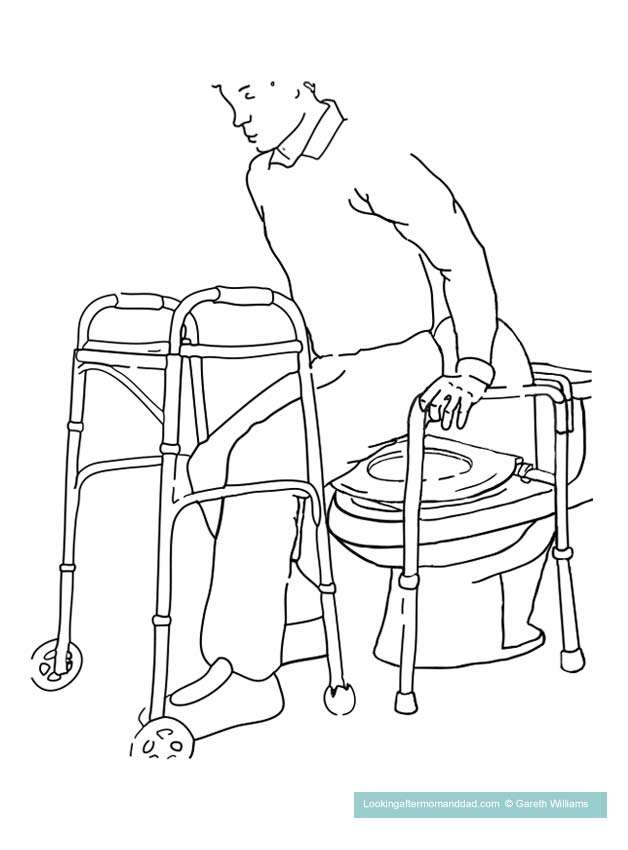
How to sit down on a raised toilet seat with armrests after a hip replacement
I personally only like raised toilet seats with armrests, unless you already have grab bars on the wall next to the toilet, or a safety frame on the toilet itself.
So, we’ll start with how to sit down on a raised toilet seat with armrests, how to stand back up, and how to use a walker to assist with balance and stability.
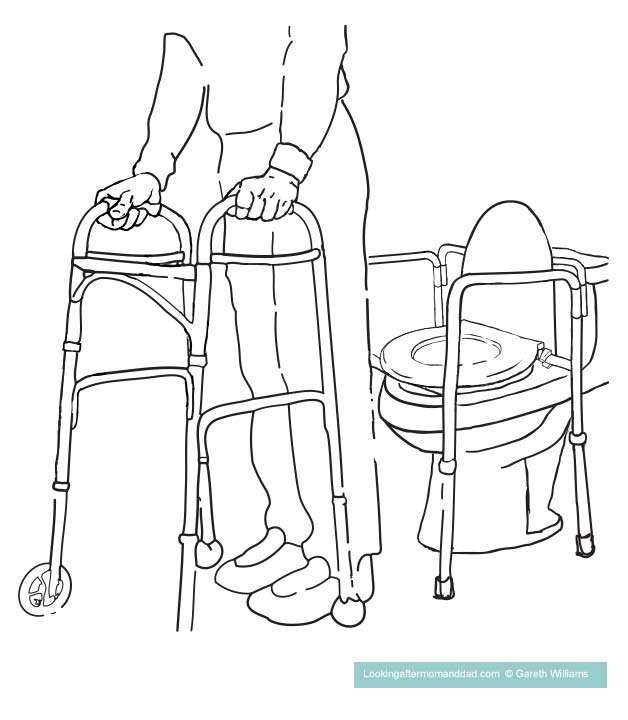
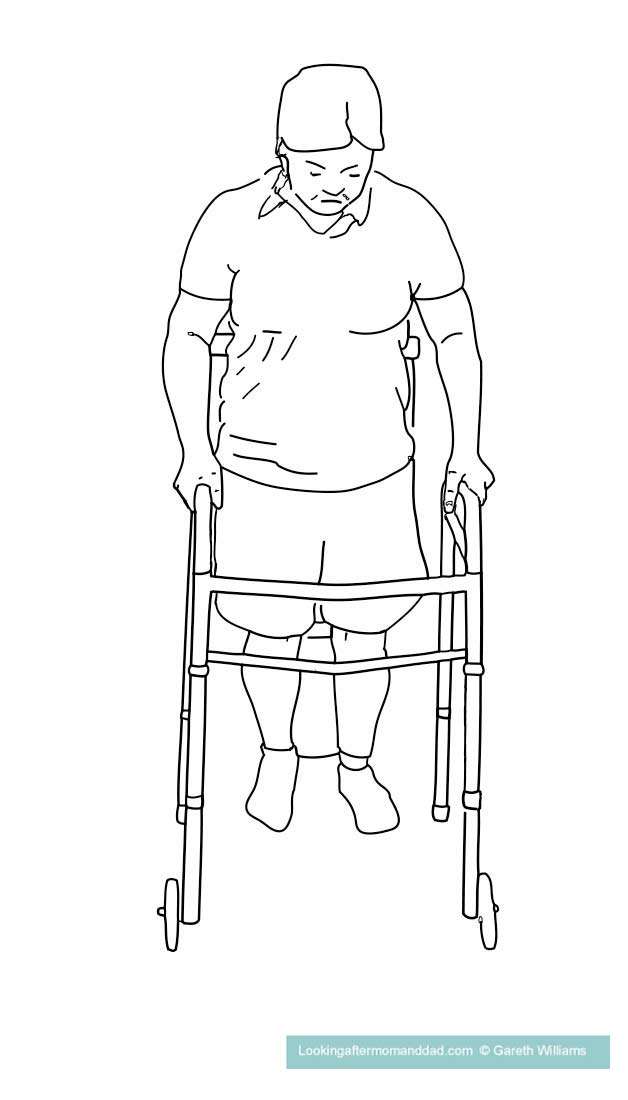
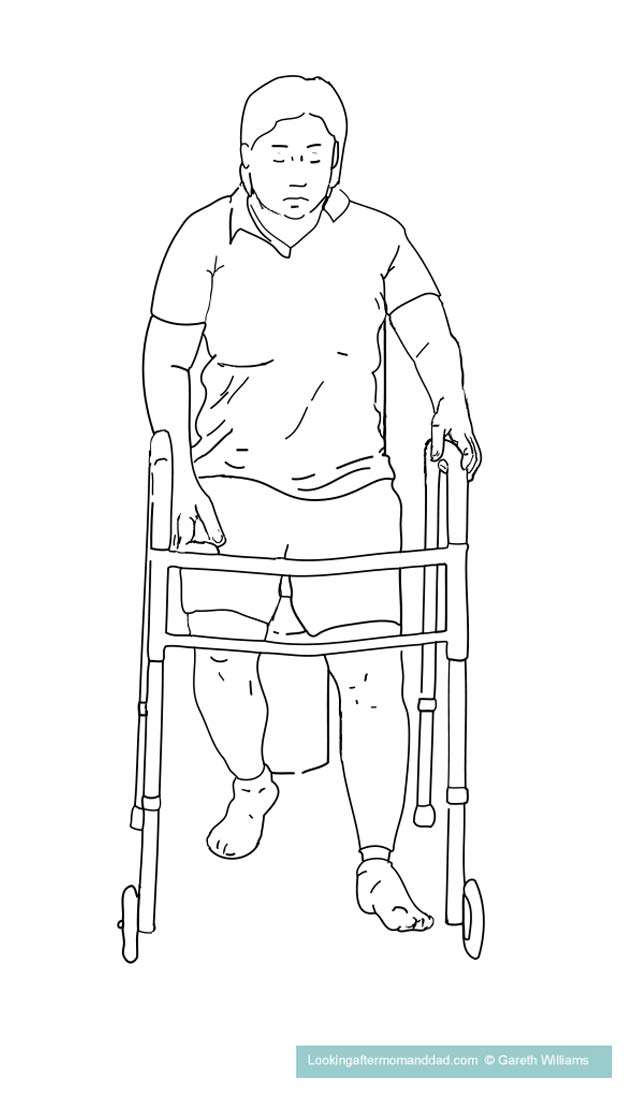
Step 1
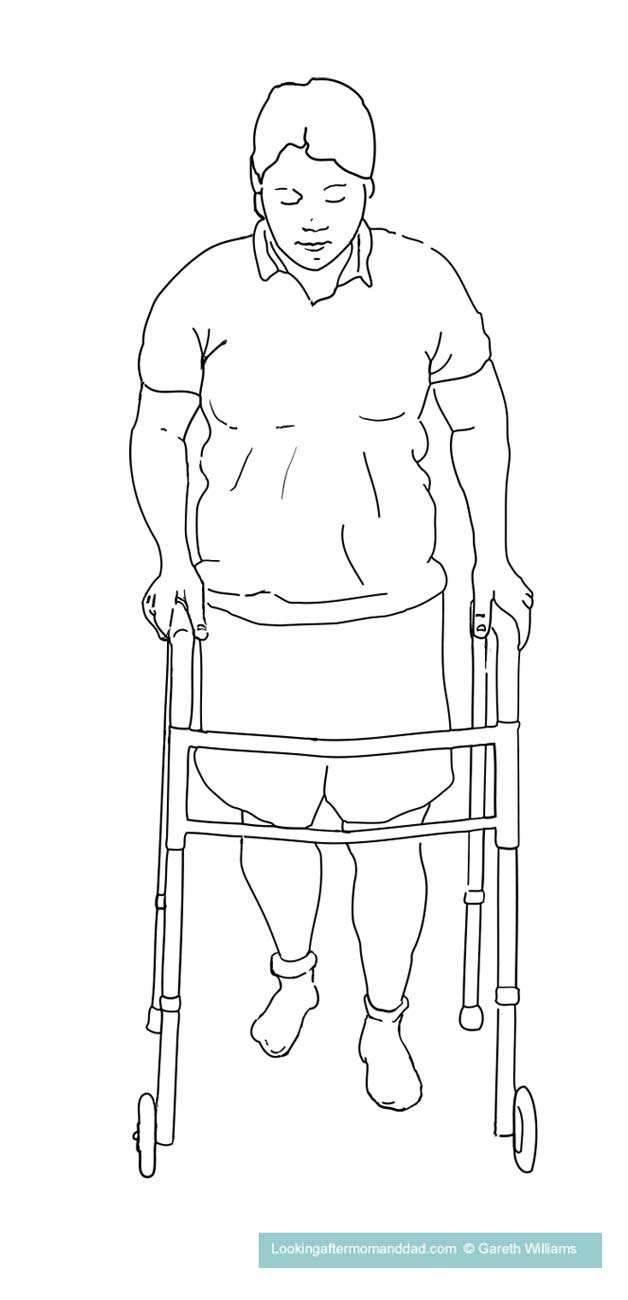
Back up to the raised toilet seat with the aid of a walker
Step 2
Stop backing up to the toilet when you feel the seat against the back of your legs.
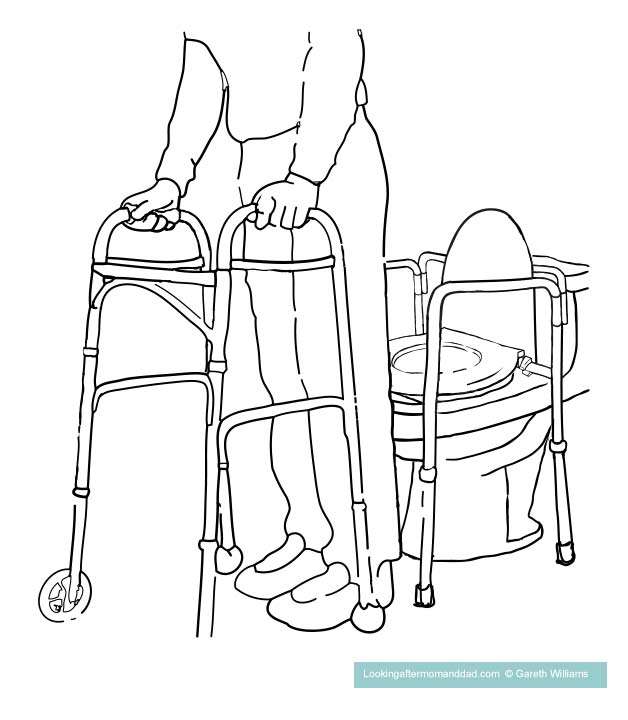
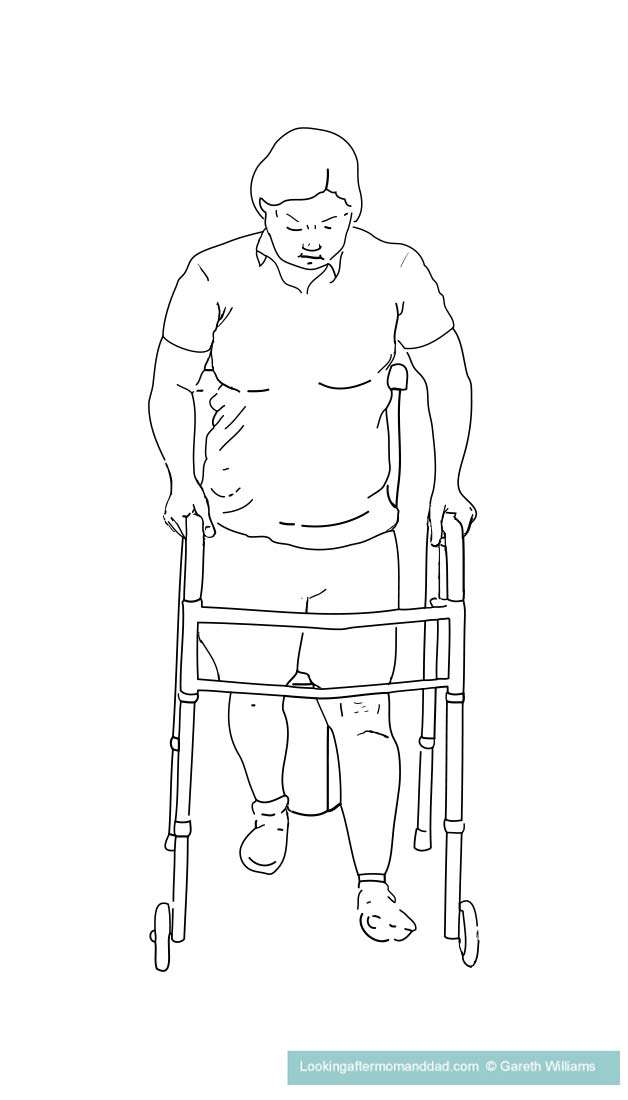
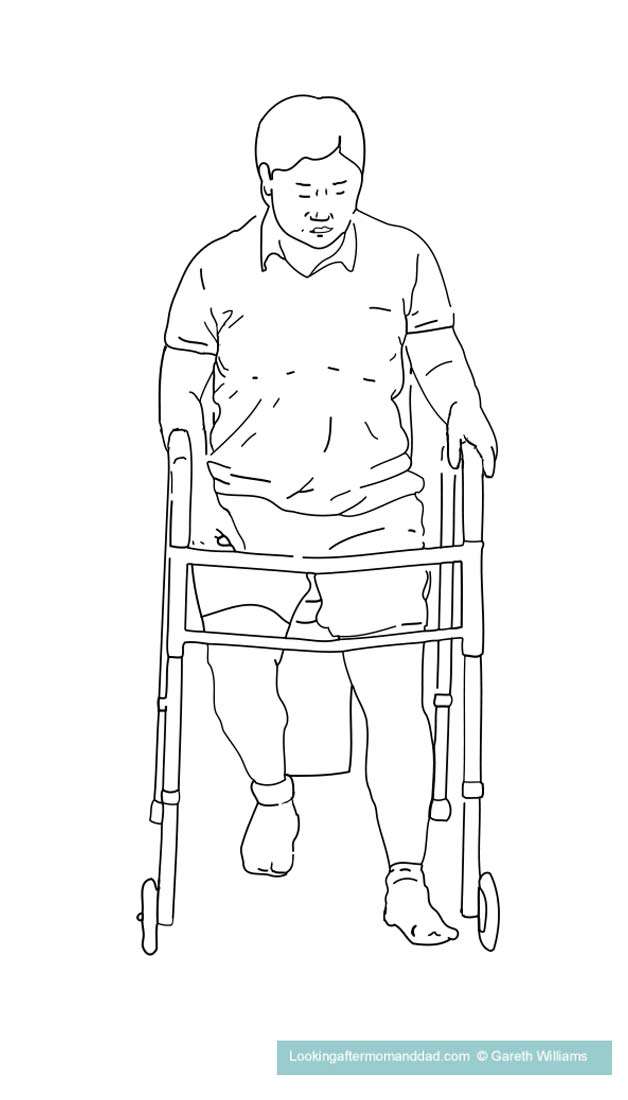
Step 3
If you have any clothes you need to lower, this is the time to do that with one hand holding on to the walker, on the side of the operated leg.
Now extend the involved leg slightly out in front of you.
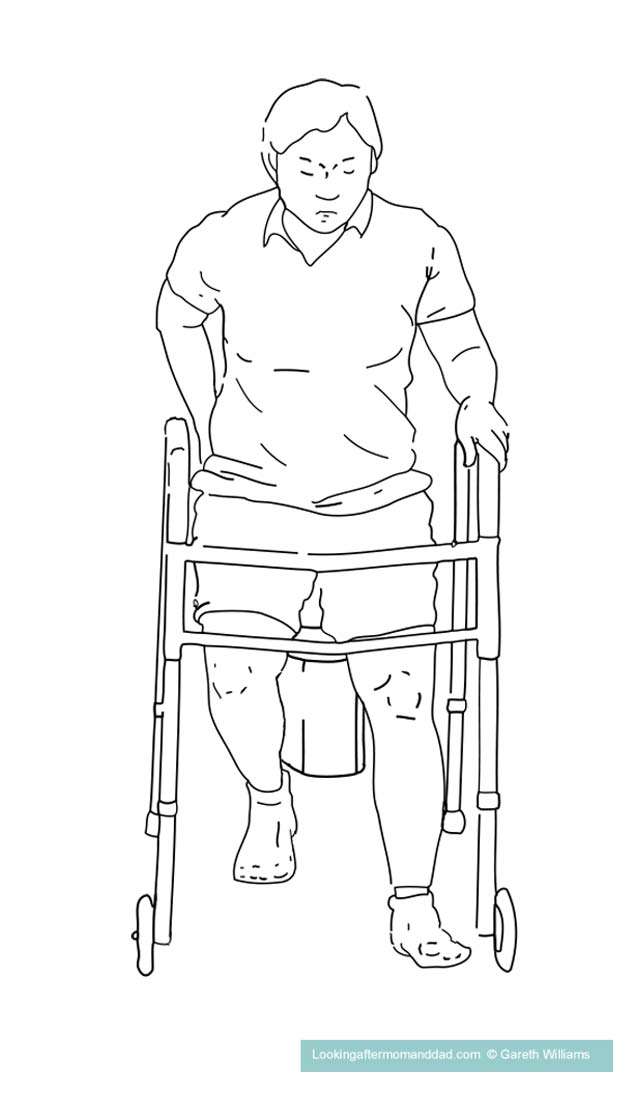
Step 4
Reach back for the armrest of the raised toilet seat on the same side as the operated leg.
Keep hold of the walker with your other hand until you have the hold of the armrest with the hand on the side of the operated leg.
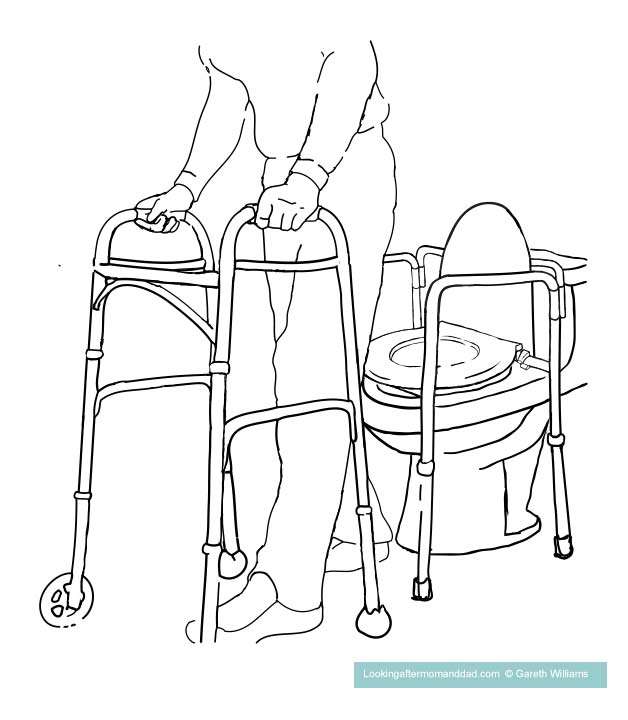
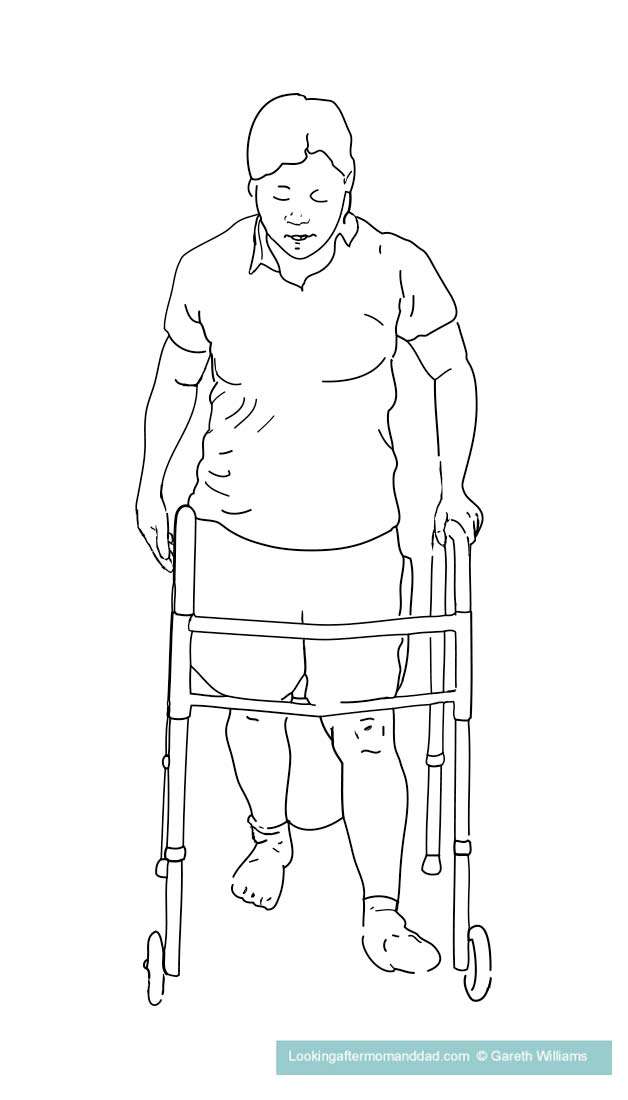
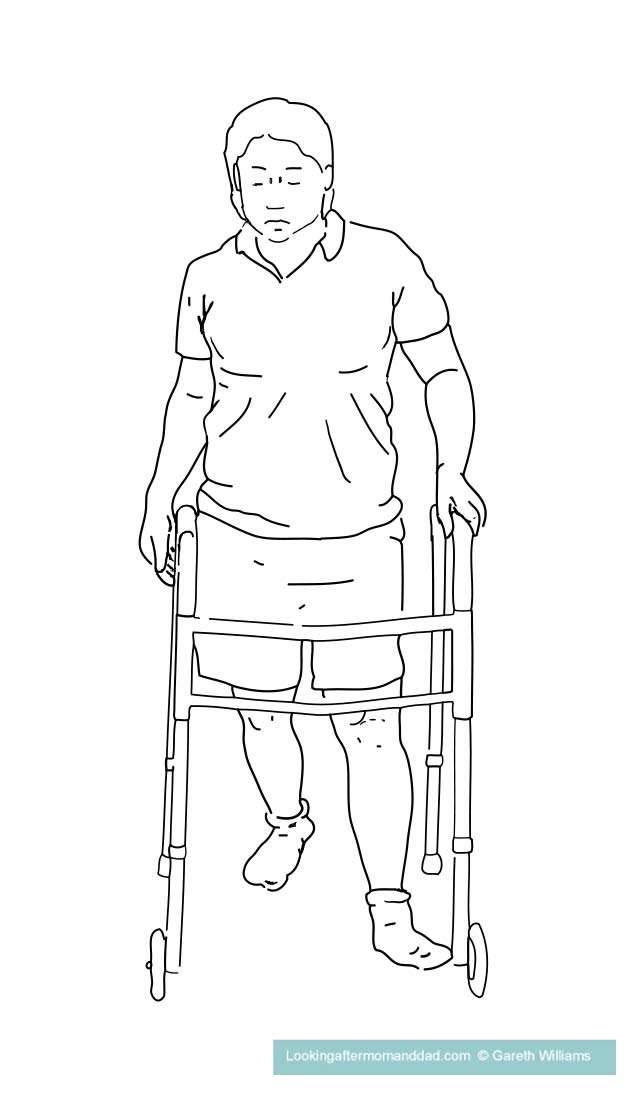
Once you have the armrest in your grip, you can let go of the walker on the side of the non-operated leg, and take hold of the armrest on the raised toilet seat on that side, and sit back onto the seat, using your arms and your good leg to take your weight.
As you sit down, do not bend forwards, just take your weight straight down through your arms keeping a nice straight back.
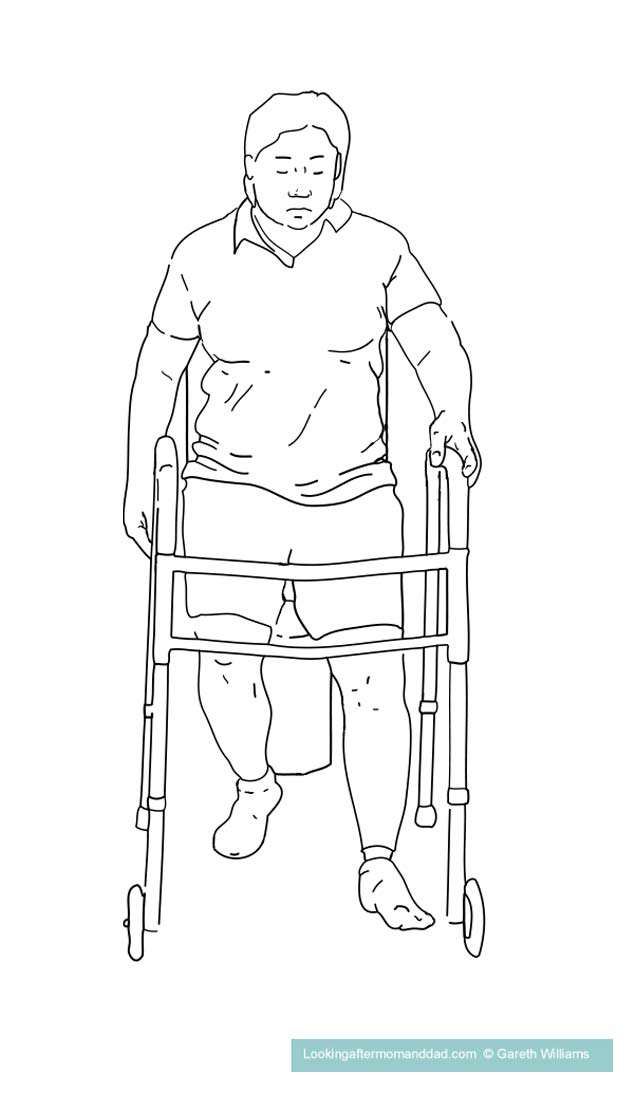
Step 5
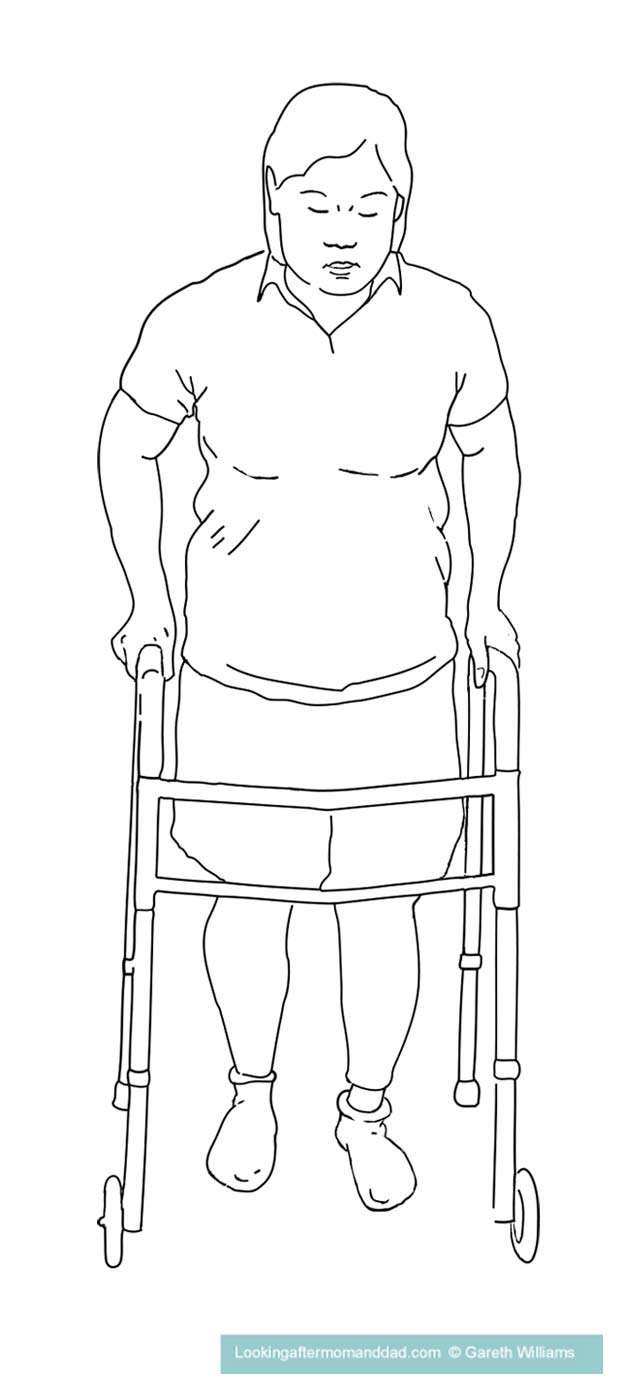
Sit on the front of the raised toilet seat.
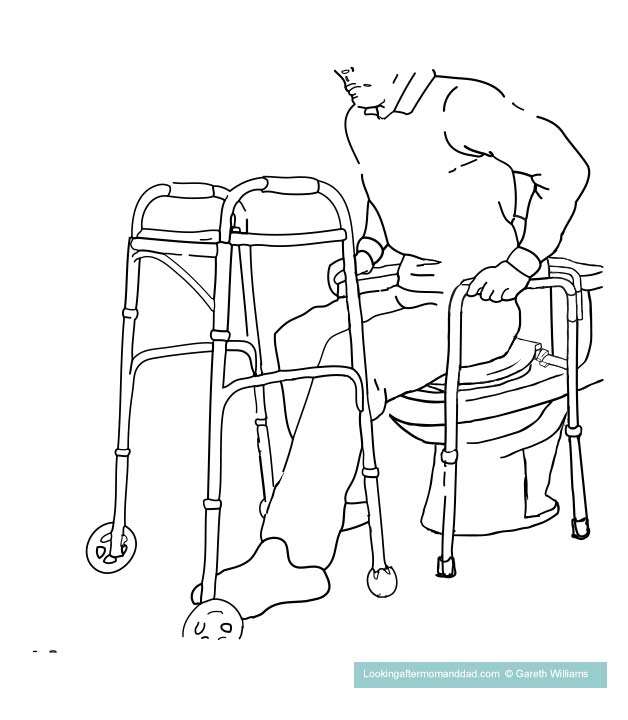
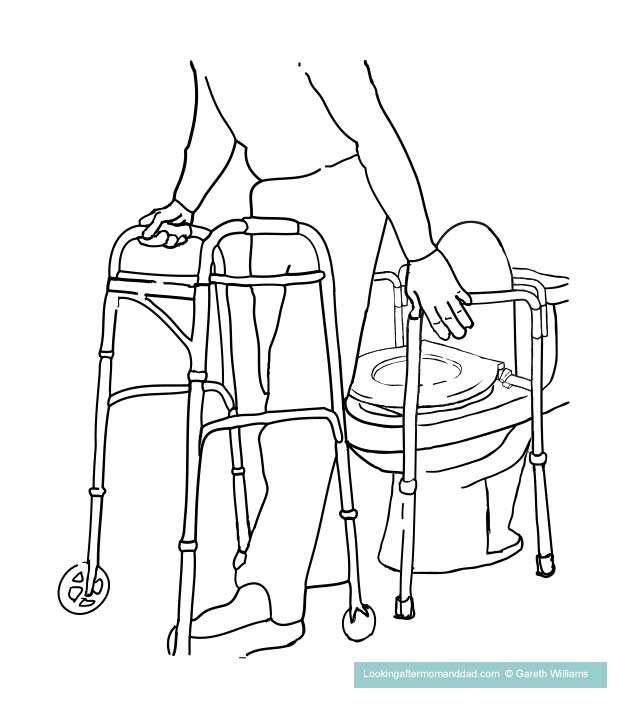
Step 6
Now use your arms to scoot your self back from the front edge of the raised toilet seat, so you are sitting on it properly – again don’t lean forwards to do this, just take your weight with your arms and use your good leg to help them push you back a little.
To stand back up
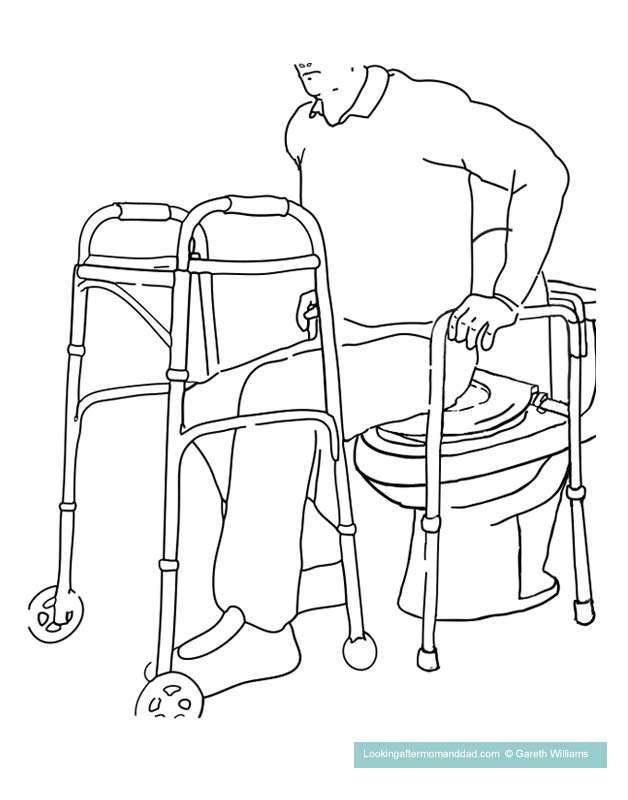
Step 1
Take hold of both armrests, and scoot yourself to the front edge of the raised toilet seat – keep your back straight, do not lean forwards, and use your arms to take your weight and to move you forwards.
Step 2
You are about to stand, but first make sure that your good leg is bent back slightly back and under you, so that your foot is tucked slightly further back than usual – the idea is that your good leg will be able to provide more force, from this position, without causing you to lean forwards and break the 90 degree rule as you stand, and it is tucked under you a little, and not so far out in front of you.
Step 3
Push up with your arms and good leg, keeping your back straight, and trying not to lean forwards.
Don’t push up with your operated leg, this should be extended out in front of you, and not load bearing as you stand up.
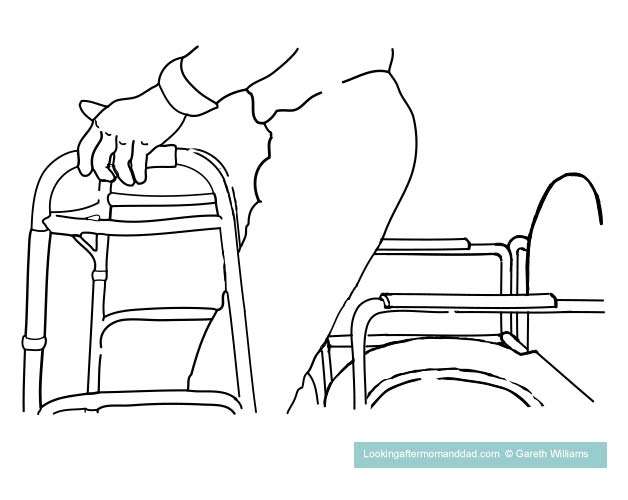
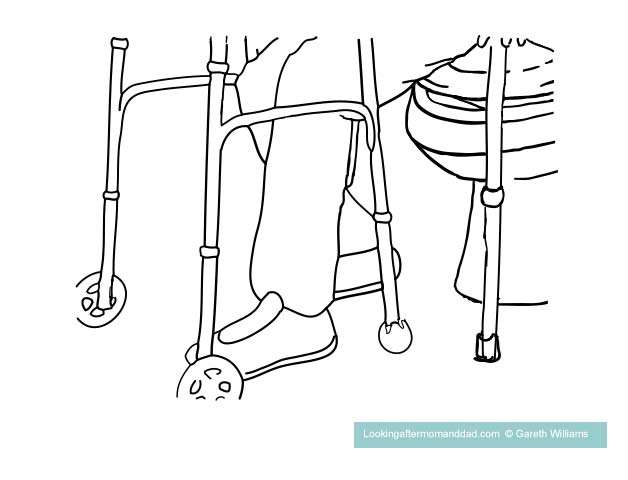
Step 4
As you stand, once you have fully pushed your arms up, take hold of the walker with your hand on the side of the operated leg, while you are still holding the armrest of the raised toilet seat with the other hand.
Step 5
You can now take hold of the walker with your other hand.
Step 6
With your hands now both on the walker, and your weight firmly on your good leg, you can bring the operated leg back into its normal position, instead of extended out in front of you, and stand normally, but taking care to not put much weight on the operated leg at first.
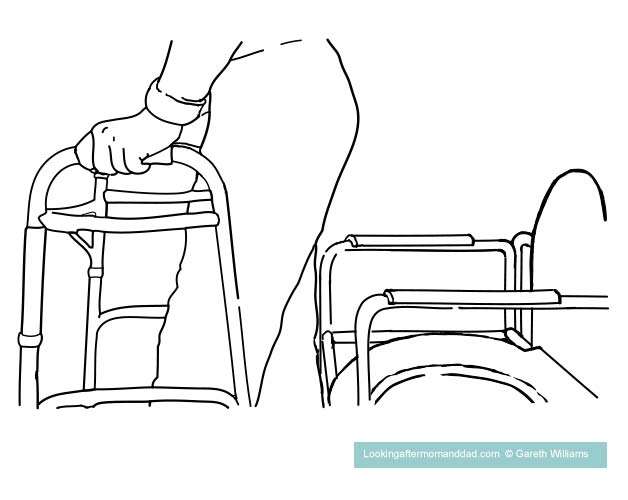
To sit down on a raised toilet seat without armrests after a hip replacement
Step 1
Back up to the toilet with the walker. Stop when you feel the seat against the back of your legs.
Step 2
Extend your operated leg in front of you.
Step 3
Keep hold of the walker with the hand on the side of your operated leg, and reach back to the raised toilet seat with your other hand.
Step 4
Sit back once you have your hand on the raised toilet seat.
You can let go of the walker once you are seated.
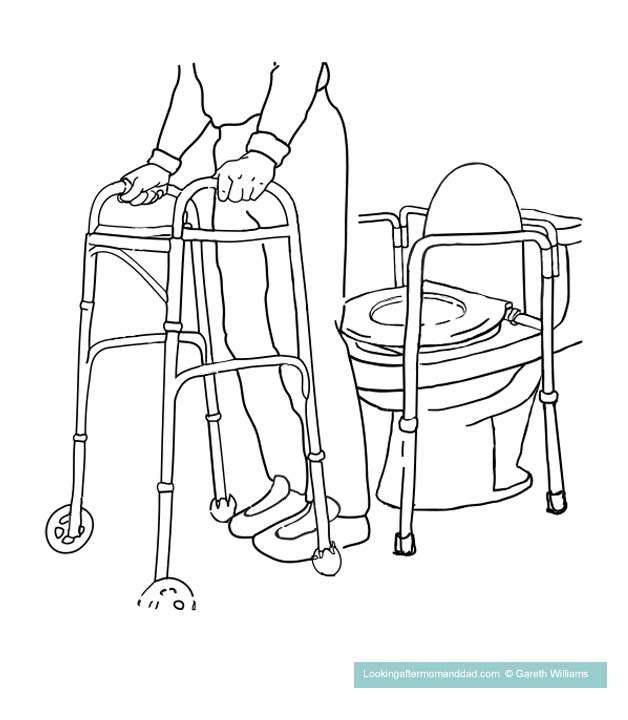
To Stand back up
Step 1
Put your hand, on the side of your hip replacement, on the walker, and scoot forwards on the seat towards the edge – as there are no armrests on this raised toilet seat you have to scoot forwards the best you can.
Step 2
Extend the leg of your operated hip out in front of you, and have your good leg tucked in under you, close to the toilet – this will help you to stand more easily – while keeping your back straight.
And keep the hand, on the side of your operated hip, on the walker.
Step 3
Now with your hand, on the side of your operated hip, is holding the walker, you can use your other hand to push up from the raised toilet seat.
Step 4
Stand up using your good leg, and your arm pushing up from the raised toilet seat – you should not be using your hip replacement to take your body weight when standing.
Step 5
Take hold of the walker with the hand that you used to push up from the toilet and stand using the walker.
Step 6
You will want to bring your extended leg and your good leg together again.
Do I need a raised toilet seat after hip surgery ?
If you have had a posterior or lateral hip replacement, the height of your toilet seat from the floor, is lower than the height of the back of your knee (where it bends) to the floor, you will need to get a raised toilet seat of some kind for after your hip replacement surgery.
If you have had an anterior hip replacement, and you are very tall, and your toilet is really low, or if you had complications you may need a raised toilet seat.
With both posterior and lateral hip replacements, some large muscles have to be cut to enter the implant into position.
So, the muscles in the area around the hip, after surgery, will be weakened with very little tone for some time, which can cause the joint to be less stable.
Due to this, there may be in certain situations, a small risk of dislocations – sitting down and standing up are two of these situations, and so to avoid this happening, one of the measures that can be taken, is to use a raised toilet seat if the level of the seat is below the level of your middle of the back of your knee when you are sitting.
Discuss what type of raised toilet seat you need with your surgeon
You will have plenty of time before you have your surgery to discuss with your doctor, or the surgeon, which kind of raised toilet seat they recommend in your particular case.
Before my mom’s surgery, which she had at 88 yrs old, we were actually given by the hospital a toilet seat which we were told to try at home, and to say it was useless would be an understatement.
It was so bad that we tried several types, just to see what they were like, and ended up buying a bedside commode as we knew we could at first use it by the bed at night, and as soon as my mom felt stable enough, I could put it in the bathroom for her, over our toilet.
We felt, that at 88 years old, Mom would need all the support of the bedside commode, with the big armrests and the four legs solidly on the ground.
After the surgery, while still at the hospital, we also received instruction, in how to sit down and stand up, to avoid any injuries.
The nurses and the physical therapists also took the time to show me how my mom should be using a walker to help her back up to the toilet, and then how to use it to sit down more safely.
You should be able to get all the same information from your doctor’s team as we did.
While you are looking for raised toilet seats, there is lots more that you can do to make your bathroom a safer place for seniors, or anyone else with mobility issues.
To find out all the different things you can do, to have an instant impact on bathroom safety, take a look here, “54 Bathroom Safety Tips For Seniors – A Helpful Guide”.
What is the correct sitting position after a hip replacement ?
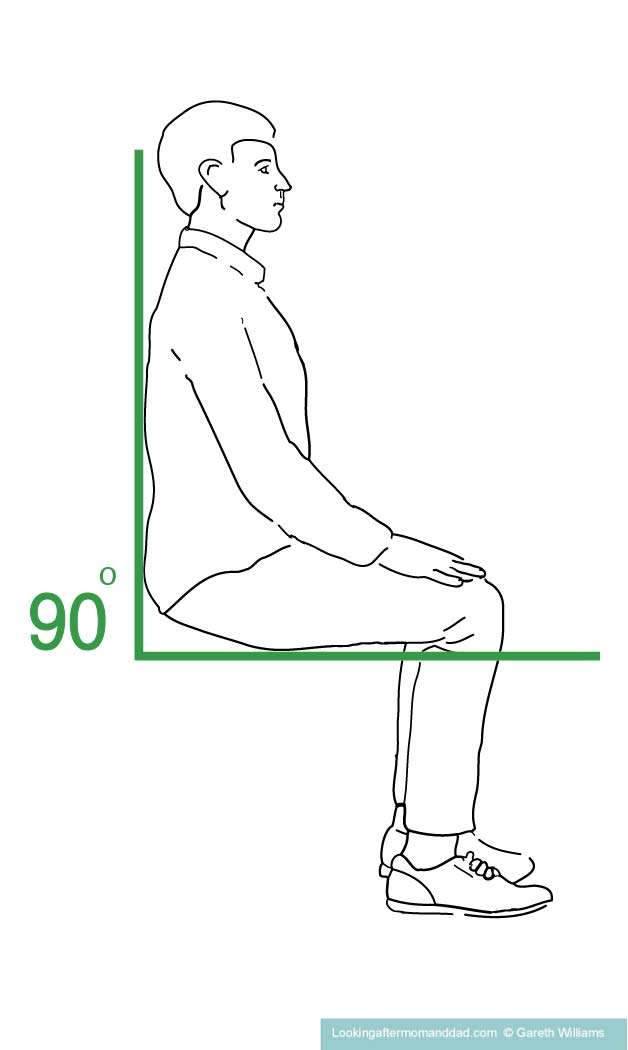
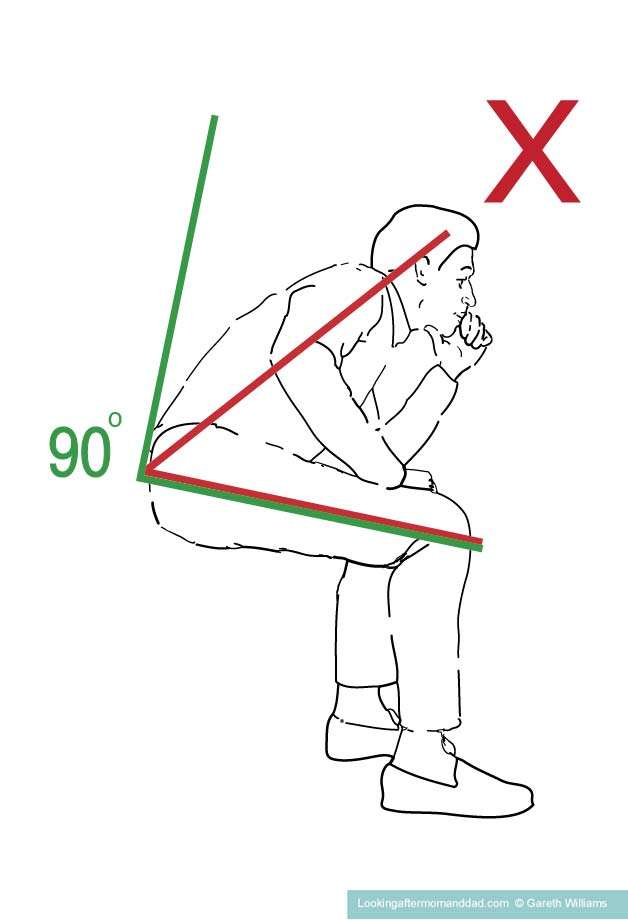
You may have heard of the 90 Degree Rule –
The 90 Degree Rule
Patients are advised after a posterior, or lateral, hip replacement, not to bring the knee of their operated hip/leg up close to their body, as there is a small risk that this can result in a dislocation of the new hip replacement, by placing it at too extreme of an angle for healing – the hip is not yet fully stable behind, so you do not want pressure to build there.
You should avoid moving your leg in any way that your hip is at an angle of 90 degrees, or more.
You can see an illustration of the rule below, this is as close as your knees should come to your chest – you should neither lean forwards to the knees, nor lift the knees upwards, as you are going to be breaking the 90 degree rule – at least during the healing of the weakened muscles, and while you are still having physical therapy to build those muscles back up.
The 90 degree rule for sitting applies more to individuals who had a “posterior approach” (back of the hip), or “lateral approach” (side of the hip) surgery, than to those who had an “anterior” (front of the hip) surgery.
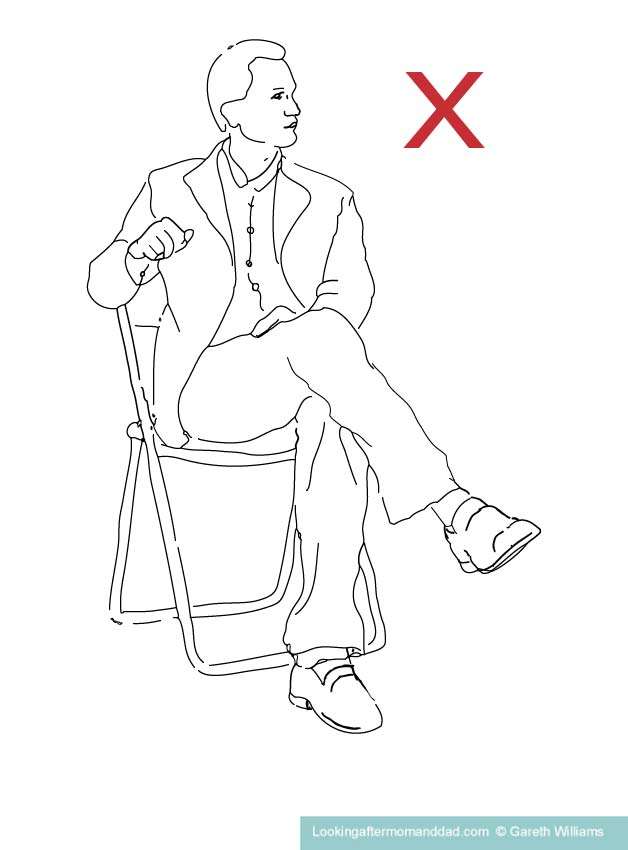
Here are a few more positions and movements you will probably be told to avoid.
Avoid bending forwards when you are seated, as this will bring the chest closer to the knees.
You can see this below.
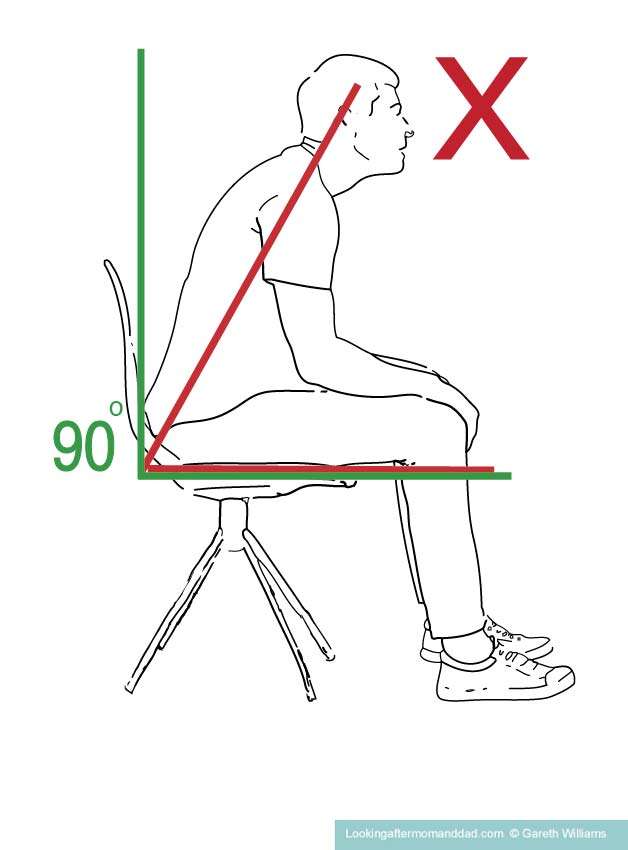
Do not lean forwards like this
One situation, in which you may be at risk of breaking the 90 degree rule, and which is to be avoided, is sitting on a low seat – lower, that is, than the height of your knees.
Another, is when you bend forwards a great deal, and both are combined when you sit on a low chair or stool, because, as a rule, the lower the seat you sit on, the more you will need to lean forwards to be able to stand up.
You have to lean forwards to gain the momentum required to rise from a low position. And as you lean forwards you are even further increasing the angle of the hip, which can greatly increase the chance of a dislocation of the hip, as you stand.
This is why, you will, most likely, be advised to use seats which are lower than the level of the back of your knee.
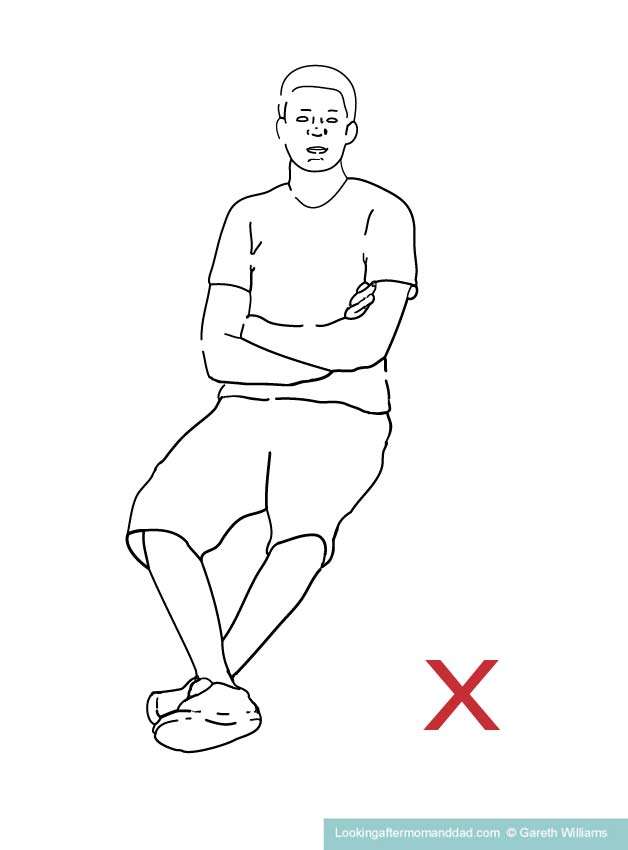
In the illustration below, you can also see that with your bottom lower than the knees, it is very difficult to sit, and to maintain a good distance between the knees and chest.

Do not sit with the knee above hip height or lean forwards
Here is another position to avoid in the illustration below.
As you see, the hip is slightly higher than the knee, which is fine, but the character is leaning forwards, and this is, again, is increasing the angle of the hip way above 90 degrees.
The torso, in this situation, should be no closer than the 90 degree line, and ideally if he were sitting upright it would be very good as an angle for the hip.
Don't lean forwards like this
Armrests can be extremely helpful with sitting and standing correctly.
Armrests, as well as providing support when you sit and stand, will make it much easier to sit and stand correctly, especially to stand.
With the support of armrests, the user can push up vertically as they stand, keeping their back straight, and vitally not lean forwards.
Without armrests, you have to lean forwards to build the momentum to get to the standing position.
The armrests, effectively, help you to maintain the correct posture to avoid injuries.
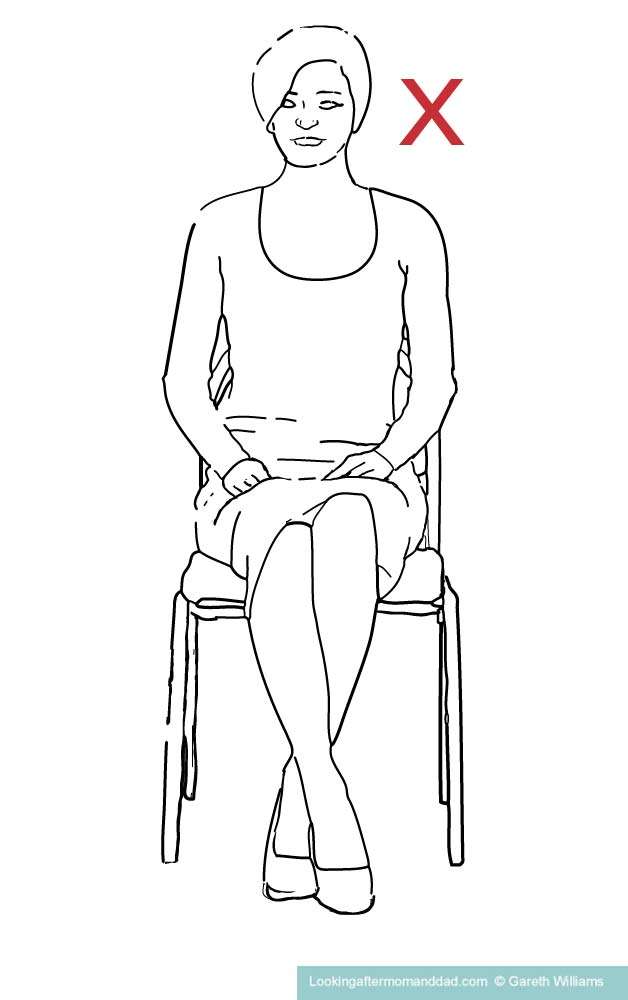
Don’t sit with your legs crossed after surgery
Another position to avoid after surgery, when you are sitting, is the crossing of your legs.
In the first few months after surgery, your doctors are going to want you to keep your legs straight, not to cross them, and not to turn them inwards in any way.
How high should a toilet seat be after a hip replacement ?
The height of the toilet seat should be high enough that the angle of your hip to your back is no less than 90 degrees – at least a right angle. In other words, the seat should not be lower than your knee.
You need to measure from the floor to the back of your knee, to the point that it bends, and make sure that your toilet seat is at the least the same height from the floor, if not an inch or so higher.

To learn more about how to measure a toilet for a raised toilet seat, you can read my article explaining how to check and measure the toilet to see if you have an elongated or a standard toilet bowl – that’s important too – and how to measure yourself to find out how much of a lift your seat needs.
That article is here – “How To Measure For A Raised Toilet Seat”.
For how long should you use a raised toilet seat after hip surgery ?
Ask your doctor this question, as each case is different.
In general, people use a raised toilet seat for somewhere up to 6 to 10 weeks, but it will depend on the strength and age of the patient – in my mom’s case it was quite a lot longer, but she was 88 and has arthritis in both legs. When I say longer, she is in fact still using it, as she finds life easier with it, but she can use a toilet with no raised toilet seat without any risk, it is just less comfortable.
But only your doctor knows how you are progressing, and what your capacities for recuperation are.
Some older adults, sufferers of arthritis or other mobility issues, may just find that the raised toilet seat makes the toilet much easier to use, regardless of whether their hip replacement is still a little fragile.
Helpful items for after a hip replacement
After hip replacement surgery, there are a number of devices, or aids, which if you have them, can make your life considerably easier.
Here are some of the most useful devices –
A walker – as we already discussed, you are going to need a walker to help to maintain your balance, and to keep your weight off your new hip, when walking, sitting, and standing.
- pouches for your walker
A bedside commode – if the bathroom is too far from your bedroom, you may for the first week wish to use a bedside commode, which can be put anywhere you need to have a toilet that is within an easy distance.
A raised toilet seat – this will allow you to sit more easily and safely on your toilet.
Dressing Aids – as you are not going to be able to bend down, cross your legs, or twist for quite some time, there are a number of inexpensive little devices that will make dressing much more comfortable, and also a lot safer, as you will not need to bend or twist if you use these.
- elastic shoes laces
- long handled shoe horn
- reacher / grabber
- sock Aid
- dressing stick
Bathing aids – the bathroom is going to pose quite a few problems, and you will need to make it as safe to use as possible. For this there are a number of items which can make showering easier, or if you have a bath transfer bench, bathing.
You cannot take a bath sitting in the bottom of the bathtub, but you can sit on a bath transfer bench, as it is too risky to step in and out of the bathtub, or sit in the bottom for the first 3 months after surgery.
- bath transfer bench
- long handled sponge
- hand-held showerhead
- non-slip rubber mat
- grab bars
How soon can I take a bath after a hip replacement ?
This is another question that you should really be asking your doctor, as they know all the specifics of your case.
In general, patients are advised not to sit in the bottom of a bath tub, or to try to get in and out of a tub, for approximately 12 weeks.
If you have a bath seat which you can transfer to on a transfer bench, and on which you can stick to the 90 degree rule, the time period that you have o wait will be less. But again, you need to be asking your doctor.
Getting in and out of a bath to sit in the bottom of the tub, though, is normally at least 12 weeks as there are so many risks involved and a lot of bending in positions which could cause a dislocation – especially how will you keep your hips at a 90-degree angle, or more, with your legs flat on the bottom of the tub.
It is also impossible in a tub, not to stand up without bringing your knees way too close to your chest for the hip replacement – the risk of a dislocation is far greater there.
Also, the stepping in, and then sitting down involves too much turning and twisting which cannot be done safely without a transfer bench.
Does Medicare cover raised toilet seats ?
Medicare Part B, which covers durable medical equipment for use in the home, does not cover raised toilet seats.
For Medicare, raised toilet seats are not “medically necessary”, and are classed as “not primarily medical in nature” and are comfort items.
Although Medicare Part B doesn’t cover raised toilet seats, it does cover bedside commodes who qualify under its guideline, which can be used as raised toilet seats.
I have another article all about Medicare Part B coverage for a bedside commode, the guidelines and qualification for bedside commodes, which you can read here – “Does Medicare cover bedside commodes ?”
Since the fall of 2020, Medicare Advantage Plans, or Medicare Part C, have been allowed to offer extra benefits for durable medical equipment which helps with chronic conditions, and you may find some plans which do cover raised toilet seats.
Types of raised toilet seat
If you need an article which covers the types of raised toilet seats, how they install on the toilet, what the advantages of each type is, with lots of different examples of models, the weight capacities of the different models etc., I have all of that in an article here – “Types Of Raised Toilet Seats: All You Should Know Before You Buy”.
Below is the quick version, with illustrations of the different types of raised toilet seat, and a brief explanation of what type of situation, and to whom, the different seats are best suited.
Raised toilet seats for a temporary situation
The two seats below are really only meant to provide a portable solution if you are staying somewhere other than your own home.
The bubble type seat is very basic. You lift the toilet seat, place the bubble seat on the bowl rim and push down hard.
The Clip-On seat actually fits on to your toilet seat. You squeeze the open end, and then pop it into the opening of your toilet seat and release it. It clips in place.
Neither seat is really suitable for anything more than a brief period of use, and I would never have someone with a hip replacement or who is elderly use one without grab bars.
The seats tend to wobble quite a lot, and as there are no bolts or clamps, I would never have my mom use a seat like either of these.
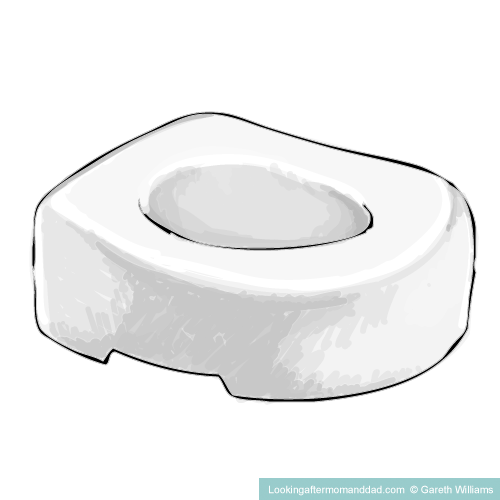
Bubble seats
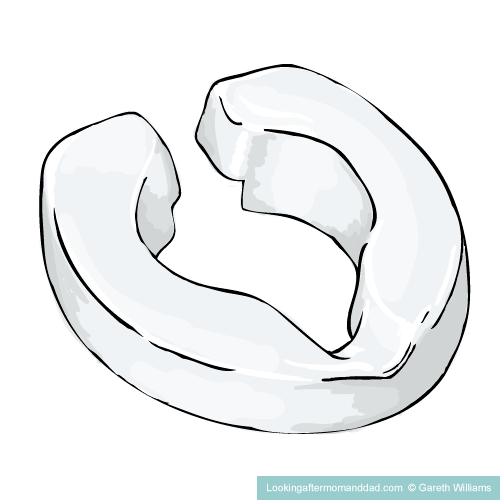
Clip-On seats
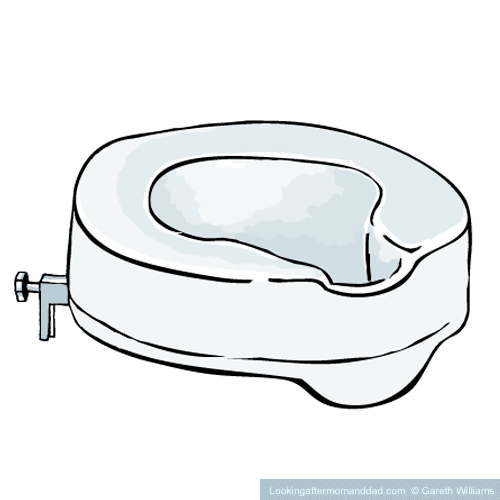
Raised toilet seats for medium term use
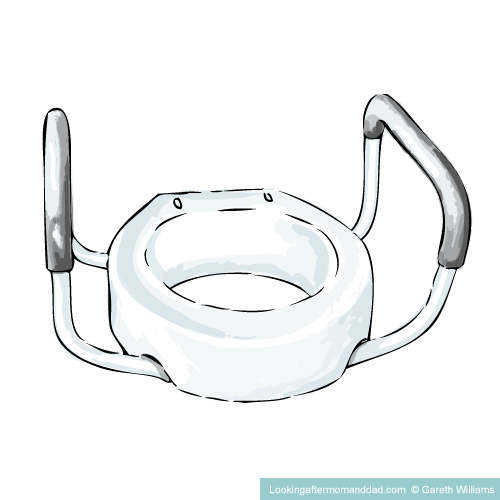
The three types of seats below, are more solid and somewhat more solidly secured to the toilet, by various plastic clamping systems, flanges and bolts, but they still are prone to moving around.
Some only fit either an elongated, or a standard shaped toilet, and although a lot of the front locking toilets say they fit all toilet shapes, this is not always true.
But at least the Clipper seats and the Front Locking types of seats can be bought with armrests.
I think these seats may be fine for younger users who have a one good leg and no problems with arthritis, balance or any other mobility problems, but I don’t feel good about suggesting them for long-term use by an elderly adult.
Seats with side fixings
Clipper Seats

Front locking seats
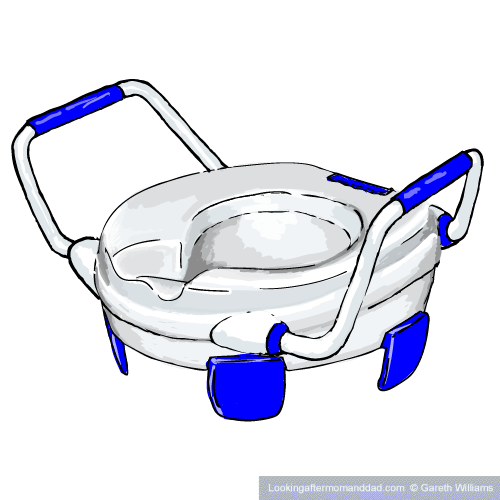
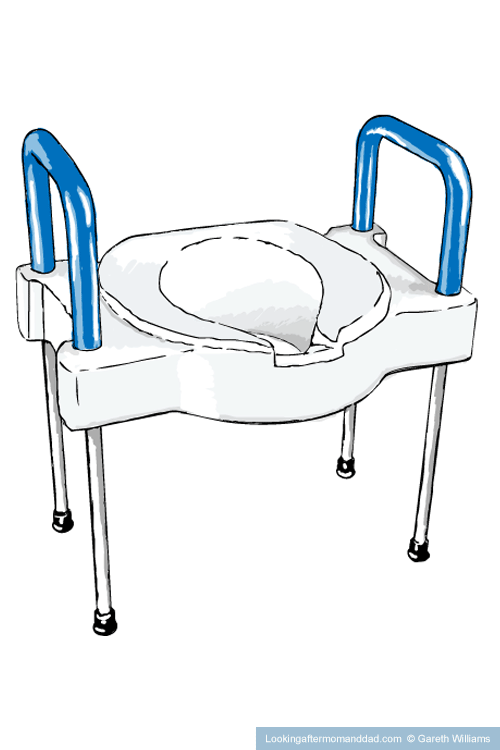
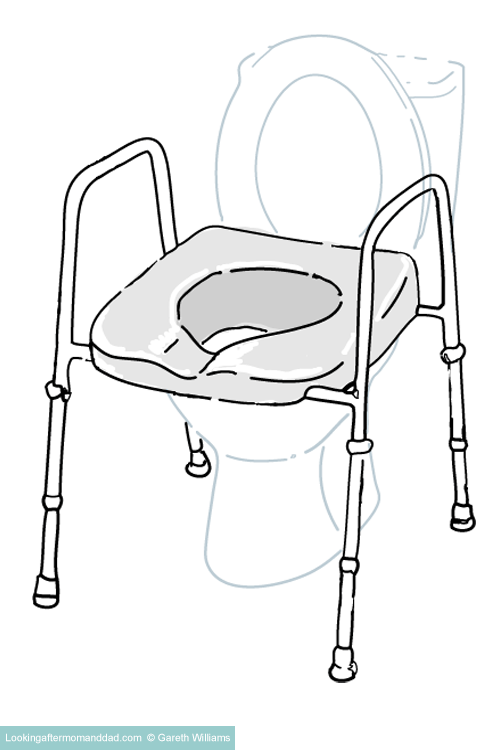
The Raised toilet seats for long-term use
The following models are my preferred models for the elderly.
I think all the following types of seats, which have been designed for long-term use.
The Tall Seats of course will need some kind of grab bar, or safety rail.
A toilet plinth or base riser may be rather over doing it though if you are not looking to raise the toilet permanently.
I prefer the last four types, as I think they are the most solid –
- raised toilet seat with legs
- safety frames with raised toilet seats
- 3-in-1 bedside commodes
- toilet plinth or base riser
Raised toilet seats with legs, safety frames with raised toilet seats, and 3-in-1 commodes can be whisked away from the toilet in seconds, if you have a guest, whereas the risers have to unbolted along with the seat and lid, which then have to be put back, which is not the quickest endeavor.
Larger individuals who require a raised toilet seat with a weight capacity of 400 lb, or more, and with more than 2 inches in extra height, have only one option, a 3-in-1 style bedside commodes.
Big John toilet seats (the only other option with a high weight capacity), can only add 1 or 2 inches to the height of a toilet.
3-in-1 commodes also offer a range of choices for seat width, aperture size, and elongated seats and seat height which you simply won’t find to the same degree with any other type of raised toilet seat.
Tall seats
Risers
Raised toilet seats with legs
Safety frames with raised toilet seats
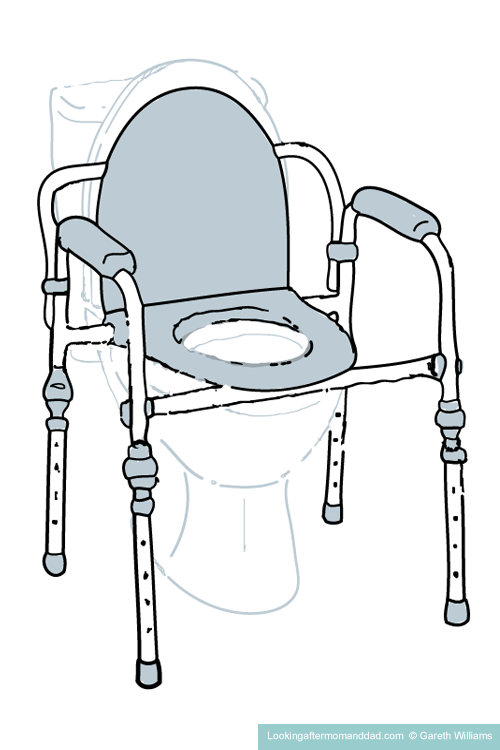
3-in-1 bedside commode
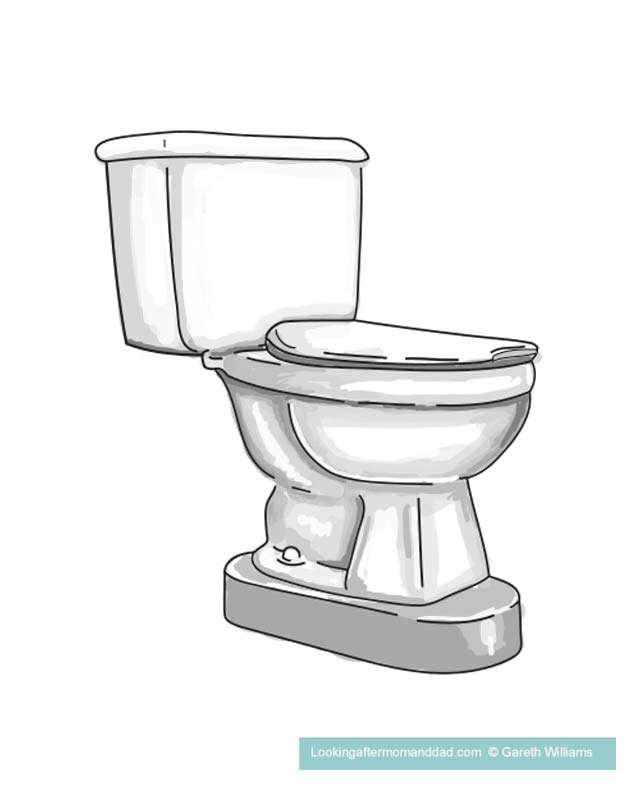
Toilet Plinth or Base
Best raised toilet seats after a hip replacement
For a more in depth explanation of my choices below, the different specifications of each seat and how they help, rather than just the lists of seats below, I have an article on the topic here – “Best Raised Toilet Seats After A Hip Replacement”
I have selected what I think are the best models of raised toilet seats for a variety of different circumstances, depending on the age and weight of the user –
Best raised toilet seat for the elderly after a hip replacement
1) OasisSpace Stand Alone Safety Frame and Raised Toilet Seat – with a hard seat
2) OasisSpace Stand Alone Safety Frame and Raised Toilet Seat – with a padded seat
3) PlatinumHealth Ultimate Raised Toilet Seat (safety frames with raised toilet seat)
4) Medline – basic 3-in-1 Bedside Commode
5) Nova Drop-Arm Padded Commode
6) PlatinumHealth GentleBoost Uplift 3-in-1 Commode and Shower Chair
Best raised toilet seat for larger elderly seniors (over 350 lb) –
1) Nova Heavy Duty Drop-Arm Commode 8583
2) Drive Deluxe Bariatric Drop-Arm Commode 11135-1
Best raised toilet seat after a hip replacement for a younger senior in good shape
Risers –
The risers are made for either a standard, or an elongated toilet bowl, they are not universal, so you need to pick the correct model for your toilet.
All of these risers have a weight limit of 300 lb.
I would only get a model with armrests, without armrests, you are going to need to have grab bars, and that means more work and more cost.
All the risers available are 3 1/2 inches tall, so if you need more height than that, you will need to either buy one of the types I discussed above – bedside commodes, or safety frames with raised toilet seats.
The two Vive risers are 1 inch wider between the armrests, but the armrests, or as they call them, handles, are the same height – 9.75 inches – on all four models.
1) Nova 3.5″ raised toilet seat riser with arms (standard), Model No. 8344-R
2) Nova 3.5″ raised toilet seat riser with arms (elongated), Model No. 8343-R
3) Vive 3.5″ toilet seat riser with handles (standard), Model No. LVA1071S
4) Vive 3.5″toilet seat riser with handles (elongated), Model No. LVA1071E
Front locking raised toilet seat with armrests
Front locking raised toilet seat are a less sturdy than the risers, which are actually bolted to the toilet itself, but for a younger person with one good leg and a walker, they should be fine –
1) Vive raised toilet seat with detachable handles, Model No. LVA10011
2) Drive Medical Premium plastic raised toilet seat with armrests, Model No. 12013
3) Nova raised toilet seat with detachable arms, Model No. 8351-R
If you are going to purchase a seat of this type, it would be prudent to also install grab bars alongside the toilet, so that you have something to hold onto which is actually bolted down.
Best raised toilet seats after a hip replacement, for larger, younger seniors (over 300 lb)
For a younger senior who needs a raised toilet seat which takes over 300 lb in weight, I would look at the same Heavy Duty Bedside commodes which I have already listed above for elderly seniors –
1) Nova Heavy Duty Drop-Arm Commode, Model No. 8583 – 500 lb weight capacity
2) Drive Deluxe Bariatric Drop-Arm Commode, Model No. LVA1071S – 1000 lb weight capacity
How to choose a raised toilet seat
To choose a raised toilet seat which is suitable for you, or a loved one, you want to consider
Points about the equipment itself –
- does the user need any particular features ?
- the size and weight capacity of the seat required
- does the intended user know how to sit using a walker ?
- is it for long, medium, or short-term use ?
Points about the intended user –
- the space where it is going ? Clutter ? Access ?
- the state of health of the user
- any specific medical conditions
You need to ask yourself a certain number of questions to help refine your choice of raised toilet seat –
The bathroom space
- how much room do you have ?
- can it be more clutter-free ?
- will the user need extra grab bars, and a walker ?
What kind of shape is the user in ?
- how strong ?
- how old ?
- are there balance and mobility issue ?
- are they overweight ?
- are they really tall ?
- are they very nervous ?
Are there specific medical issues ?
- are there medical issues which will affect your choice ?
- do you need to talk to the user medical provider ?
- are there visual impairments ?
- is this for a post surgery rehab ?
These are just a few of the questions which will hopefully get your thinking juices flowing, and help you along.
If you want to learn more, you can go to my post, “How To Choose A Raised Toilet Seat ?”.
The post has lots more information on the features that you want to consider on the different seats, and a free Raised Toilet Seat Checklist full of questions that you can use to help you make your choice.
Frequently asked questions
What is the tallest toilet seat available ?
The tallest toilet available is a wall mounted toilet from Kohler.
The Kohler Veil Wall-hung Toilet K-6303 has a maximum bowl height of 28 1/2 inches from the floor.
The tallest standing toilet is the Signature Hardware Bradenton Elongated Toilet, which has a bowl rim height of 21 inches without a seat from the floor.
How high are raised toilet seats ?
Raised toilet seats which attach to the toilet come in a range of heights from 1 to 6 inches.
Freestanding raised toilet seats, known as safety frames with raised toilet seats, or 3-in-1 commodes (these can also be used), typically have an adjustable seat height of 17 to 21 inches, with taller models available, up to 27 1/2 inches.
What sizes do raised toilet seats come in ?
Raised toilet seats which attach to the toilet come in a range of heights from 1 inch up to 6 inches.
With regard to the size of the toilet bowel shape, you can get raised toilet seats which fit only elongated toilets, only round/standard toilets, and seats which are universal.
You can also buy raised toilet seats in safety frames with standard models, or 3-in-1 commodes, which range in seat height from 17 to 21 inches – which have adjustable legs and are placed over your toilet.
The tallest model is the OasisSpace Safety frame with elevated toilet seats, which have a top seat level of 27 1/2 inches.
Who benefits from a raised toilet seat ?
Anyone who has difficulty sitting down, or standing up from the toilet, can benefit from a raised toilet seat.
This will include those with arthritis, Parkinson’s, balance issues, reduced mobility, a lack of muscles, visual impairments, and anyone in rehab from a knee or hip surgery.
Can a raised toilet seat be too high ?
If a toilet seat is too high and the user’s feet are hanging in the air, and not flat to the floor, the blood circulation in the legs can be affected, causing the user’s feet to go to sleep, and lead to falls when standing.
Secondly, for those with issues with constipation, a lower seat is more conducive to passing a bowel movement.
Do raised toilet seats fit any toilet ?
A freestanding elevated toilet seat should be able to be place over most toilets, as they typically have a maximum seat height of at least 21 inches from the floor.
Raised toilet seats which attach to the toilet, depending on the particular model, can be for –
- elongated toilets only
- round toilets only
- universal, fitting both types of toilet type
How do you raise an existing toilet ?
Your first option is to use a “toilet plinth”, or “toilet riser”, to raise your toilet up from the floor.
The most popular models are –
Medway Easy Toilet Riser
Toilevator
Thetford toilet riser
Easy Toilet Riser
The risers come in a range of sizes, 2 to 4 inches, and are inserted under your toilet.
The second option is to raise your toilet seat you can use a raised toilet seat, which either attaches to your toilet bowl, or is a frame with a seat in it which is placed over your toilet.
Why do people use a raised toilet seat ?
The main reason for using a raised toilet is to reduce the distance a user has to bend down to sit on
the toilet, to reduce any pain and to increase the user’s stability and safety.
Hopefully, using a raised toilet seat will also help build a user’s confidence and increase their independence if it allows them to use the toilet without assistance safely.
I’m Gareth, the author and owner of Looking After Mom and Dad.com
I have been a caregiver for over 10 yrs and share all my tips here.