As my mom’s carer, I learned a great deal about how you can make hip replacement recovery easier, and faster, for the patient. So I have put together over 100 tips, that I think will make things go much more smoothly, and hopefully I can make it easier for you, in your recovery.
Tips for hip replacement recovery –
- you can begin even before you have had your surgery
- get yourself into the best shape you can before your surgery
- lose any excess weight, quit smoking etc.
- strengthen your leg and hip muscles as much as you can
- set your house up so that you don’t strain yourself after surgery
- buy any assistive devices you will need
- find the people to help you in the first few weeks after surgery
- rest as much as you have been told to, so you don’t strain the injury
- follow all the precautions you have been given after surgery
- do your exercises as instructed, and as frequently as you can
CONTENTS - Overview & Quick Links
Hip Replacement recovery tips –
- What to do before hip replacement surgery
- What to do after hip replacement surgery
- Posterior and lateral hip replacements
- Sitting tips
- Sleeping tips
- Standing and walking tips
- Icing and exercise tips
- Helpful devices for posterior and lateral approach hip replacement
- How to get medical equipment and assistive devices for free, or cheap ?
- Multipurpose devices
- Toileting, bathing and personal care
- Dressing
- Anterior hip replacement recovery tips
Home care after hip replacement surgery
- Home care for posterior and lateral approach hip replacements
- Home care for anterior approach hip replacements
What not to do after a hip replacement ?
Hip replacement recovery week by week
Hip replacement recovery tips
Prior to your hip surgery, you can take the same steps to preparing the foundations toward a good recovery, for each of the different types of hip replacement.
What to do before hip replacement surgery
1. Go on a diet if you are overweight.
2. Build up the strength as much as you can in your leg and hip before your surgery – you will find a full set of exercises here – https://www.durangojointreplacements.com/patient-forms/hip-exercises-before-total-hip-surgery.pdf.
3. This is a good time to quit smoking – anything which helps you go into your operation healthier is a benefit.
4. Make sure you have someone to drive you to appointments.
5. Find a carer to help you after your surgery.
6. Learn to sit down and to stand up using a walker – helps you maintain stability.
7. It’s also a good idea for your carer-to-be needs to know how to use the walker correctly for sitting and standing.
8. You will want to learn how to –
- get on, and off, the bed, using a leg lifter, or if you have a carer they can use a towel to swing your legs up
- transfer into a shower to a shower seat, using a walker
- use a bath transfer bench, or bath board, with or without the aid of a leg lifter
Learning to do this can help to eliminate silly mistakes, which could cause painful injuries.
9. A pair of flat shoes with a low, flat heel with a good capacity for shock absorption – something like a tennis shoe is going to essential. You can slip on shoes, or get shoes with elastic laces, which you tie up before the shoes are put on, then put them on with a shoe horn in the same way as you would a slip-on shoe.
Preparing the house
10. You will be wiser living on just one floor of your home during your recovery, at least for a few weeks, to avoid using the stairs.
11. Cook meals in advance and freeze them – you can simply heat them up in the oven after your surgery.
12. If you have a microwave, and you can put it at a nice height for access without bending, use that to heat up meals, rather than an oven, so you won’t have to bend down.
13. Buy about a month’s worth of canned foods, and non-perishables.
14. Group all you buy in one place at a good height – between your waist and your shoulder height.
15. Set up an area in the kitchen with –
- a couple of plates
- a couple of bowls
- a set of cutlery
- a glass
- a drinking cup with a cover
Put all the items together, and make sure again that they are at the right height.
16. Buy a vacuum insulated mug, if you don’t have one, so you can carry it around with you without spilling the drink, and it’ll keep drinks warm or cold.
17. Buy a vacuum insulated thermos if you want to make larger amounts of hot drinks, and then just put that next to you, for refills – particularly in the first 7 days when you may not want to be walking a great deal more than you have too, and you won’t have to constantly ask your carer to get you another drink.
18. Do the same with items you use on a daily basis in the living room, bathroom, and bedroom, and put them at a height where you can get to them in each room.
19. Have a good chair with armrests in all rooms where you will be spending time – the seat has to be the right height for your hip replacement. If you’re not sure what height that is, you can find out in my article “How To Sit In A Chair After A Hip Replacement: An Illustrated Guide”, which also tells how to find the correct height, the best type of chair, how long you will need the chair, and more.
20. Set up an area with a good chair with armrests and table where you will be spending most of your initial recovery time, and have –
- a kettle or a vacuum insulated thermos
- coffee, or some other hot drinks products
- snacks
- some bottles of water
- reading materials, puzzle books
- the landline telephone
If you are watching the TV, don’t do it miles from there !
21. Check the bed that you are using is at the right height, and that the adjacent floor by the bed is not slippery – if it is put down something non-slip.
22. Get a bedside commode for next to the bed – this is extremely useful in the first week after hospital, as you aren’t going to be able to get to the bathroom quickly.
23. Elderly adults may have problems with bladder control, for a month or so after, after general anesthetic, so a bedside commode becomes even more handy.
24. Elderly adults may also want to wear a disposable incontinence briefs for a few weeks after the hip replacement surgery, so you may need to buy some of those.
25. You may also want to protect the bed with a disposable incontinence bed under pad, if you are looking after an elderly person.
26. Next to the bedside commode, you will also need to set up a place where you can put all the toilet supplies that you will need for personal care and toileting, plus any ladies sanitary products, a towel etc.
27. Don’t forget to put some kind of floor protection down on the floor if you get a bedside commode for next to the bed – I have an article covering different types of floor protection for bedside commodes, and there are plenty of cheap options you can use. You can read that here – “Floor Protection For A Bedside Commode”.
28. Attach a walker pouch, or bag to your walker – it’ll hold lightweight items in it, and wear a fanny pack.
29. Wear a fanny pack, so you have a way of keeping small items such as a cell phone on you at all times.
30. Keep a cellphone on you – in the fanny pack.
31. Take a tour of your home and remove rugs, or other obstacles, on which you can trip.
32. Move furniture away from in front of curtains – it can cause over reaching and straining of the hip, when you try to open or close the curtains.
33. Get lots of clean laundry ready in advance.
The bathroom is statistically the most dangerous room in the house, but you can take a few precautions to make it a lot safer.
34. Install grab bars in the shower, by the tub and by the sink – only use the type that are actually screwed to the wall.
35. Put on a clamp-on vertical bathtub grab bar on the bathtub, or a tension mounted floor to ceiling pole.
36. You will need a raised toilet seat with armrests – you can use your 3-in- 1 bedside commode.
37. Get a shower seat/bench/chair, so that you can wash yourself sitting down in the shower.
38. Use a handheld shower head to shower.
39. Place non-slip mats in the shower, and next to the bathtub, and in the tub if you are going to stand in it.
What to do after hip replacement surgery
Posterior and lateral approach hip replacement surgeries are far more invasive than anterior approach hip replacement surgery, and as such, the tips for recovery after surgery are quite different for a lot of things.
So, let’s start with the more involved –
Posterior and lateral hip replacement recovery tips
Sitting Tips
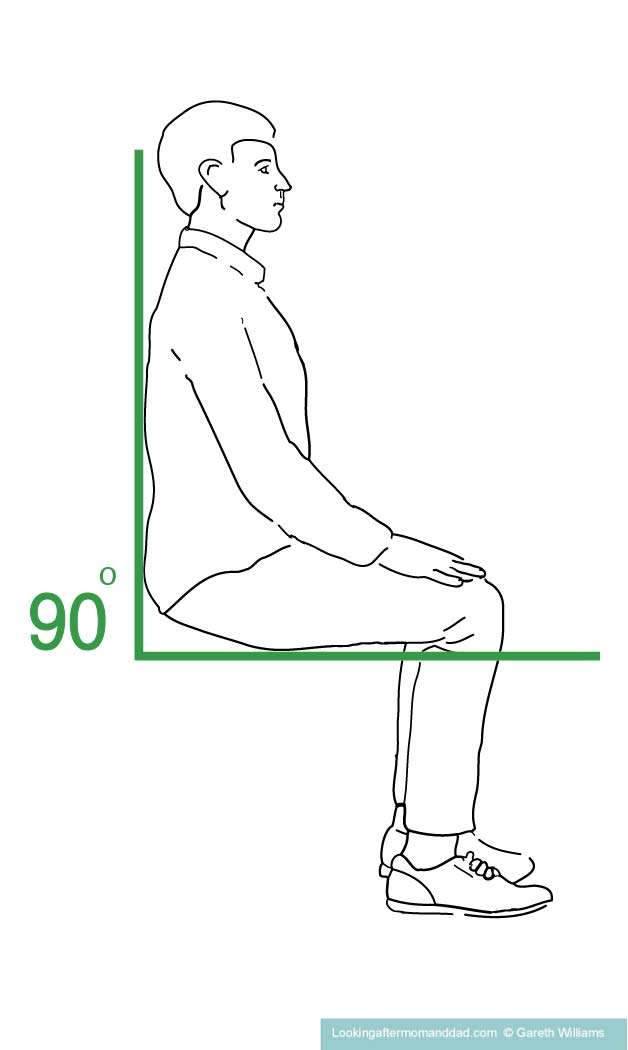
Illustration 1/
40. The 90 degree rule – the illustration above shows the 90 degree rule for a person who is seated.
You should not bend your hip more than this when you are seated, standing or lying down – your hip should not bend more than 90 degrees.
41. The 90 degree rule is to be observed after posterior and lateral hip replacement surgery for up to 6 to 12 weeks. Your surgeon will tell you when you can stop following the precautions.
42. Only sit in chairs with a firm seat which is at the same height as, or higher than, your knees, that way your hip will be higher than your knee, and so cannot be at an angle greater than 90 degrees.
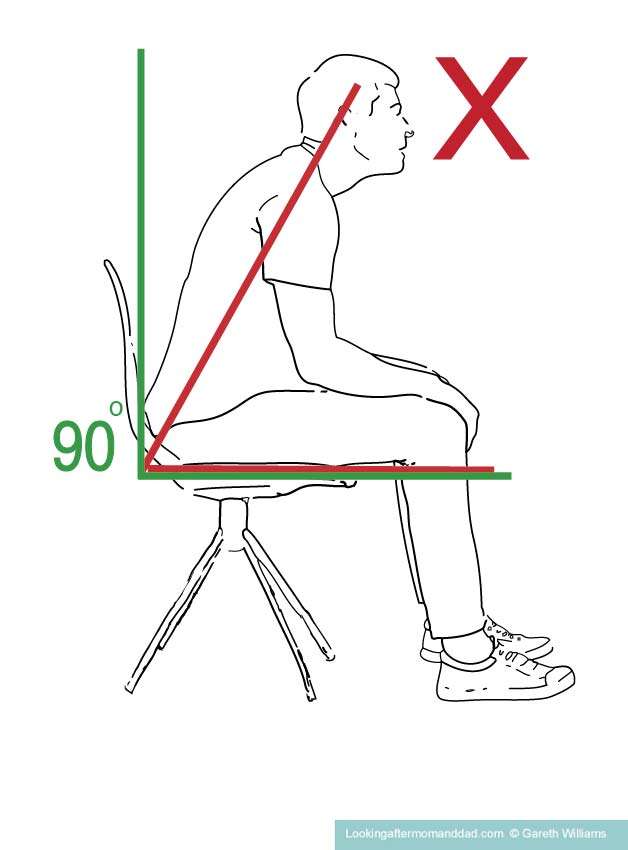
Illlustration 2/
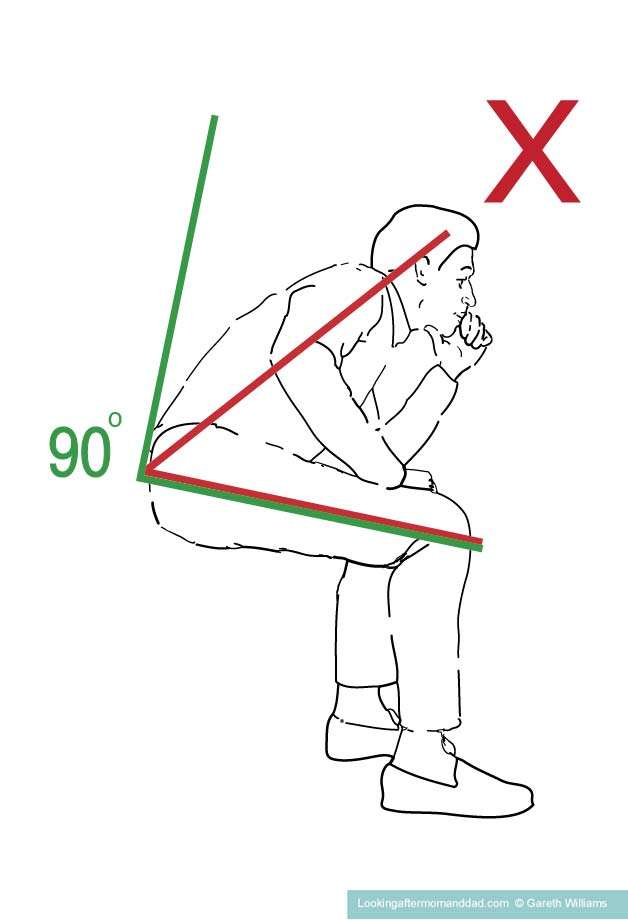
Illustration 3/
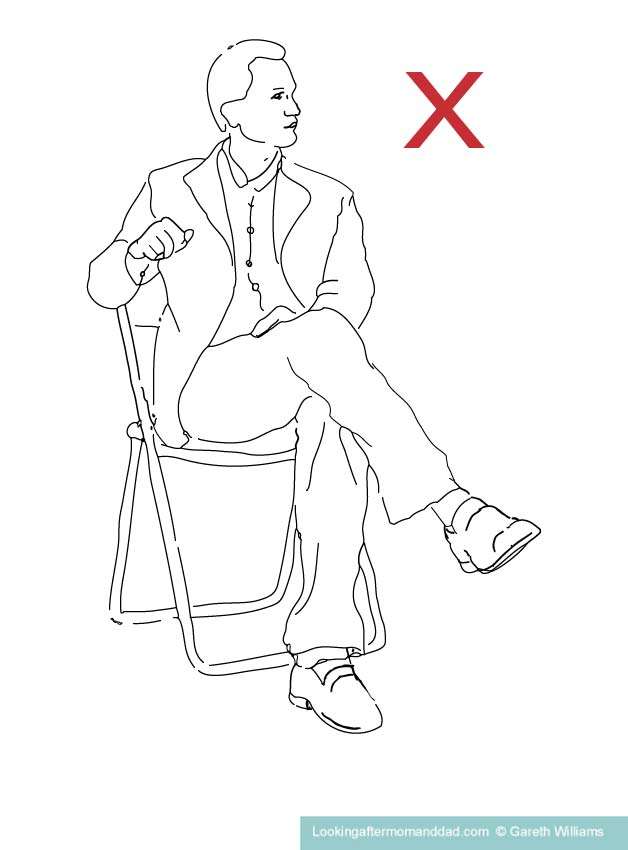
43. Do not lean forwards like the figures, in illustrations 2 and 3, you can that it breaks the 90 degree rule doing – it results in too much pressure being exerted on the new hip replacement.

Illustration 4/
44. Your hip should never be lower than your knees when you are seated, as you see it in illustration 4/.
45. As the figure, in illustration 4/, attempts to stand up, it will only be possible to do so by leaning forwards, to gain momentum to lift themselves upwards, and this will put way too much pressure on the hip, and risks it dislocating.
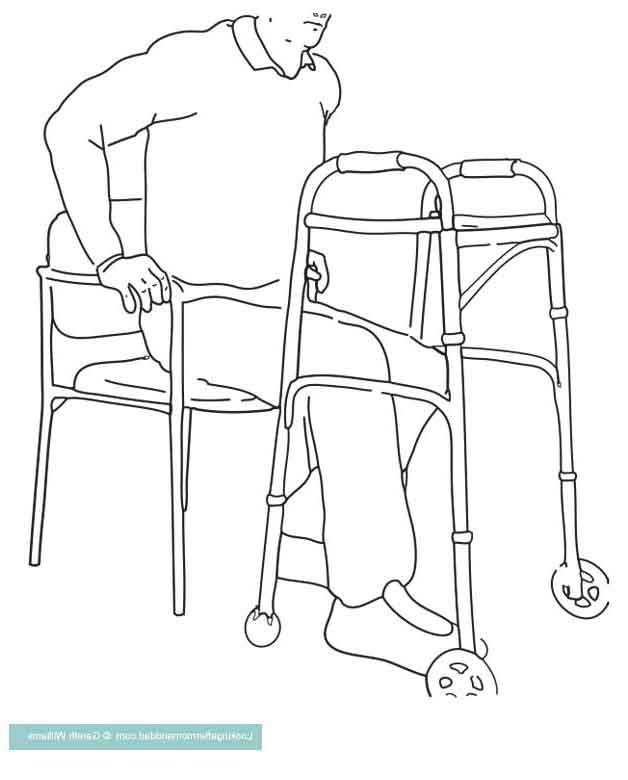
Illustration 5
46. Don’t sit in sofas, armchairs, soft chairs, on bean bags, floor cushions and low seats after your surgery – only sit in upright, straight-backed chairs with armrests.
47. Use chairs with armrests after hip surgery, as the armrests help you to sit down, and to stand up, correctly, without leaning forwards and breaking the 90 degree rule – you can see in illustration 5/, above, how the figure is pushing up vertically, using the armrests of a chair to stand, or to lower themselves down without bending forwards as they sit.
48. Before you stand up from a chair, or a raised toilet seat, tuck your good leg a little further in and under your body than you normally would – this helps you push up more easily, with increased power, and means that you won’t naturally lean forwards so much as you stand.
49. You should not be load bearing on your operated hip leg as you sit down and stand up during the precautionary period, as the muscles and tendons have not yet fully healed.
If you would like to learn how to sit down, or stand up, using a walker, after a posterior or lateral hip replacement, I have a fully illustrated article “How To Sit On A Toilet After Hip Surgery: A Detailed Illustrated Guide”. The article also shows you how to sit down and stand up from a seat without armrests, which although not advised, may be your only solution in some situations.
50. Whenever you use the walker to sit down, or to stand up, do not hold onto it with both hands and tilt it towards you, and then try to sit or stand – this is going to cause you to fall. Learn how to stand properly using the walker, as described in the article above.
Illlustration 6/
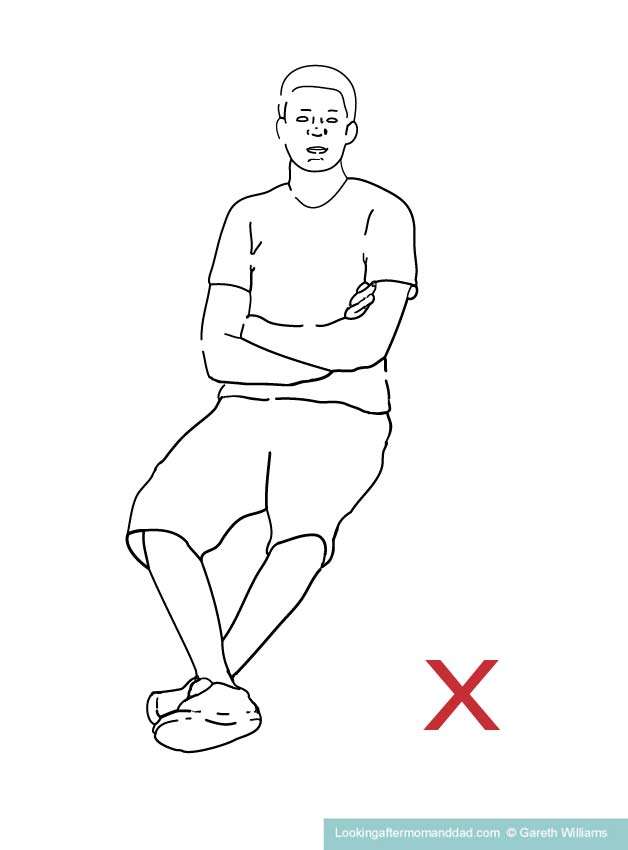
Illustration 7/
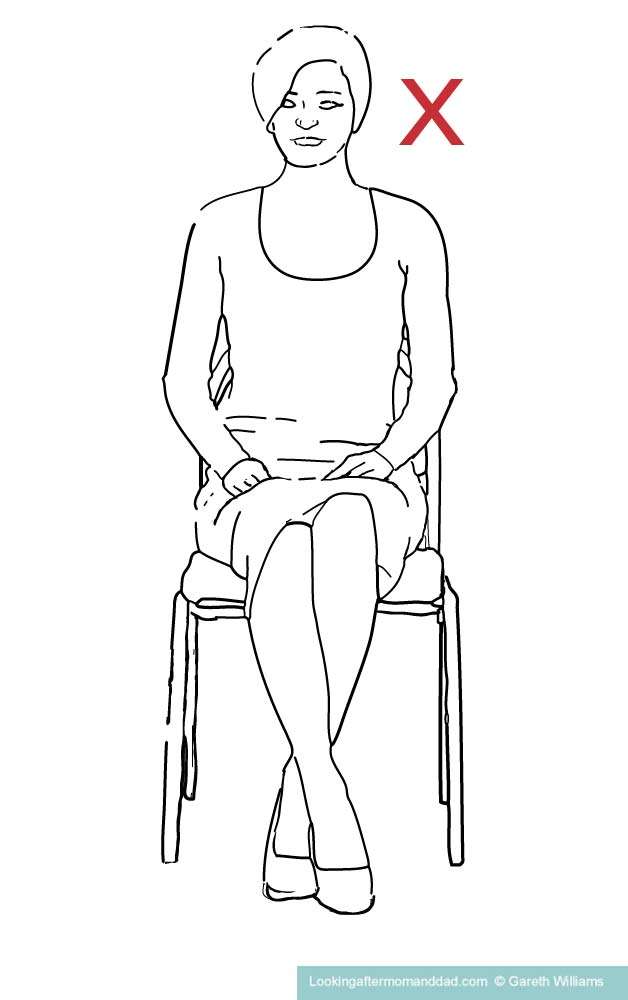
Illustration 8/
51. Don’t cross your legs like the figures sitting down in the illustrations above, or in any other way – you will twist your hip.
Sleeping tips-
52. For sleeping, you are best on your back – you should put one or two pillows, going length ways, between your legs which will stop your feet rolling inwards.
53. If you do sleep on your back – don’t sleep with your knees up with pillows under them, your legs should be flat.
54. You can sleep on your side – you can sleep on your side, but not on the side with the new hip replacement operation, and do not bring your knees up towards you more than 90 degrees.
55. Sleeping on your side, you need to place a pillow between your legs to keep a neutral angle for the hip – you can check these instructions here – https://my.clevelandclinic.org/health/articles/15645-sleeping-position-tips-after-total-hip-replacement-surgery.
56. Keep a reacher by your bed – this will be very useful, as you are not supposed to sit or lie in bed and reach down to pull up your covers when you are lying in bed. You also need a reacher if you sit on the bed to get dressed, as you will see in a minute.
57. If your bed is slightly high, or if the floor is smooth by the bed – put down a mat which has a bit of grip – make sure it is not a thick mat, and at this stage taping it down is a good idea. I use PVC non-slip rug underlay, which I tape down where my mom gets on, and off her bed, and Mom found this a great success. I tape it down with gorilla tape, changing it once a year.
58. Keep the walker by your bed at night while you are still following sitting and standing precaution (6 – 10 weeks typically), so you have it there when you stand up.
59. Keep water by your bed in a bottle, so you don’t have to go wandering off to find water if you get thirsty at night.
60. Set up a table with drinks and kettle, or insulated vacuum thermos, books, snacks in the bedroom – I would do this only if you are lying down a lot in the daytime.
Standing and walking tips
60. Remember, always use a reacher to pick things up – don’t bend down or lean over.
61. Your toes should be pointing ahead of you, or just a little to the outside when you are standing, but not inwards.
62. As you walk, and you want to turn, don’t pivot, or spin round, on your foot – to turn you need to do so by taking small steps.
63. To stand for a longer period of time, use a walker to support you, or crutches – I was on forearm crutches for several years, and they are great for standing for extended periods of time, without putting weight on your leg or hip. Forearm crutches may be a little too tough on the shoulders for some older adults, and a walker may be preferable.
64. For doing chores at a counter in the kitchen, use the walker just to help you.
Icing and exercise tips
65. To reduce your swelling and pain level, icing can be effective for around two weeks – 3 to 4 times a day at a minimum, for 15 to 20 minutes at a time. To find more out about icing, you can go to an article all about it by PeerWell here – https://peerwell.co/blog/expert-icing-after-joint-replacement-surgery/
66. It is recommended that the icing of your hip replacement is done lying on your side.
67. My mom used a bag of frozen peas wrapped in a towel to do her icing – I would just keep popping back into the freezer when Mom was done with it.
68. Follow your exercises as advised by your medical team and repeat as much as you can – walking and the physio exercises will have a huge impact on how quickly, and how well, you recover from your surgery, if you don’t exercise you will not strengthen your hip and leg.
69. Mom used some very cheap resistance bands when she needed to build up the resistance on the exercises.
70. Get your carer to go through the exercises with you if you are lacking motivation.
71. Do the exercises smoothly and breathe properly as you do them to increase the benefit – don’t hold your breath as you do them – stay relaxed and don’t go too fast.
72. You don’t have to just do your hip and leg exercises – you can move your arms around to increase circulation, get a mini-cycling machine, put it on a table and pedal with your arms, and also do exercises with light weights with your arms. The more you increase your circulation, the quicker your body will heal, and the better you will feel generally. You can also squeeze your thigh with your hands to increase circulation in the area – but don’t reach down too far !
73. Get up and walk around as much as you have been told that you can – don’t stay in the same position for too long, as you will stiffen up, and your circulation won’t be so good.
Helpful devices for posterior and lateral approach hip replacement recovery
Due to the precautions related to bending that you are going to be taking with a posterior or lateral approach hip replacement, you will find a lot of the normal daily activities will be quite difficult without a few assistive devices. This section is going to give you an idea of the assistive devices there are, and how they can help you.
How to get the medical equipment and assistive devices for free, or cheap ?
74. Before you go out and buy anything, have a good look in your area for “Medical equipment loan closets” – as a lot of this equipment is only going to be of use to you during the recovery period, I would try to borrow wherever you can.
75. Check with your Area Agency On Aging, and see if they know of any loan closets in your area, as they lend equipment to people who need it on a temporary basis, and are generally free.
76. If your Area Agency on Aging can’t tell you of any loan closets, check with –
- local senior citizens’ authority, be it a municipal, town or village department
- your local public Senior Center may have a loan closet, or know of others who have one
- private Senior Centers also often have loan closets, and if they don’t, they may well know where there is one
- local churches
- local faith groups
- lions and rotary clubs sometimes have medical loan closets
- American legion posts often loan closets
77. Non-profit charities who refurbish donated equipment will often loan or sell at a very low price durable medical equipment to residents of their area. To find one in your area look up charities and non-profits who accept donations of assistive equipment and DME, as they will be refurbishing that, and the passing it on.
78. Thrift stores also frequently have cheap used durable medical equipment, but do check that it has been sanitized and is not broken, as you don’t want to have the equipment, or device, break on you while you are using it.
Multipurpose devices
79. A walker – you are going to need this for at least a week or so to help you with your stability, especially when sitting and standing
80. An indoor walker with a tray, and a carry bag, and weights capacities of around 270 lb – because of the cost I am really thinking of this for –
- the elderly adults, such as my mom, who may take some time to recover, and who would benefit from having one of these for the long term
- individuals who are going to be looking after themselves almost for the whole recovery, as there is both a tray for meals and drinks, plus a bag to put items in, and the latest models now feature a far easier braking system just like those on shopping carts
81. A reacher – you can get 3 or 4 of these and put one by the bed, another in the bathroom and one where you will be sitting, as they indispensable for the first few weeks.
82. A leg lifter – this is an aid which can be really helpful for getting in and out of bed if you are on your own, and it is as cheap as dirt !
83. Non-slip PVC rug underlay – I use this on the floor, taped down, where my mom gets on and off the bed – it is cheap and lasts about a year before I put down a fresh piece.
84. A cane – you will be given an adjustable cane, or two, after surgery so that you can transition from the walker to two canes, one cane and then no cane at all. Just make sure the ferules, or tips, are in good shape, because if you wear them through, it is then usually metal on the ground or floor, and if it is a wet floor you can go flying, as I did on numerous occasions on crutches when people bumped into me, on a wet day.
85. Crutches – I prefer the forearm type, but for older adults the type which go under the armpit may be easier.
86. Upright chairs with armrests and a firm correct height seat
Toileting, bathing and personal care
87. An open front toilet seat – get a raised toilet seat which has a seat with an open front, it will make cleaning yourself far simpler.
88. Wiping aids – toilet wands – long handled plastic gadgets with a gripper, on one end, to which you can attach wipes or toilet paper to clean yourself after going to the toilet.
89. Handheld bidet spray – handheld water spray units which are simply attached to the toilet at the water inlet valve, and can be used for cleaning by washing, rather than wiping, all without twisting, or bending.
90. Bidet toilet seat – you can buy a toilet seat with a bidet built into it, or a bidet unit which fits under your existing seat, and has a spray head built in.
91. Raised toilet seat – most people will be advised to get a raised toilet seat to increase the height of their toilet, and if I had any say in the matter, you would only get one with legs and armrests !
92. I would stay away from raised toilet seats which do not bolt on to the toilet, or which do not have armrests – I would only buy –
- risers with armrests
- safety frames with raised toilet seat
- 3-in-1 bedside commode
- raised toilet seats with legs
If you don’t know anything about raised toilet seats you can go to the article I have suggested two tips below this one, as I outline the different types and how to choose one, as well as those which i think are best suited to adults after hip replacements.
93. If you require a raised toilet seat for an elderly person who has real trouble with sitting down and standing up due to a lack of strength, and their age, I would suggest you get the PlatinumHealth Gentleboost bedside commode. This can be used over the toilet and by the bedside, and it has a spring mechanism which assists the user to sit and to stand.
I have an article all about the best raised toilet seats for after a hip replacement, and I indicate which seats are best suited for elderly adults. You can read that here – “Best Raised Toilet Seats After A Hip Replacement”.
94. Bedside commode – this can be indispensable in the bedroom just after surgery, when you will be very slow to get to the bathroom, also at night by the bed, and later can be moved to the bathroom and uses as a raised toilet seat.
95. If you are worried about the problem of odors from a bedside commode, I have an article about bedside commode odor control with lots of tips to follow to reduce the odors from a bedside commode. If you empty the commode immediately, you can keep things under control easily. You can read the article here – “Bedside Commode Odor Control: How to keep it Smelling Sweet”.
96. If you want to use the bedside commode as a raised toilet seat once you can get to the bathroom, get a 3-in-1 bedside commode, as these will be able to go over your toilet – you need adjustable height.
97. Shower chair, or bench – post surgery for showering, it’s best to use a shower chair, or bench, so that you are sitting.
I would suggest that you use one with armrests so that you can transfer to it more easily and don’t risk bending when you sit down on it.
It is also a good idea to put everything you require in the shower placed next to this at the right height to avoid stretching around to get things.
98. Shower walker – once you can stand a little, you can get a shower walker if you don’t enjoy the sitting down and showering. You can’t just use any walker, as many are not waterproof, and even if the frame is waterproof, water may get in through the holes in the frame and can rust out any corrosive parts in the legs.
99. A bath board – you can place a bath board, on top of the sides of your bathtub, and you sit on that to wash yourself over the tub – you can use the leg lifter I mentioned earlier to help you lift your leg up over the side of the tub as you transfer. You will also want a handheld shower head for the washing and rinsing, as you cannot reach or bend down to the water in the tub.
100. Bath transfer bench – this is a type of seat which will have legs both inside and outside the bathtub, and has a sliding seat which ultimately positions you over the bathtub with your fit in the water below. You would again you something like a leg lifter to help you get your operated hip leg up and over the side of the tub.
101. Long handled sponge – a very long handle with a sponge on the end for washing yourself, designed to help you reach difficult places without twisting or bending – you can sit and wash your feet and legs without bending to do so.
102. Non-slip rubber mats – use non-slip mats anywhere you may be standing in water, like the shower, in the bathtub, by the bathtub etc.
103. Grab bars – you should be using the grab bars which are fixed with screws.
Don’t fix grab bars diagonally, it is best to fix them either vertically or horizontally, and on a personal note, we chose those with an etched grip, as it is easier to hold on to in the wet.
It’s a good idea to have them on the walls of the shower, around the toilet and next to the bathtub, so that there is something to hold on to for stability, and should you slip you have something to grab onto at that moment.
104. Tension mounted floor to ceiling transfer pole – this can also be put by the bathtub, to assist with a transfer. The height of the handle on the poles is usually adjustable, and you can place them wherever you need them without any screws or fixings, making them very useful indeed.
105. A toilet safety frame – if you do not have a raised toilet seats with armrests, or grab bars, a toilet safety frame will provide you with the security of a big set of armrests for sitting down on, and standing up from, the toilet.
106. A towel robe belt, or a towel cut into strips, – can be used for drying between your toes, you just pull them through with a reacher.
107. A hair dryer – as well as drying your hair, this is a great way to dry your toes and feet with a without bending down.
108. Disposable commode liners – to make life easier, and to cut down on bad odors in a bedroom, I would use commode liners on your bedside commode – you just pop them into the commode pail with an absorbent pad before each usage, and once the person has been to the toilet, you tie up the liner, and throw it into the trash for landfill.
If you don’t know anything about bedside commodes and disposable commode liners, and want to know a little more, I have an article which talks about the different brands, buying in bulk, and how to make your own. You can find the article here – “How To Dispose Of Commode Liners ?“.
I also have a couple of articles which deal with toileting and personal care after a hip replacement in much more depth, which you can read here –
“Toileting After A Hip Replacement: How To Do It Safely ?”, and, “How To Wipe Your Bottom After A Hip Replacement ?“
Dressing
109. Elastic shoelaces – if you don’t like slip-on shoes, you can buy elastic shoelaces. You simply put into your shoes and tie them up. Now you can put the shoes on in the same way as slip-ons, using the long handled shoe horn. As you place your foot into the shoe and push, the tied up laces will stretch to accommodate your foot, and then shrink back and tighten up, once the foot is all the way in there. You will want to get the right tension on there before you have to do this for real, so I suggest sorting that out before your surgery.
Don’t forget that you want a shoe with a flat, wide heel, which supports your foot and has good shock absorption.
110. Slip-on shoes – so, if you have just read the section above, and you don’t want the elastic laces, slip-on shoes are the easiest type of shoes to put on after a hip replacement. You want the shoe with the lowest heel possible, and a wide heel, as well. The ideal kind of shoe, is a tennis shoe, as it will be solid and flat.
To put them on, you will place them on the floor with the reacher (remember no bending down at all in the seated position), and then placing your toes into the shoe, use the long handled shoe horn to slide your foot on into the shoe. Unless you have a carer to do this for you, of course.
111. A long handled shoe horn – quite simply, a shoe horn with a very long handle, which allows you to not bend down and put stress on your hip, when you put your shoes on.
112. A dressing stick – is a stick with a hook on it, which is deigned for a person to help put their clothes on, and also to pick them up.
Anterior hip replacement recovery tips
After an anterior hip replacement, you will be told to take a few precautions, avoiding getting into certain positions for up to 6 – 12 weeks, but really life is much easier than after the two other types of hip replacement.
The advice for preparing for a posterior or lateral hip replacement, applies to anterior hip replacements as well –
- the setting up of the house, but for a far shorter period of time – maybe 1 week to 10 days
- buying in more food – for a week or two
- cooking meals and freezing them
- strengthening your leg and hip muscles before surgery
- dieting if you are overweight
- following your surgeon’s advice on any exercises
- you may be advised to not use very low chairs, but typically none of the bending forwards applies, unless your surgeon has told you so
- should you have pain bending while dressing or washing, you can also use any of the different aids that I outlined for daily activities to avoid bending
- removing obstacles which could cause you to fall is never a bad idea
- in the bathroom, I would still consider the grab bars in the shower, and over the tub, or a floor to ceiling pole
- I would also consider sitting to bathe, or shower for maybe 7 to 10 days, just until you are used to new sensations in your hip
- you will need someone to take you to appointments for the first 2 to 4 weeks, depending on which side you had the operation, the length of time you are taking pain meds, and the type of car you drive – stick, or automatic
- you will most likely need a carer to help with cooking and chores for a week or two
- for elderly adults, you may need to increase the time needed to get to each of the different stages in your recovery
You shouldn’t get into various positions –
113. Even if you have been told you are allowed to do certain things, if they cause a lot of pain, go easy or don’t do it, and check with your medical team.
114. Don’t do any bending backwards, or stretching while leaning backwards.
115. You can have sexual intercourse as soon as it is comfortable, though you don’t want to do vigorous forward lunging.
116. The best sleeping position is on your back, and put a pillow between your legs – length ways – to stop the legs from turning in and the hips from twisting.
117. Don’t cross your legs when lying down or sleeping.
118. Don’t lay down or sleep on your stomach – this will twist the hip outwards.
119. You can use a recliner – be careful if it is very low and really soft and spongy.
120. Don’t sleep in a recliner – this is not good for the hip, as the position is not right for sleeping and may cause the hip to stiffen and become hard to relax again.
121. Where ever you can use chairs with armrests in the beginning, so you don’t strain your hip.
Home care after hip replacement
Typically, after an anterior approach hip replacement, you may require help for 7 to 10 days at home, and after a posterior, or lateral, approach hip replacement, you may require help with many tasks for 2 to 4 weeks.
Posterior, or lateral, approach hip replacements, for a period of 6 to 10 weeks, require you not to bend your hip more than 90 degrees, and it can be quite a bit longer for the more elderly, and fragile.
So, for the elderly adults who will require home care, it may be for longer than the typical time frames we are looking at here.
Home care for posterior and lateral approach hip replacements
Activities for which you may need assistance for up to 2 to 4 weeks after a posterior or lateral hip replacement –
– getting in and out of bed
– getting to the bathroom
– going to the toilet
– your exercise program
– dressing
– bathing
– getting in and out of the bath, or shower, as well as the actual washing
– driving
– cooking
– household chores
– laundry
– groceries
– follow-up appointments
My mom, who had her hip replacement at the age of 88, required my help for almost everything for 6 weeks – I took care of the majority of the household chores, the cooking, the groceries etc. for around 2 months at least.
My mom had a carer who helped her to bathe for 4 weeks, and I continued to help her for another two weeks.
I have an article here – “How Long Do You Need A Caregiver After Hip Surgery ? A Guide With Recovery Times”, in which I go over typical timelines of recovery, and what is required when you are caring for a more elderly adult after a posterior approach hip replacement.
Home care for anterior approach hip replacements
Typically, after an anterior hip replacement, you don’t have restrictions on bending, so you should be able to –
– dress on your own, with, or without, dressing aids
– wash on your own, just wait 48 hours after surgery, you may want to use a shower chair, so you don’t risk slipping
– you should not immerse your incision before your surgeon has said it is completely healed
Because you are using a walker for the first 5 – 10 days, you may need help with –
– cooking and housework
– driving for at least 2 weeks, and depending on the which hip it is, and your car is a stick or automatic, it can be as much as four weeks before you can drive
What not to do after a hip replacement surgery
For Posterior and lateral Hip replacements
Typically, the precautions will last for up to 3 months – your surgeon will tell you when you stop observing the different precautions.
- don’t raise your hip to an angle greater than 90 degrees
- don’t bend at your waist when sitting
- don’t bend at the waist and reach down when standing
- don’t twist your upper body when you are sitting, sit facing forwards
- don’t lean forwards when you are sitting
- if you are sitting, don’t reach down to pick up items
- don’t sit on low seats
- don’t sit in sofas, low recliners and on soft seats
- only sit in chairs where your hip will be higher than your knee once you are seated, i.e. the seat is higher than your knee when you stand next to it
- don’t sit on a low toilet – get a raised toilet seat
- don’t stay in the same position when seated for too long
- don’t cross your legs in any way when you are sitting
- don’t twist your upper body out of line with your hips when you are standing – try to stay facing the same way
- don’t point your feet inwards
- when walking, don’t pivot on your foot of the operative hip to turn, instead turn taking little steps
- don’t point your feet in outwards when you walk
- don’t kneel until your surgeon says that you can, and shown you how to – this won’t be before 3 months
- don’t try to sit in the bottom of a bathtub until your surgeon says you can – 6 – 12 weeks typically
- don’t immerse your incision in water until it is completely healed- usually 6 – 8 weeks
- don’t sleep on your stomach as it will twist your legs as your feet will have to point outwards
- don’t put pillows under your knees when you are sleeping on your back or side
- when sleeping, don’t cross your legs
- if you sleep on your back, put a pillow between your legs to stop your legs from twisting
- if you sleep on your side, don’t sleep on the side of the operation and put pillows between your legs
- don’t bend forwards and reach to pull the covers up when you are lying in bed
- don’t bend your knees, bringing your hip up to the 90 degree point, if you are sleeping on your side
- don’t drive until you are given the okay by your surgeon – this could be 4 to 6 weeks after surgery
- don’t play sports until your surgeon says you can – generally at least 3 months or longer
For anterior hip replacements
The less invasive nature of anterior hip replacements, when compared to the posterior and lateral replacements, results in far fewer precautions for patients to observe post surgery. There is a far lower risk of the hip dislocating after an anterior hip replacement.
You must remember that you should not stop observing precautions until your surgeon says it is okay to do so.
- if it hurts to lean forwards, don’t do it – wait until it is less painful
- you must not bend backwards, pushing your hips forwards (known as a hip extension) as this exerts pressure on the area where you were operated at the front of the hip
- when you walk avoid spinning round on your foot, just take a few small steps
- avoid turning your foot outwards, as it twists your hip replacement, including don’t point your toes outwards
- laying down, do not go onto your stomach, and do not sleep on your stomach either – this will force you to point your feet outwards twisting the hip
- don’t sleep with your knee pointing outward
- you are allowed to sleep on your side, but not on the hip replacement side, sleep on the other side
- don’t bring your knees up to a 90 degree position or greater when you sleep on your side
- put pillows between your legs when you sleep on your side to keep your hip in a neutral position
- if you sleep on your back, do not put pillows under your knees
- if you sleep on your back, put a pillow between your legs, length ways, to stop your legs from twisting
- if you sleep on your back do not point your feet outwards, they should be pointing upwards
- don’t immerse your incision underwater until it is completely healed – typically 6 to 8 weeks
- avoid sleeping in recliners as this can cause the hip to become stiff
- sit-ups are not allowed for the precautionary period
- bridging exercises are not allowed for the precautionary period
- you can’t play any sports until your surgeon says it is okay to do so
Hip replacement recovery week by week
The recovery rates for the different types of hip replacement are quite different, so I have once again divided this into two sections –
- posterior and lateral hip replacement recovery week by week
- anterior hip replacement recovery week by week
Posterior and lateral hip replacement recovery week by week
This is a very broad timeline, everyone is different, and different people will recover at different speed, and start to do the different activities at different time – this is not meant to be used by anyone to decide when to start and stop doing certain activities.
That said, there are some rough guidelines that you can use to imagine where you will be in your recovery.
I am going to divide the recovery timeline into a number of phases.
Remember, though, that your surgeon is the only person who can tell you exactly when you are able to resume activities, and to drop precautions.
Phase 1 – This phase is the first 1 – 1 1/2 weeks after surgery.
This period of time is all about getting you use to your new hip, and developing your confidence.
- on the first day, you will typically do your first walk a few hours after surgery
- 48 hrs is the typical wait before you can shower (you won’t be able to immerse your incision in water until it has totally healed)
- this period is all about getting you use to your new hip, and developing your confidence
- you will be given all of your precautions for all the positions to avoid, and you will be shown how to sit and stand, how to get in and out of bed, how to get on and off the toilet, how to shower and bathe, and how to put on clothes using assistive devices
- your physio team will show you your exercises and get those started
- by the end of this period you will typically be able to walk with one or two canes, a walker or crutches, with confidence
- you will leave the hospital, or rehab facility and be driven home at some point in this period – the elderly will stay for the longest in hospital to make sure they are able to walk and do a few basic things
Phase 2 – This phase is from around 1 1/2 weeks to 6 weeks after surgery.
This period of time is all about building up your strength, walking more and more, and getting back to some light activities in the home.
- you will be icing for the first 2 weeks typically, so this will end a few days into this phase
- full weight-bearing may be resumed at 2 weeks after surgery
- you should be doing exercises every day
- for a good part of this period you may need help with chores, and cooking
- some time around 3 to 6 weeks, you will start to walk unaided
- if you have a desk job, you should be able to return to work after 4 weeks
- you will be aiming to return to light daily activities during this period
- between 4 – 6 weeks, driving starts again
Phase 3 – This phase is from around 6 weeks to 12 weeks after surgery.
- somewhere between 6 and 12 weeks, your precautions will be lifted, so no more rules about bending !!!!
- you will be able to resume sexual intercourse at 6 to 8 weeks
- in the 10 to 12 week time period, you will be returning to regular daily activities such as gardening and long walks
Phase 4 – 12 weeks and beyond
At this point you have had all the precautions lifted, unless you are elderly and are recovering at a slower rate, and you can now get on with your life again.
- if you have a “mixed labor job” – some sitting, some standing, light lifting, you should return to work after 12 weeks
- to return to low impact sports may take you 3 to 6 months, and include sports like swimming, hiking, rowing, low-impact aerobics, bowling and bowling
- you may at this point be allowed to kneel down
- a full recovery may take up to a year
Anterior hip replacement recovery week by week
This is a rough timeline, and only your surgeon can tell you when you can, and cannot, start to do the different activities.
Phase 1 – 1st week – this is a phase where the patient gets used to the new hip, and starts walking
1-2 days
- walking starts on the first day with a walker
- basic exercises – not all doctors give exercises
- showering regularly after 48 hrs
- depending on stability, you may still need the walker indoors
- still using a walker when outside in public areas
5-7 days
- you may be having a follow-up with your surgeon
- your medication is assessed
- you may be allowed to start driving – depend on which side the hip replacement is, and also on the type of car – stick or automatic
- typically still using the walker in public areas
Phase 2 – week 2 – week 4 – in this phase the activity levels build up, there is a resuming of normal life
10-14 days
- you should have come off the walker in public if you are still using it
- most patients begin to up their activity levels – some can start putting or chipping if they play golf
- at the two-week mark, you may start physical therapy if it is needed (not all surgeons suggest physical therapy)
- return to desk work
3rd Week
- many patients will be walking very well without walkers or crutches
- return to driving, but it may take up to 6 weeks and cannot be done while you are still taking (narcotic/opioid pain medications)
- normal daily activities should have been resumed
- for golfers, you may start chipping and putting
Phase 3 – this is the end of precautions, a return to low impact sports
4th – 6th Week
- after 4 weeks (time for wound to heal) you can go in a swimming pool or hot tub
- end of anterior hip precautions during this time
- stiffness and swelling begin to dissipate
- after 6 weeks some surgeons allow exercises like regular gym exercise, doubles tennis, aerobics (low impact), hiking, rowing, biking, golf and weight lifting
- at 6 weeks, return to driving if you had the operation on the right hip
10th -12th Weeks
- all patients should be back to work except for heavy lifting or manual labor
- patients should have resumed normal activities
- home exercise is recommended to keep strengthening the joint
Phase 4 – this is from 12 weeks onwards
- some surgeons advise 3 – 6 months before sports activities
- you may be able to return to heavy lifting and manual jobs
- you will be told to avoid high impact sports such as jogging and basketball, which can damage the hip replacement
https://www.edwinsu.com/anterior-hip-replacement-post-op-instructions.html
https://www.newyorkhipknee.com/faqs/total-hip-replacement-faqs/
https://www.stefankreuzermd.com/anterior-hip-replacement.html
https://www.orthonewengland.com/wp-content/uploads/sites/156/2018/02/KENNON-DISCHARGE-INSTRUCTIONS-HIP-2016.pdf
https://www.nwh.org/classes-and-resources/patient-guides-and-forms/joint-replacement-surgery-patient-guide/joint-replacement-faqs
https://www.ozorthopaedics.com.au/blog/how-long-after-a-hip-replacement-can-i-tie-my-shoe-laces-23710.html
https://orthoinfo.aaos.org/en/recovery/activities-after-hip-replacement/
https://my.clevelandclinic.org/health/treatments/17102-hip-replacement
https://scottsdalejointcenter.com/patient-education/anterior-total-hip-replacement-precautions/
https://www.arthritis-health.com/surgery/hip-surgery/anterior-hip-replacement-dos-and-donts
https://ortho.duke.edu/sites/ortho.duke.edu/files/u18/Anterior%20Hip%20Precautions.pdf
https://www.sehat.com/sleeping-positions-after-anterior-hip-replacement
https://www.henrymayo.com/documents/CP-Anterior-Hip-Complete.pdf
https://orthospecialtyclinic.com/wp-content/uploads/2013/04/OSC-Gait-Instructions.pdf
https://rothmanortho.com/stories/blog/total-hip-replacement-recovery
https://greaterphoenixorthopedics.com/blog/what-to-expect-after-anterior-hip-replacement/
I’m Gareth, the author and owner of Looking After Mom and Dad.com
I have been a caregiver for over 10 yrs and share all my tips here.